Upgrading OneSpan Sign for Salesforce
This topic describes how to upgrade to the latest version of OneSpan Sign for Salesforce (version 5.0 and higher).
If your installed version is 3.x or 4.x, you must begin by upgrading to 4.12. If your installed version is 4.12, you must successively upgrade to the "bridge versions" 4.12.3 and 4.12.4. Once your installed version is 4.12.4, you can then upgrade to 5.0 and higher.
The upgrade process thus looks like this:
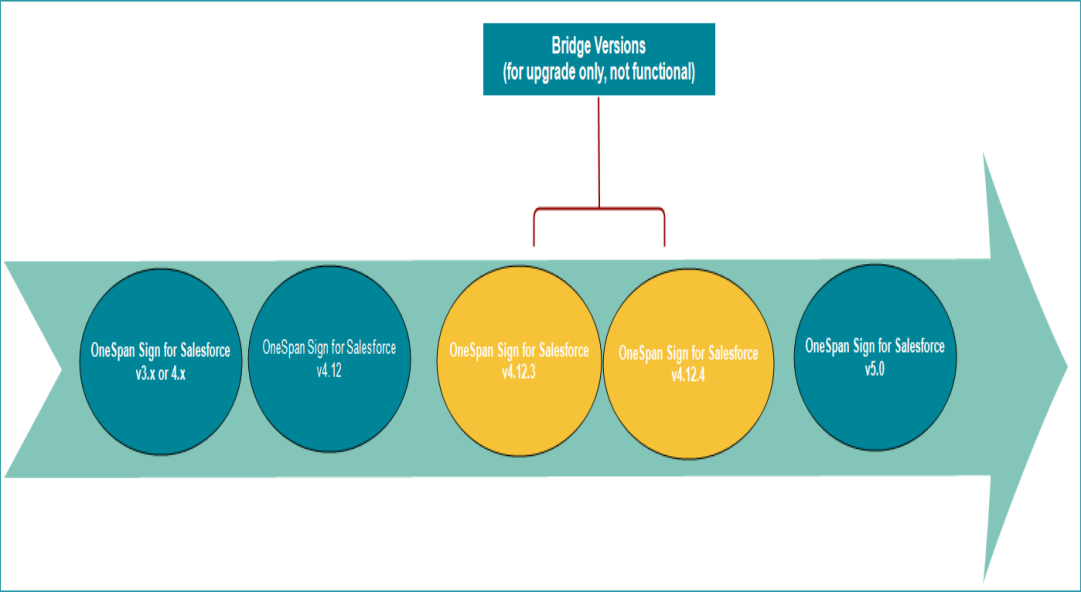
Versions 4.12.3 and 4.12.4 are not functioning versions of OneSpan Sign for Salesforce. They are simply "bridge versions" whose purpose is to ensure that all existing functionality is fully migrated to version 5.0 and higher. Once you install these versions, you must continue the upgrade process to 5.0 and higher.
Once you start the upgrade process, you must continue to the end. You cannot revert to a previous version of OneSpan Sign for Salesforce.
The rest of this page describes:
Upgrading to 5.0.x
Prerequisite
-
Your installed version of OneSpan Sign for Salesforce must be 4.12.4.
If you need to upgrade to version 4.12.4 from 4.12, see Upgrading to 4.12.3 and 4.12.4. If you don't yet have version 4.12, see Upgrading to 4.12.
Action
To upgrade to version 5.0 and higher:
- Go to the Salesforce AppExchange store, and search for OneSpan Sign for Salesforce. Alternatively, you can click this link.
-
Install version 5.0.x using the regular installation process. For more information, see Installing the Application .
-
Create and grant the permissions that will then need to be assigned to your users. For more information, see Configuring Permission Sets.
Upgrading to 4.12.3 and 4.12.4
Prerequisite
-
Your installed version of OneSpan Sign for Salesforce must be 4.12.
If you need to upgrade to version 4.12 from 3.x or 4.x, see Upgrading to 4.12.
Action
To upgrade to versions 4.12.3 and 4.12.4:
- To install version 4.12.3, click one of the following links, and log in with your regular OneSpan Sign for Salesforce credentials:
The installation of this version may take some time. You will receive an email notification once the upgrade has completed.
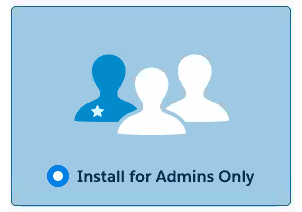
- The Package Installation Details page appears. Again, we recommend that you Install for Admins Only.
- Click Upgrade to begin installing version 4.12.4.
The installation of this version may take some time. You will receive an email notification once the upgrade has completed.
Upgrading to 4.12
To upgrade to version 4.12 of OneSpan Sign for Salesforce from a 3.x or lower 4.x version, you must perform the following procedures:
These procedures can also be performed on version 5.0 of the application.
Configuring a Transaction's Available Languages
To enable your administrators to configure the language that will be displayed in a transaction, you must first configure the set of available languages.
This procedure is required only if you are upgrading to version 4.12 of OneSpan Sign for Salesforce. If you are performing a fresh installation of that application, please see Selecting Display Languages.
To configure the available languages for a transaction:
- From the drop-down menu next to your account name, click Setup.
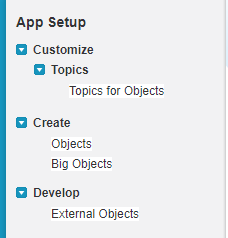
- In the App Setup menu on the left-hand side, click Create > Objects. The Custom Objects page appears.
- In the Label column, click Transaction.
- In Label Field column of the Custom Fields & Relationships table, click Language.
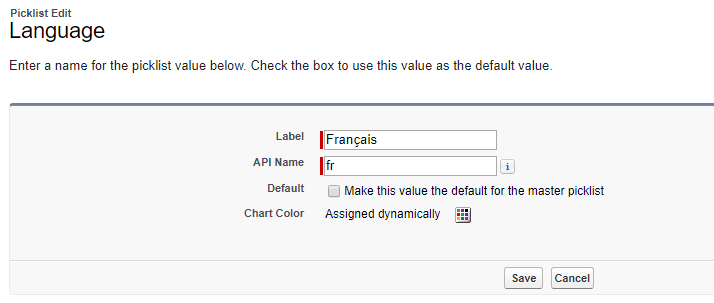
- In the Values table, click New. The Add Picklist Values page appears.
- Enter the language codes for all the languages you want to enable. Ensure that you enter each language code on its own line.
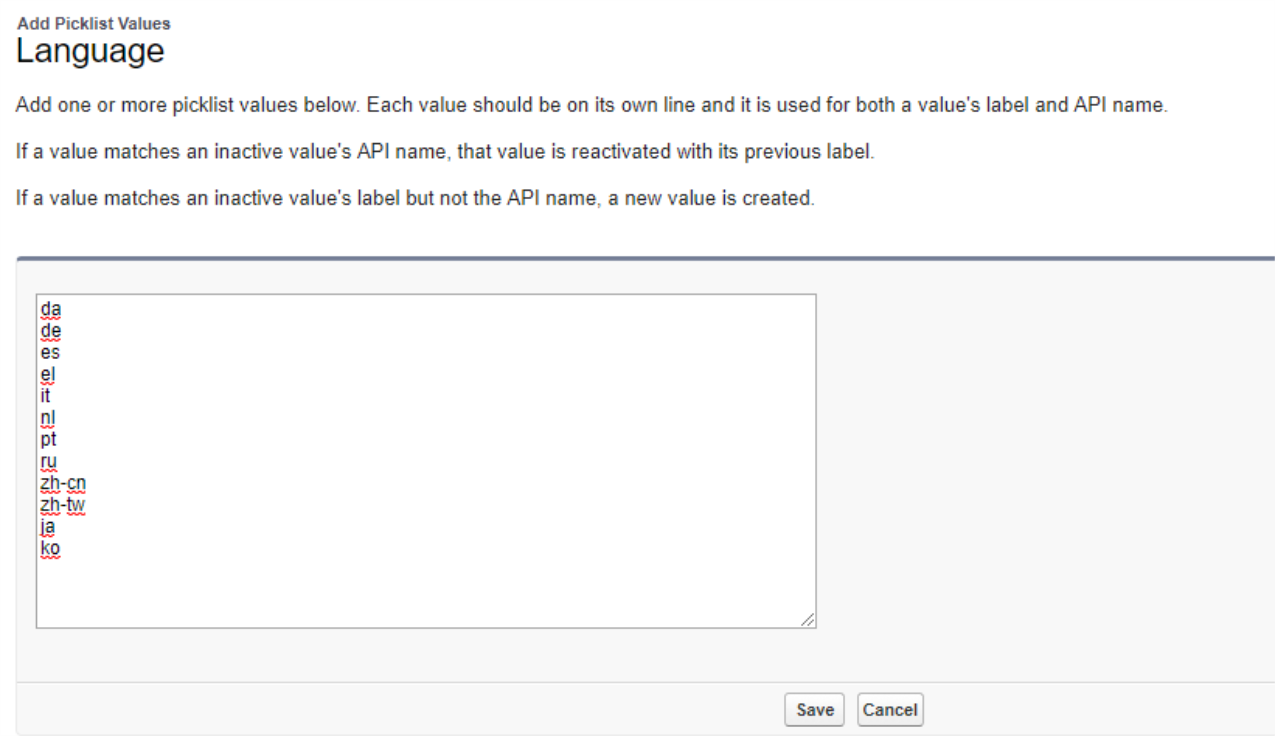
The following languages are supported:
Language Value in the Code български (Bulgarian) [bg] English (United States) [en] English (United Kingdom) [en-GB] Dansk (Danish) [da] Deutsch (German) [de] Español (América Latina) [es] Español (España) [es-ES] Français (French) [fr] Italiano (Italian) [it] Nederlands (Dutch) [nl] Norsk - Bokmål (Norwegian) [nb] Português (Portuguese) [pt] Polski (Polish) [pl] Română (Romanian) [ro] Pусский (Russian) [ru] Ελληνικά (Greek) [el] 中文简体 (Chinese - Simplified) [zh-CN] 中文繁體 (Chinese - Traditional) [zh-TW] 日本語 (Japanese) [ja] 한국어 (Korean) [ko] اللغة العربية (Arabic)
Available only in the Signer Experience
[ar] - Click Save. The Transaction Custom Field Language page appears. You must now ensure that the language values match their corresponding API Names.
- To match language values with their corresponding API Names:
- In the Transaction Custom Field Language page, scroll to the Values table.
- Click Edit next to a language for which you want to match an API Name.
- In the API Name field, give the selected language its proper code according to the table above (e.g., for Français, enter fr).
- Repeat the preceding steps for each enabled language.
Rebranding to OneSpan Sign's Corporate Design
The product formerly called eSignLive has been renamed OneSpan Sign.
This change was accompanied by a change in the product's corporate branding.
Thus to fully upgrade to version 4.12, you must perform the following procedures:
Rebranding Your Tabs
To rebrand your tabs:
- In Salesforce, navigate to App Setup > Create > Tabs.
- In the Custom Object Tabs section, locate the Conventions tab, and click Edit.
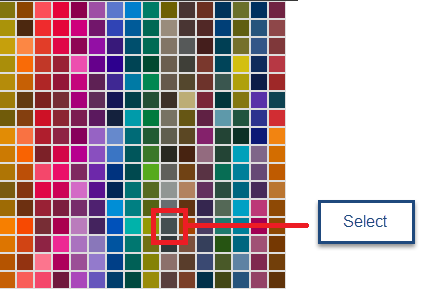
- In the Tab Style field, click the search icon.
- In the Tab Style Selector page, click Create your own style.
- In the Define a new color style page, click the search icon and select the color shown below:
- In the Icon field, click Insert an Image.
- Navigate to the Silanis folder, and select the OneSpan Tab Icon.
- Click OK, and then click Save.
- Repeat the above steps for each of the remaining tabs:
- Field Mappings
- Templates
- Transactions
- Admin
Rebranding the Application's Name and Labels
To rebrand the application's name and labels:
- In Salesforce, navigate to App Setup > Create > Apps.
- In the Apps section, click Edit next to eSignLive. The Custom App Edit page appears.
- In the App Label field, enter OneSpan Sign.
- Click Insert an Image.
- Navigate to the Silanis folder, and select the OneSpan Sign Logo.
- Click OK, and then click Save.