Text Tag Extraction enables integrators to automatically extract signatures and fields by placing Text Tags in a document. OneSpan Sign will analyze the uploaded document, and replace every text that matches the Text Tag pattern with the appropriate signature or field.
This section discusses:
- Text Tag Syntax
- Role Names in Text Tags
- Text Tag Types
- Text Tag Parameters
- Signer with Multiple Signatures
Best Practices for Using Text Tags
Here are some best practices that you should keep in mind when using text tags:
- When you have multiple attributes specified in text tags, try using comma to separate them, like below:
{{esl:Signer1:textfield:size(40,15),Maxlen(3)}}
A more complicated example could look like:
{{esl_checkbox1:Signer1:checkbox:offset(0,-15),size(275,25),Maxlen(40)}
- Try using a smaller font for your text tags. This will save space and help you avoid affecting your content layout.
- Make sure your text tag is within one line.
Here is some sample code that incorporates these suggestions:
{{esl_optionA:Signer1:Radio:Group("Frequency"),Value("X"),size(10,10),offset(40,-8)}}
{{esl_optionB:Signer1:Radio:Group("Frequency"),Value(""),size(10,10),offset(40,-8)}}
{{esl_optionC:Signer1:Radio:Group("Frequency"),Value(""),size(10,10),offset(40,-8)}}
In this example, tags size are set to 1, and the regular text size is set to 12. Here is what you get after extracting to those fields:

For a copy of the Word document used in this example, click here.
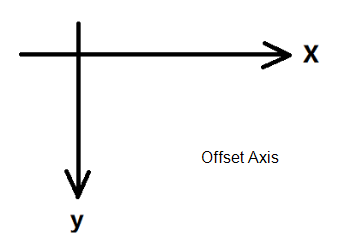
If you are having problems putting your text tags in its proper location, try using the offset attribute. This is especially helpful when using a Microsoft Word document.
Text Tag Syntax
The following line illustrates the syntax of a Text Tag:
{{Xesl[_fieldName]:roleName:fieldType[:parameter1,parameter2,...]}}
When you have multiple attributes specified in text tags, try using comma to separate them, like below:
{{esl:Signer1:textfield:size(40,15),Maxlen(3)}}
A more complicated example could look like:
{{esl_checkbox1:Signer1:checkbox:offset(0,-15),size(275,25),Maxlen(40)}}
Field names are alphanumeric. They cannot contain special characters other than the underscore (_).
Note from this line that:
- The beginning and end of a Text Tag have double curly brackets. Curly brackets should not appear anywhere else in a Text Tag.
- The third character — the
X— is placeholder for an optional character. That character can be either a question mark (?) or an asterisk (*). An asterisk indicates that an Input Field is required. A question mark indicates that an Input Field is optional. The question mark is the default value — i.e., if neither character is present, an Input Field will be optional. Example:{{*esl:Signer1:textfield}} fieldNameis the name of the field that will be created by the Text Tag (a Signature, an Autofield, or an Input Field) — see Text Tag Types. If specified, this parameter will follow the “esl” prefix. Field names are alphanumeric. They cannot contain special characters other than the underscore (_). If you plan to retrieve the value entered during the Signer Experience, enter a unique name per field. Example:{{esl_SignerAutograph:Signer1:Signature}}roleNameis the name of the role associated with the intended signer. To find the role name you need to use, see Role Names in Text Tags.fieldTypeis one of the field types described in Text Tag Types.parameter1andparameter2are parameters described in Text Tag Parameters.
Please be aware of the following:
A Text Tag cannot appear on multiple lines.
If a list of parameters is present, it must be a comma-separated list.
The following line illustrates the shortest valid syntax for a Text Tag:
{{esl:roleName:fieldType}}
Role Names in Text Tags
If you create a transaction using the OneSpan Sign web UI, the role name of the sender is always Owner.
If you create a Recipient" signer or a Group signer using OneSpan Sign, the role name of the signer is Signer#, where # starts at 1 and increases by one for each signer. The lowest available # is used for each new signer. Thus, if you delete the signer with role name Signer1 and then add a new signer, the new signer's role name will be Signer1.
If you create a placeholder signer, and name it Client, then Client will be the role name. Client will remain as the role name when that placeholder is later replaced with a specific recipient or group.
If you create a signer using the SDK, and assign a Custom ID to that signer, that ID will be the signer's role name. If you do not assign a Custom ID to the signer, one is generated for the signer using the same rules as when using the OneSpan Sign web UI.
Text Tag Types
There are three main types of Text Tags:
Signatures
A particular Signature Text Tag can be any of the following field types:
- Signature — This Signature Block is Click-to-Sign. The signer's name will be stamped on the clicked block.
- Initials — This Signature Block is Click-to-Initial. The signer's initials will be stamped on the clicked block.
- Capture — The signer clicks this Signature Block, and draws their signature using a mouse or another input device. The signer can also choose to sign on a mobile device such as a smartphone if the sender has mobile capture enabled on their account. The drawing is then stamped on the Signature Block. Note that the use of a stylus is not supported in the Classic UI.
- Mobile_Capture — To e-sign this Signature Block, the signer will receive a link via email that redirects them to open the document on their mobile phone. They are then required to draw their signature using their finger or a stylus. The drawing of the signature is then stamped on the block. Note that the use of a stylus is not supported in the Classic UI.
Autofields
A particular Autofield Text Tag can be any of the following field types:
- SignerName — At the time of signing, the system automatically populates this field with the full name of the signer.
- SignerTitle — If the signer's title is available, the system automatically populates this field with that title at the time of signing. Otherwise, the field is left blank.
- SignerCompany — If the name of the signer's company is available, the system automatically populates this field with that name at the time of signing. Otherwise, the field is left blank.
- SigningDate — At the time of signing, the system automatically populates this field with the current date.
Input Fields
A particular Input Field Text Tag can be any of the following field types:
- TextField — This box accepts any text entered by the signer prior to signing.
- TextArea — This is similar to the TextField type, in that it provides an area where free-form text can be entered by signers. However, unlike Text Fields, it provides automatic wraparound. Each Text Area can accept up to 4000 characters.
- List — This drop-down menu provides the ability to select one of many options.
- Radio — Radio buttons also provide the ability to select one of many options.
- Checkbox — Prior to signing, the signer can either select or clear this simple check box.
- Label — The package sender can add a Label Field to embed text in a document. This is a read-only field with a value that will be simply stamped on the PDF. During the Signer Experience, the Label Field is displayed as non-editable text.
Text Tag Parameters
When building a Text Tag, the system uses the parameters described in the following table.
-
Offset and Size are used for all three Text Tag types.
-
The table's other parameters are used only for Input Field types.
-
All parameters in the following table are optional.
If quotes are required in any parameter in the following table, you must use straight quotes. You cannot use curly quotes.
| Parameter | Description | Examples |
|---|---|---|
| Offset |
Offset (in points x 1.3) to be applied in positioning the field relative to the top left corner of the Text Tag If unspecified, the field will be inserted at the exact position of the Text Tag. Values can be positive or negative. To move the extracted field more to the right and lower, use positive offset values. |
|
| Size | Size of the field (in points x 1.3). If unspecified, the system's default values will be used. Valid values must be positive. | {{esl:Signer1:capture:size(200,50)}}
|
| Group |
The radio group to which the field will belong If unspecified, the system will use its default radio group. |
{{esl:Signer1:Radio:Group("MyGroup"),Value("X")}}
|
| Options | The list of values available for a List field | {{esl_colour:signer1:list:options("Red", "Blue", "Green")}}
|
| Value |
The field's default value For Radio and Checkbox field types:
(1) if no value is specified, the option will by default be deselected/unchecked; (2) to have the option selected/checked by default, the value “ |
|
| Maxlen | The maximum permitted value for the field | {{esl_paymentMethod:signer1:textfield:Maxlen(200)}} |
| Signature | Name of the signature to which an autofield is bound | {{esl:Signer1:SigningDate:signature("signer1Sig2")}} |
You can't add Custom Fields or Notary Fields via Text Tags.
Signer with Multiple Signatures
Suppose a document extraction uses Text Tags, and the document has more than one Signature Field for a given signer. This requires the specification of appropriate metadata, as the following sections explain:
Signatures
The following metadata enable a document to have two signers, each with two Signature Fields:
Signer1: {{esl_signer1Sig1:Signer1:Signature}}
Signer1: {{esl_signer1Sig2:Signer1:Signature}}
Signer2: {{esl_signer2Sig1:Signer2:Signature}}
Signer2: {{esl_signer2Sig2:Signer2:Signature}}
Autofields
If any of the autofields SignerName, SignerTitle, SignerCompany, or SigningDate is bound to any of a signer’s multiple Signature Fields, the autofield’s metadata must be updated for the specific Signature Field to which it is bound (not necessarily bound to the signer’s first Signature Field).
The following metadata enable a signer’s multiple signatures to have different date stamps in the same document:
{{esl:Signer1:SigningDate:signature("signer1Sig2")}}
{{esl:Signer1:SigningDate:signature("signer1Sig1")}}
{{esl:Signer2:SigningDate:signature("signer2Sig1")}}
{{esl:Signer2:SigningDate:signature("signer2Sig2")}}
{{esl:Signer1:SignerName:signature("signer1Sig2")}}
{{esl:Signer1:SignerName:signature("signer1Sig1")}}
{{esl:Signer2:SignerName:signature("signer2Sig1")}}
{{esl:Signer2:SignerName:signature("signer2Sig2")}}
Input Fields
If an Input Field is bound to any of a signer’s multiple Signature Fields, that Input Field’s metadata must be updated for the specific Signature Field to which it is bound (not necessarily bound to the signer’s first Signature Field).
The following metadata enable a signer’s multiple signatures to have different Text Field and Text Area bindings in the same document:
{{esl:Signer1:TextField:signature("signer1Sig2")}}
{{esl:Signer1:TextField:signature("signer1Sig1")}}
{{esl:Signer2:TextField:signature("signer2Sig1")}}
{{esl:Signer2:TextField:signature("signer2Sig2")}}
{{esl:Signer1:TextArea:signature("signer1Sig2")}}
{{esl:Signer1:TextArea:signature("signer1Sig1")}}
{{esl:Signer2:TextArea:signature("signer2Sig1")}}
{{esl:Signer2:TextArea:signature("signer2Sig2")}}
Video Tutorial
Other Extraction Methods
You may also be interested in our other extraction types:
To download the full code sample see our Code Share site. The PDF used in this guide can be found here.
Text Tag Extraction enables integrators to automatically extract signatures and fields by placing Text Tags in a document. OneSpan Sign will analyze the uploaded document, and replace every text that matches the Text Tag pattern with the appropriate signature or field.
To add text tags you need an approved document type that already has text tags in it. These text tags must be named in a way that OneSpan Sign can recognize. For more information on text tag parameters and formats, see the feature overview.
The text tags used in this topics are shown in the image below.
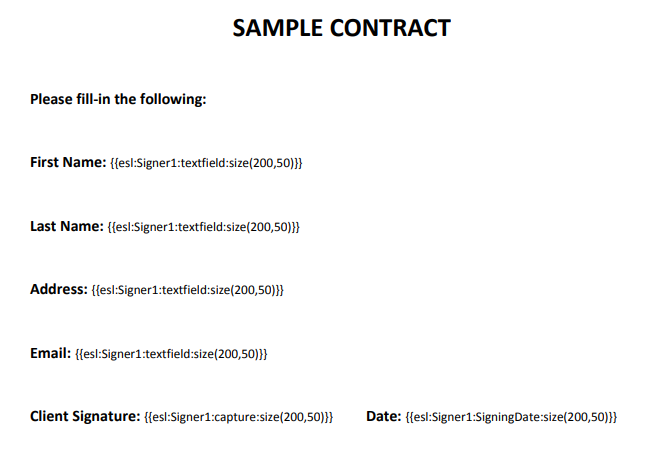
The signer for this document is named Signer1. This will be the custom ID used in the code to let OneSpan Sign know what fields to associate with each signer.
Adding Text Tags
The sample code below shows you how to setup your transaction for Text Tag extraction. In the withSigner call, the custom ID is the same as shown in the image of the PDF form above. The .withDocument call also has a call to enableExtraction.
You do not have to define signature locations, nor do you have to define who needs to sign the document. This is already taken care of with the ID and the associated text tags from the PDF.
DocumentPackage pkg = PackageBuilder.newPackageNamed("Text Tag Example Package")
					.withStatus(PackageStatus.SENT)
					.withSigner(SignerBuilder.newSignerWithEmail("[email protected]")
					.withFirstName("John")
					.withLastName("Smith")
					.withCustomId("Signer1"))
					.withDocument(DocumentBuilder.newDocumentWithName("Sample Contract")
					.fromFile("C:/Users/hhaidary/Desktop/sample_contract.pdf")
					.withExtractionType(ExtractionType.TEXT_TAGS_ONLY)
					.enableExtraction())
				.build();
Results
After running your code, the transaction will be created with the appropriate fields for each signer.
To download the full code sample see our Code Share site. The PDF used in this guide can be found here.
Text Tag Extraction enables integrators to automatically extract signatures and fields by placing Text Tags in a document. OneSpan Sign will analyze the uploaded document, and replace every text that matches the Text Tag pattern with the appropriate signature or field.
To add text tags you need an approved document type that already has text tags in it. These text tags must be named in a way that OneSpan Sign can recognize. For more information on text tag parameters and formats, see the feature overview.
The text tags used in this topics are shown in the image below.
The signer for this document is named Signer1. This will be the custom ID used in the code to let OneSpan Sign know what fields to associate with each signer.
Adding Text Tags
The sample code below shows you how to setup your transaction for Text Tag extraction. In the withSigner call, the custom ID is the same as shown in the image of the PDF form above. The .withDocument call also has a call to enableExtraction.
You do not have to define signature locations, nor do you have to define who needs to sign the document. This is already taken care of with the ID and the associated text tags from the PDF.
DocumentPackage pkg = PackageBuilder.NewPackageNamed("Text Tag Example Package")
					.WithStatus(DocumentPackageStatus.SENT)
					.WithSigner(SignerBuilder.NewSignerWithEmail("[email protected]")
					.WithFirstName("John")
					.WithLastName("Smith")
					.WithCustomId("Signer1"))
					.WithDocument(DocumentBuilder.NewDocumentNamed("Sample Contract")
					.FromFile("C:/Users/hhaidary/Desktop/sample_contract.pdf")
					.WithExtractionType(ExtractionType.TEXT_TAGS_ONLY)
					.EnableExtraction())
				.Build();
Results
After running your code, the transaction will be created with the appropriate fields for each signer.
To download the full code sample see our Code Share site. The PDF used in this guide can be found here.
Text Tag Extraction enables integrators to automatically extract signatures and fields by placing Text Tags in a document. OneSpan Sign will analyze the uploaded document, and replace every text that matches the Text Tag pattern with the appropriate signature or field.
To add text tags you need an approved document type that already has text tags in it. These text tags must be named in a way that OneSpan Sign can recognize. For more information on text tag parameters and formats, see the feature overview.
The text tags used in this topics are shown in the image below.
The signer for this document is named Signer1. This will be the custom ID used in the code to let OneSpan Sign know what fields to associate with each signer.
Adding Text Tags
Typically, a JSON string is built dynamically, and not with a giant static string as demonstrated here. However, this example is shown as a giant static string so as to give a good representation of the structure of the JSON you will need to create your transaction.
The JSON below is formatted for readability. In each roles object, you will see that the custom ID is the same as shown in the image of the PDF form above The documents object also has extract set to true.
You do not have to define signature locations, nor do you have to define who needs to sign the document. This is already taken care of with the ID and the associated text tags from the PDF.
HTTP Request
POST /api/packages
HTTP Headers
Accept: application/json
Content-Type: multipart/form-data
Authorization: Basic api_key
Request Payload
------WebKitFormBoundary1bNO60n7FqP5WO4t
					Content-Disposition: form-data; name="file"; filename="sample-contract.pdf"
					Content-Type: application/pdf
					%PDF-1.5
					%µµµµ
					1 0 obj
					<>>>
					endobj....
					------WebKitFormBoundary1bNO60n7FqP5WO4t
					Content-Disposition: form-data; name="payload"
					{
					"documents": [
					{
					"id": "sample-contract",
					"name": "Test Document",
					"extract": true,
					"extractionTypes":[
					"TEXT_TAGS"
					]
					}
					],
					"status": "DRAFT",
					"type": "PACKAGE",
					"roles": [
					{
					"id": "Signer1",
					"type": "SIGNER",
					"signers": [
					{
					"email": "[email protected]",
					"firstName": "John",
					"lastName": "Smith",
					"id": "Signer1"
					}
					],
					"name": "Signer1"
					}
					],
					"name": "Text Tags Example Package"
					}
				------WebKitFormBoundary1bNO60n7FqP5WO4t--
For a complete description of each field, see the Request Payload table below.
Response Payload
{
					"id": "9sKhW-h-qS9m6Ho3zRv3n2a-rkI="
				}
Results
After running your code, the transaction will be created with the appropriate fields for each signer.
Request Payload
| Property | Type | Editable | Required | Default | Sample Values(s) |
|---|---|---|---|---|---|
| status | string | Yes | No | DRAFT | DRAFT / SENT / COMPLETED / ARCHIVED / DECLINED / OPTED_OUT / EXPIRED |
| type | string | Yes | No | PACKAGE | PACKAGE / TEMPLATE / LAYOUT |
| name | string | Yes | Yes | n/a | Text Tags Example Package |
| documents | |||||
| id | string | Yes | No | n/a | sample-contract |
| name | string | Yes | No | n/a | Test Document |
| extract | boolean | Yes | No | false | true / false |
| extractionTypes | string array | Yes | No | [] | ["TEXT_TAGS","ACROFIELDS"] |
| roles | |||||
| id | string | Yes | No | n/a | Signer1 |
| name | string | Yes | No | n/a | Signer1 |
| type | string | Yes | No | SIGNER | SIGNER / SENDER |
| signers | |||||
| string | Yes | Yes | n/a | [email protected] | |
| firstName | string | Yes | Yes | n/a | John |
| lastName | string | Yes | Yes | n/a | Smith |
| id | string | Yes | No | n/a | signer1 |
To download the full code sample see our Code Share site. The PDF used in this guide can be found here.
Text Tag Extraction enables integrators to automatically extract signatures and fields by placing Text Tags in a document. OneSpan Sign will analyze the uploaded document, and replace every text that matches the Text Tag pattern with the appropriate signature or field.
To add text tags you need an approved document type that already has text tags in it. These text tags must be named in a way that OneSpan Sign can recognize. For more information on text tag parameters and formats, see the feature overview.
The text tags used in this topics are shown in the image below.
The signer for this document is named Signer1. This will be the Role Name used in the code to let OneSpan Sign know what fields to associate with each signer.
Adding Text Tags
The sample code below shows you how to setup your transaction for Text Tag extraction. When building the Role object, the Role Name is the same as shown in the image of the PDF form above.
Once that is done, enable the document level extract, and set esl_doc_extract_type to 1.
You do not have to define signature locations, nor do you have to define who needs to sign the document. This is already taken care of with the ID and the associated text tags from the PDF.
    	ESignLiveSDK sdk = new ESignLiveSDK();

					//Create package
					ESignLiveAPIObjects.Package_x pkg = new ESignLiveAPIObjects.Package_x();
					pkg.name = 'Test Text Tags - ' + Datetime.now().format();
					pkg.status = ESignLiveAPIObjects.PackageStatus.DRAFT;

					//Create Roles
					String roleId1 = 'Signer1';
					ESignLiveAPIObjects.Role role1 = new ESignLiveAPIObjects.Role();
					role1.signers = sdk.createRolesSigner('sigenr1_firstname', 'signer1_lastname', '[email protected]', 'CEO', 'ABC Bank');
					role1.id = roleId1;
					role1.name = roleId1;
					pkg.roles = new List<ESignLiveAPIObjects.Role>{role1};    //add role

					//Prepare Documents Blob
					String document1Name = 'Sample_Text_Tag';
					StaticResource sr = [SELECT Id, Body FROM StaticResource WHERE Name = 'test_text_tag' LIMIT 1];
					Map<String,Blob> documentBlobMap = new Map<String,Blob>();
					documentBlobMap.put(document1Name, sr.Body);

					//Create Document Metadata
					ESignLiveAPIObjects.Document document1 = new ESignLiveAPIObjects.Document();
					document1.name = document1Name;
					document1.id = document1Name;
					document1.extract = true;
					ESignLiveAPIObjects.Data data_x = new ESignLiveAPIObjects.Data();
					data_x.esl_doc_extract_type = '1';
					document1.data = data_x;
					pkg.documents = new List<ESignLiveAPIObjects.Document>{document1};    //add document

					//Send package One Step
					String packageId = sdk.createPackage(pkg,documentBlobMap);
				System.debug('PackageId: ' + packageId);
Results
After running your code, the transaction will be created with the appropriate fields for each signer.