Welcome!
This guide is intended only for users of OneSpan Sign for Microsoft Dynamics CRM Online (update 8.2 or higher).
The product called OneSpan Sign provides a complete e-signature platform for the Web, including preparing, distributing, reviewing, signing, and downloading documents.
A connector called OneSpan Sign for Microsoft Dynamics CRM enables its users to quickly obtain secure and compliant electronic signatures for transactions created in that connector.
Not all OneSpan Sign features are supported by an integration with this Connector. However, most if not all, features supported by this integration can be found in this Connector's documentation. For questions about a specific feature, please ask in our Forums. If a feature you're looking for is not supported, please let your sales contact know so that an official request can be made.
The purpose of this guide is to get you up and running quickly with version 2 of this connector. You can do so by performing the following procedures:
File Size Constraints
- The maximum size of a single document is 16 MB. Smaller documents yield better performance — we recommend under 5 MB per document.
- If your organization uses Salesforce or Microsoft SharePoint connectors, the file size maximum is 5 MB per document.
- If your organization uses Salesforce connectors, the maximum number of documents that can be added to a transaction is ten (10).
- If you enable email delivery while configuring a recipient, attachments larger than 5 MB are not supported.
File Name Constraints
- Document file names should not contain any of the following comma-separated characters: *, /, \, :, <, >, |, ?, ".
- A document's name cannot contain the string esigned.
General File Constraints
- We recommend that you do not use PDF documents that make use of XML Forms Architecture. For more information, see XFA Support.
- Do not upload password-protected or corrupted documents. These will generate an error.
- OneSpan strongly recommends that you scan a PDF for syntax errors (e.g., by using Adobe's Preflight tool), and resolve any errors before you add the document to a transaction.
- PDFs with the NeedAppearances flag set to true are not currently supported.
Installing the Solution
Prerequisites
- You have a Sandbox or Production account for version 11 of OneSpan Sign, and an associated API Key. To get a free Sandbox account, follow the instructions on this page.
- You have Administrator privileges for OneSpan Sign for Microsoft Dynamics CRM.
- You have downloaded OneSpan Sign for Microsoft Dynamics CRM (the solution package).
Action
To install version 2 of OneSpan Sign for Microsoft Dynamics CRM:
- Log into Microsoft Dynamics CRM as a user with Administrator privileges.
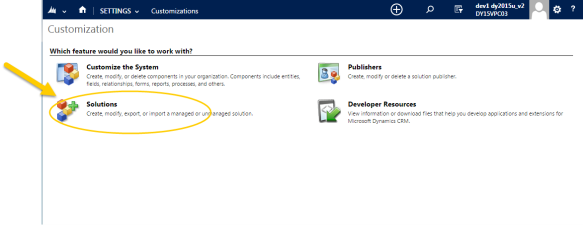
- Navigate to Microsoft Dynamics CRM > Settings.
- In the Customization group, click Solutions.
- In the All Solutions window, click Import.
- Click Browse, and select the file Download OneSpan Sign for Microsoft Dynamics v2.0 Release Candidate (Solution Package).
- Click Next to display the Solution Information.
- Click Next to display the Import Options.
- Select the checkbox under Post Import Actions, then click Import. The solution is imported, and a summary page appears. After a certain delay, a message should state that the import was successful.
- Click Close.
- Click Publish All Customizations. This ensures that OneSpan Sign for Microsoft Dynamics CRM online will be aware of all data changes that affect the User Interface.

You are prompted for the location of the solution package.
To complete your installation, you must configure the solution.
Configuring the Solution
This section describes how to configure your solution by performing the following procedures:
- Configuring Microsoft Azure
- Specifying Account Information
- Specifying a Language
- Specifying User Permissions
Configuring Microsoft Azure
Prerequisites
- You must have Administrator privileges for Microsoft Azure.
- Microsoft Azure's location-based policy has been turned off. For more on that policy, see this article.
Action
To register OneSpan Sign for Microsoft Dynamics CRM with Microsoft Azure:
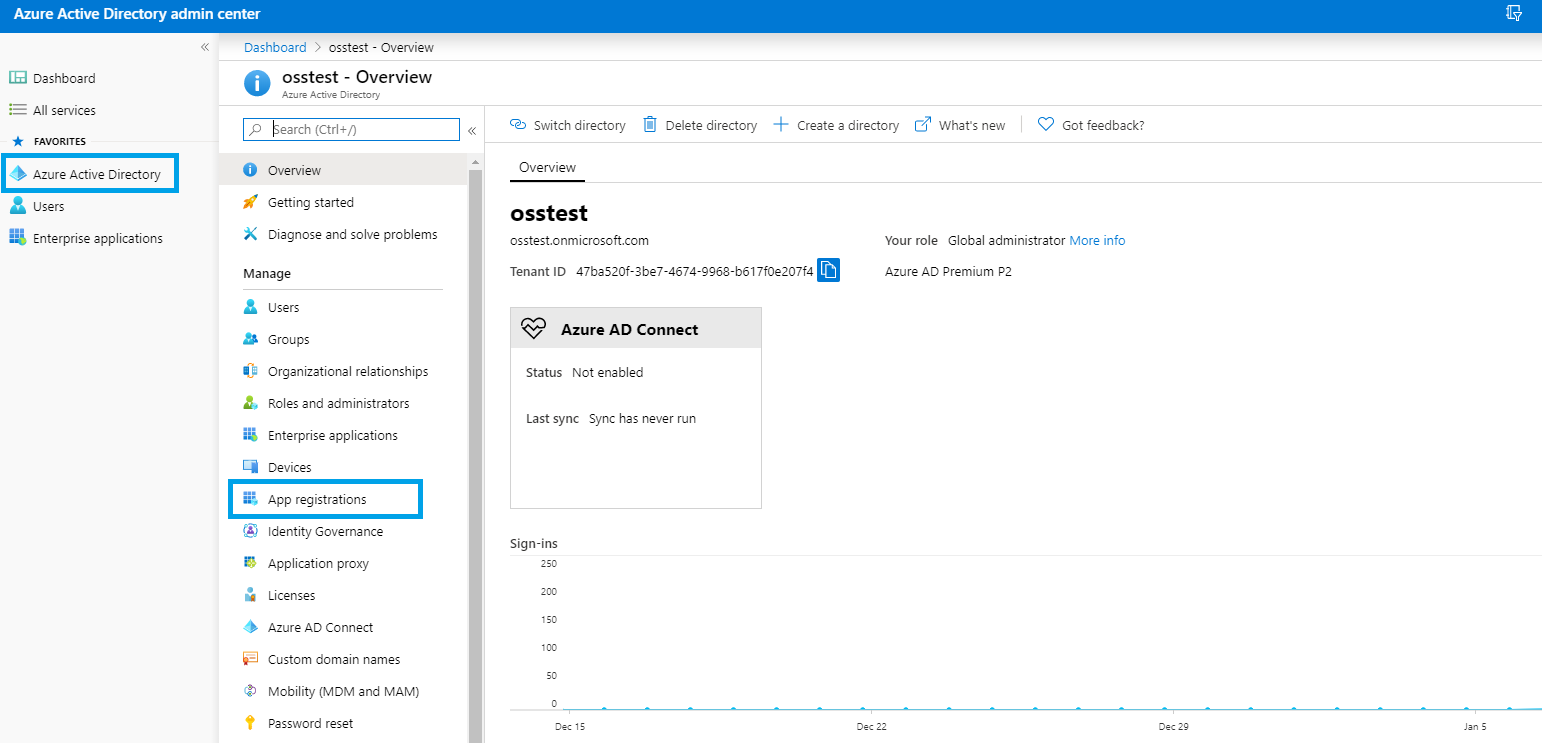
- Log into https://portal.azure.com as a user with Administrator privileges.
- From the menu, select Azure Active Directory.
- From the active menu, select App registrations.
-
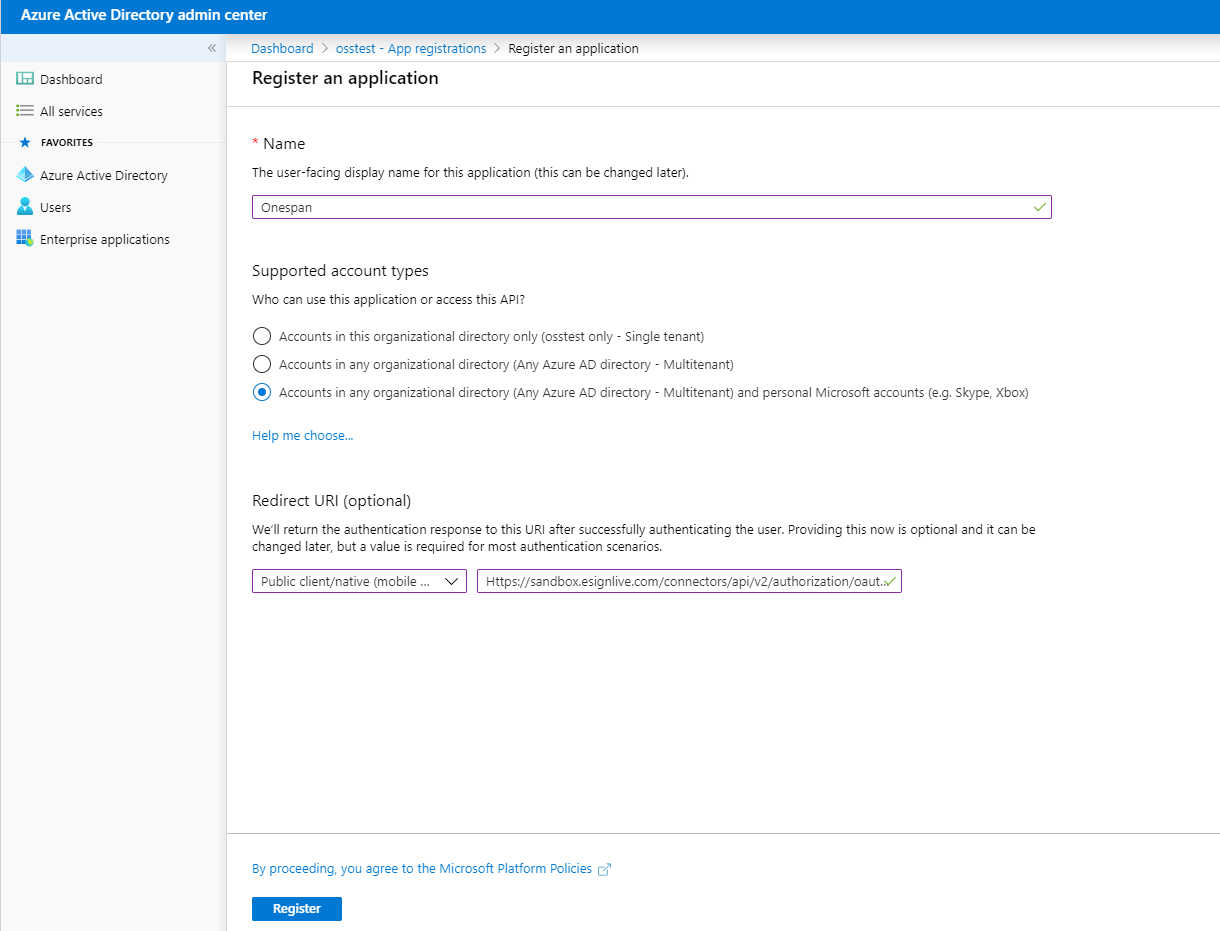
Click + New registration. The Register an application page appears.
- Type a Name for your application.
- Under Supported account types, select who can access this application.
- Specify the Redirect URL, giving it the following form:
https://<DOMAIN_NAME>/connectors/api/v2/authorization/oauth2/dynamicscrm/<ORGANIZATION_NAME>
Here:
- Replace the variable
< DOMAIN_NAME>with the string that corresponds to your environment. The last two columns of the following table provide some examples:
Sandbox Production US Customers sandbox.esignlive.com apps.esignlive.com Candadian Customers sandbox.e-signlive.ca apps.e-signlive.ca Australian Customers apps.esignlive.com.au European Customers apps.esignlive.eu - Replace the variable
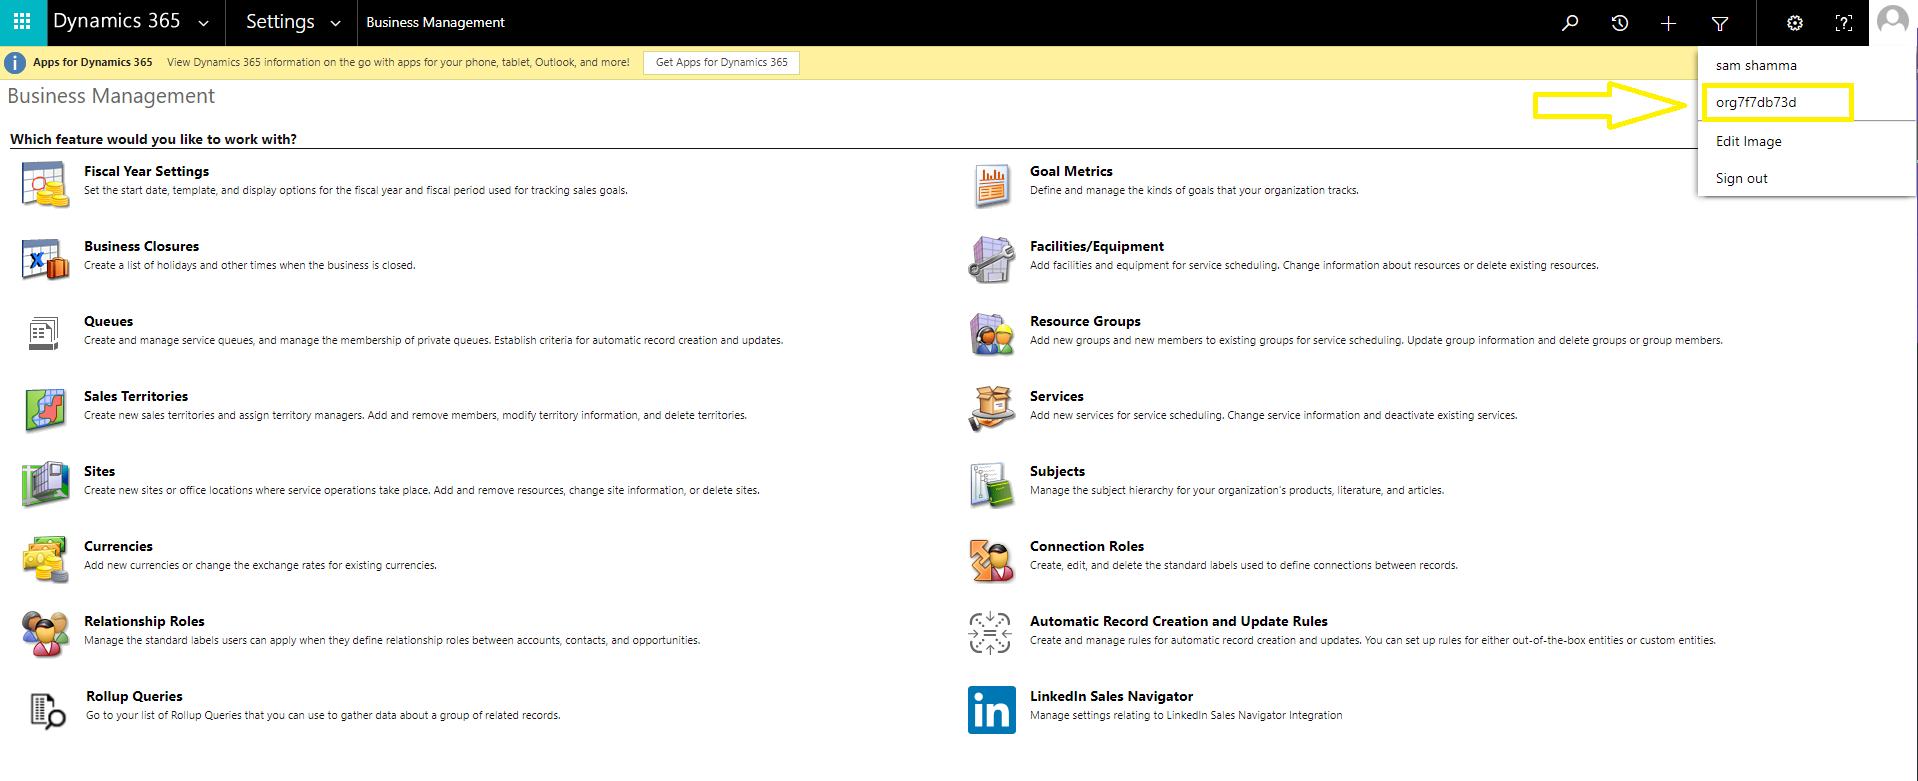
<ORGANIZATION_NAME>with the value you see in the drop-down menu under your user name (your organization name begins with "org").
The following example of a Redirect URL has no variables:
Do not use the following URL — it's only an example. You must build your own URL.
https://sandbox.esignlive.com/connectors/api/v2/authorization/oauth2/dynamicscrm/org7f7db73d
- Replace the variable
- Select Public client/native as your application type.
- Click Register.
- Copy the application ID, and keep it handy (example: e1928f91-f723-4406-94cf-024fcf9ae6b8).
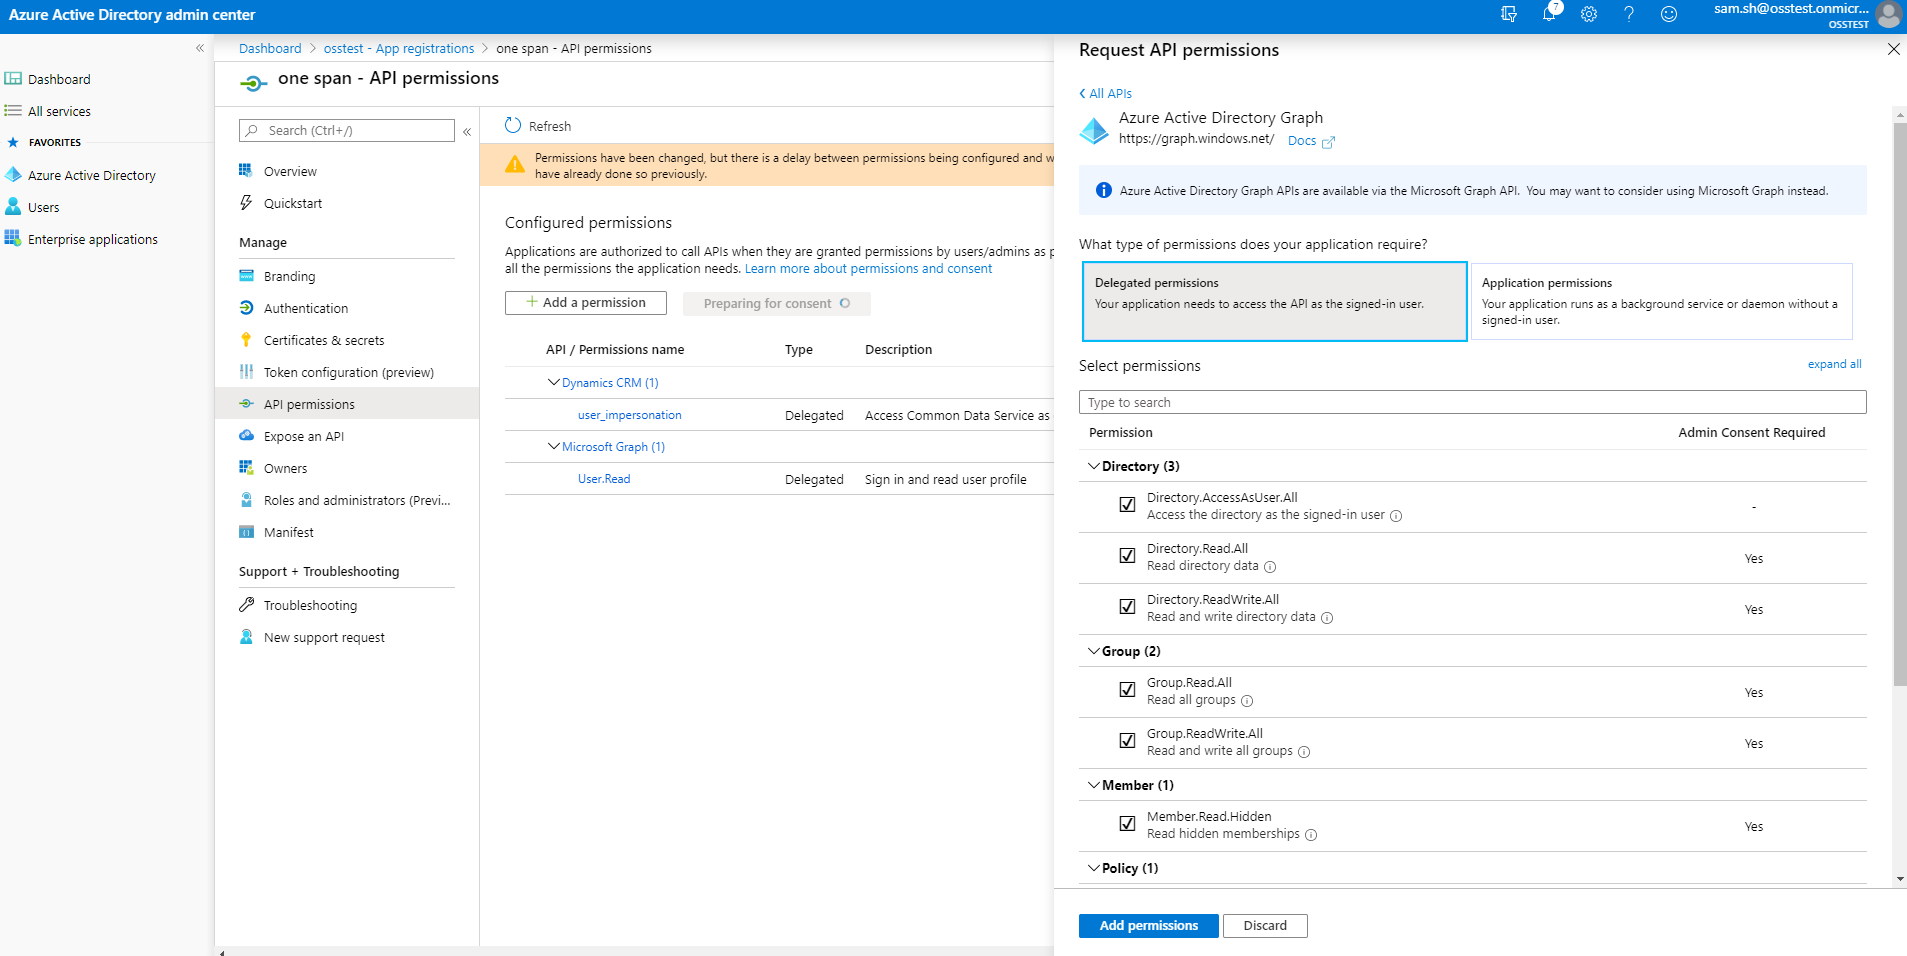
- Click View API permissions. The API permissions page appears.
- Click Add a permission.
- Select Dynamics CRM.
- Under Delegated Permissions, check the user_impersonation box.
- Click Add a permission.
- Select Azure Active Directory
- Under Delegated Permissions, expand all and then check all.
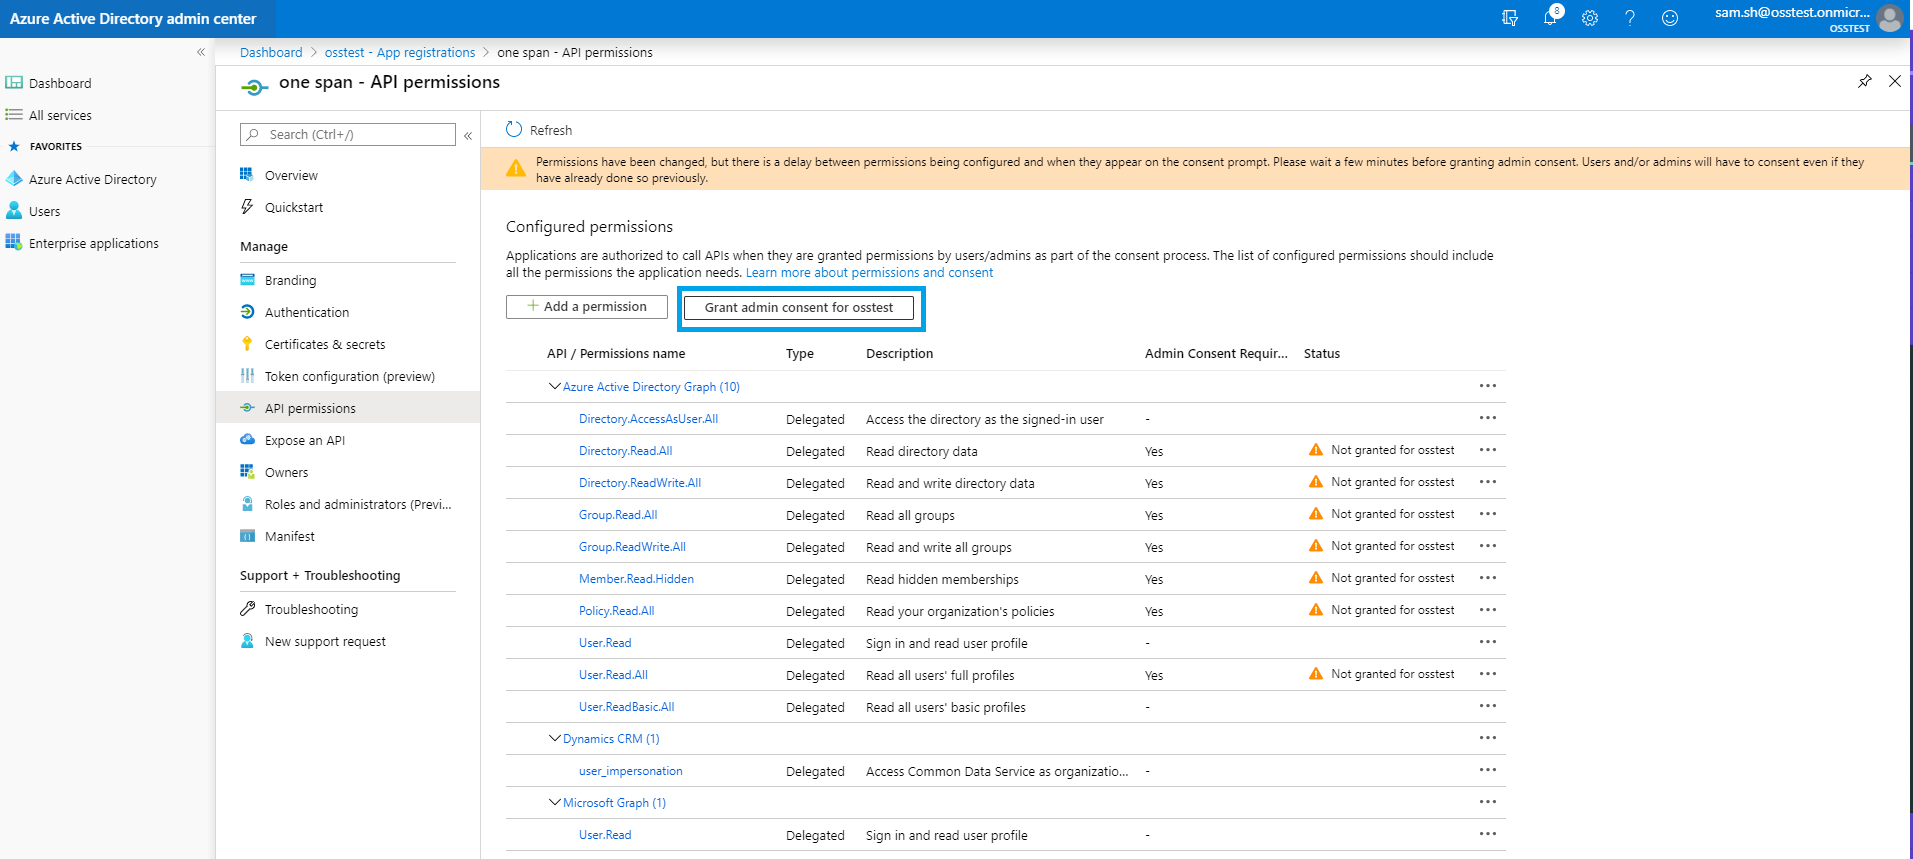
-
Wait until the Grant admin consent button is available, then click that button.
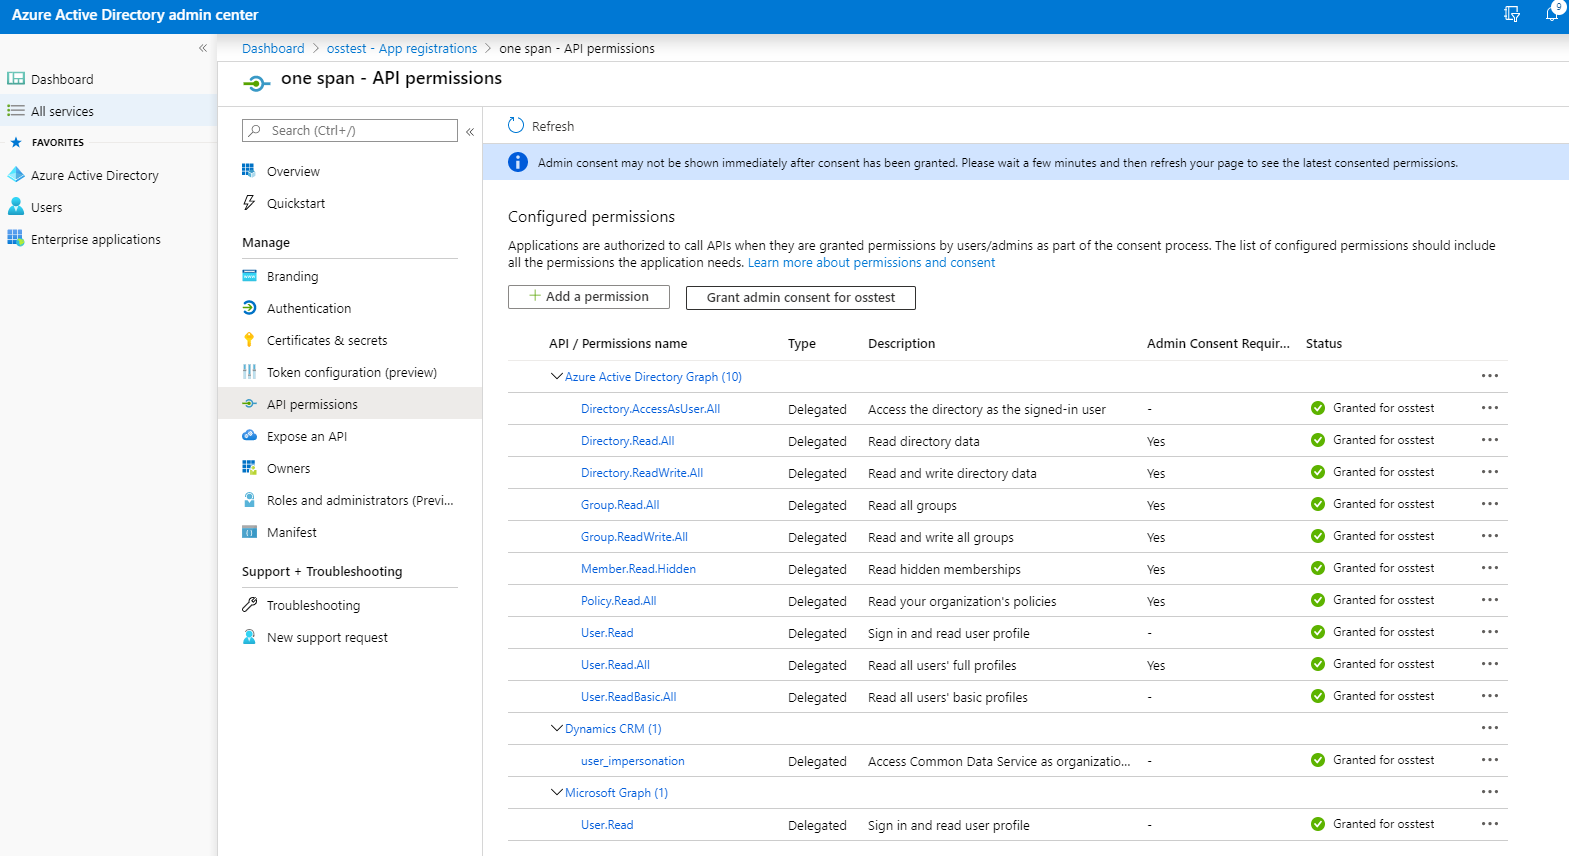
- Click Yes in the dialog box that appears. The page should now look like this:
Specifying Account Information
Your organization should have only one OneSpan Sign account.
To inform OneSpan Sign for Microsoft Dynamics CRM about your OneSpan Sign account:
- Log into OneSpan Sign for Microsoft Dynamics CRM as a user with Administrator privileges.
- Navigate to OneSpan Sign for Microsoft Dynamics CRM > OneSpan Sign > Accounts.
- From the ribbon, click New to create a new OneSpan Sign account. A new page appears.
- Ensure that the parameters on the following tabs have been correctly specified:
- General
- OneSpan Configuration
- SharePoint Integration
- API Key: You can obtain this OneSpan Sign API key from our Support Team.
- Specify the parameters API URL, Designer URL and Signer URL. For example, if you have a Sandbox account, specify them as follows:
- Callback URL: Enter the following value:
http://0.0.0.0:80/PostEvent.svc/PostESLEvent - Client ID: Specify the Client ID from the procedure Configuring Microsoft Azure.
API URL https://sandbox.esignlive.com/api Designer URL https://sandbox.esignlive.com/auth?senderAuthenticationToken={0}&target=https://sandbox.esignlive.com/designer/{1}?profile=dynamics2.1 Signer URL https://sandbox.esignlive.com/auth?signerAuthenticationToken={0}&target=https://sandbox.esignlive.com/packages/{1}/sign?iframe=true - If you wish, you can change the default value of any of the following parameters: SharePoint Integration, Maximum Number of Documents, Maximum Document Size, Accepted File Types and Package Name Date Stamp Format.
- Click Save or Save and Close.
- From the ribbon, click Verify Settings to confirm that: (a) the API Key and API URL are correct; (b) communications with the OneSpan Sign server can be established.
- From the ribbon, click Set Callback URL to register the URL with OneSpan Sign.
An Active OneSpan Sign Accounts list appears. Initially this list should be empty.
Specifying a Language
To specify a language for OneSpan Sign transactions:
- Log into OneSpan Sign for Microsoft Dynamics CRM as a user with Administrator privileges.
- Navigate to OneSpan Sign for Microsoft Dynamics CRM > OneSpan Sign > Language. A Languages list appears. This list should initially be empty.
- To create a new language for OneSpan Sign, click New.
- Enter the required information (e.g., Name = English, Value = en). You can view all supported languages and their associated values here. You must enter one of those values, though you can specify the name as you wish.
- Click Save.
Specifying User Permissions
To specify a user's permissions:
- Log into OneSpan Sign for Microsoft Dynamics CRM as a user with Administrator privileges.
- Click the gear icon in the upper-right corner, and select Advanced Settings > Settings > Security > Users.
- From the Enabled Users list, double-click the name of the relevant user.
- Click Manage Roles.
- Check all and only the boxes next to the Roles you want the user to have (e.g., OneSpan Package Creator, OneSpan Plugin Role, OneSpan Template Creator). Each Role is defined by a set of associated permissions.
- Click OK.
Testing the Solution
To test your installation, at least one user must have the right to create packages, or the right to create templates. System Adminstrators always have those rights.
After you've installed and configured your solution, you can test it by performing the following procedures:
Creating, Preparing and Sending a Package
To create a package:
- Log into OneSpan Sign for Microsoft Dynamics CRM as a user who has the permission to create packages.
- Navigate to OneSpan Sign for Microsoft Dynamics CRM > OneSpan Sign > OneSpan Sign Packages. A Packages list appears. This list should initially be empty.
- On the ribbon, click New. The New OneSpan Sign Package page appears.
- In the Details section, type a Name for the package.
- Click Save.
The package is created, with the logged-in user as its default signer.
A package must be saved before documents can be added to it.
To add documents to a package:
- From the Documents section of the package, click "+". The New OneSpan Sign Document page appears.
- From the Document Type drop-down list, select Upload Local Files.
- Click Choose Files.
- Select one or more files from your local directory, and then click Open.
- Adobe's Portable Document Format (*.pdf) — PDFs on which OneSpan Sign can act generally have at least these permissions enabled: (1) Changing the Document; (2) Signing; (3) Filling of form fields.
- Microsoft Word (*.doc or *.docx)
- Open Office (*.odt)
- Text (*.txt)
- Rich Text Format (*.rtf)
- Select those files in the Selected Documents pane, and then click Add Documents. A confirmation prompt appears.
- Click OK. The selected documents are added to the package.
OneSpan Sign supports the following document types:
In addition, the OneSpan Sign Print Driver supports any document that can be printed from a Windows-based application (e.g., Microsoft Word, Microsoft Excel, Microsoft PowerPoint).
To prepare documents for signing:
- While viewing a package to which one or more documents have been added, click Prepare.The Designer view appears
- On the Electronic Disclosure and Signature Consent agreement, click the right arrow to display the package's first document.
- From the drop-down Signers list, select a Signature Block to add to the document.
- Click Add Signature.
- Drag the Signature Block to where you want it to appear in the document.
- If you want to change the Signature Block type, or you want to add a field, click the gear icon. The Signature Block menu appears.
- Repeat Steps 3-6 for each Signature Block you want to add to the document.
- If there is another document, click the right arrow to display it, and repeat Steps 3-7.
- Repeat Step 8 for each document in the package.
To send documents to be signed:
- From within the Designer view of the package, click Send.
- Click OK. The documents are sent to be signed, and each signer receives an invitation email.
Signing Documents
To sign the documents in a package that has been sent:
- Log into OneSpan Sign for Microsoft Dynamics CRM as the user who created the package you want to sign.
- Navigate to OneSpan Sign for Microsoft Dynamics CRM > OneSpan Sign > OneSpan Sign Packages.
- Open the package, and verify that its status is Sent.
- Click Start Signing.
- Read the Consent Agreement, and click Accept. The package's first document appears.
- Sign all of your Signature Blocks in the document. Those blocks should be identified by sticky notes.
- To confirm your signatures in the current document, click OK.
- Repeat Steps 6-7 for each document in the package.
- Click Save & Close. The page associated with the signed package appears.
- To verify that all documents have been signed, click the link to download signed documents (that link is at the bottom of the page). Open each document, and verify that all its Signature Blocks have been signed.
If any unsigned Signature Blocks lie outside your screen, an Unsigned Signatures notification displays the number of signatures that are still required.
A progress bar at the top of the document indicates the number of signatures you have completed, as well as the total number of signatures assigned to you in this document (e.g., 3/10 completed).