Pour télécharger l'exemple complet de code, consultez notre site Partage de code.
Une transaction est l'expérience d'un utilisateur de OneSpan Sign lorsqu'il examine, accepte, signe et éventuellement télécharge des documents.
Cette rubrique vous guidera dans le processus de création et d'envoi d'une transaction à l'aide du SDK Java OneSpan Sign.
Préalables
Pour effectuer ces procédures, vous aurez besoin des éléments suivants :
- Eclipse IDE pour les développeurs Java EE : Vous pouvez le télécharger ici.
- SDK Java de OneSpan Sign : Vous pouvez le télécharger à partir de notre portail communautaire. Ou alternativement, vous pouvez les importer de notre dépôt Maven en utilisant les commandes suivantes :
<dependency>
            <groupId>com.silanis.esl</groupId>
            <artifactId>sdk</artifactId>
            <version>11.21</version>
</dependency>
Comment créer et configurer un projet Java
Pour créer et configurer un projet Java
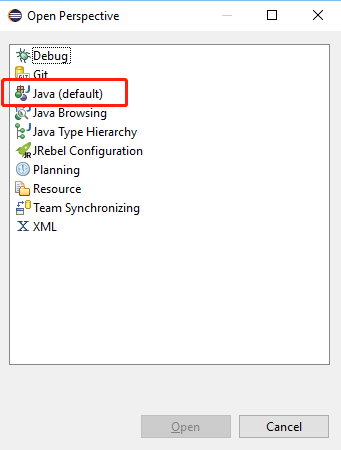
- Ouvrez Eclipse en exécutant eclipse.exe à partir du dossier racine d'Eclipse. Une fois démarré, ouvrez la perspective Java. Vous pouvez le faire en allant sur Windows > Perspective ouverte > Autre > Java.
- Une fois la perspective Java ouverte, vous devriez voir la vue de l'Explorateur de paquets sur le côté gauche de l'écran. Cliquez avec le bouton droit de la souris dans cette fenêtre et allez à Nouveau > Porjet Java. La fenêtre suivante apparaît :
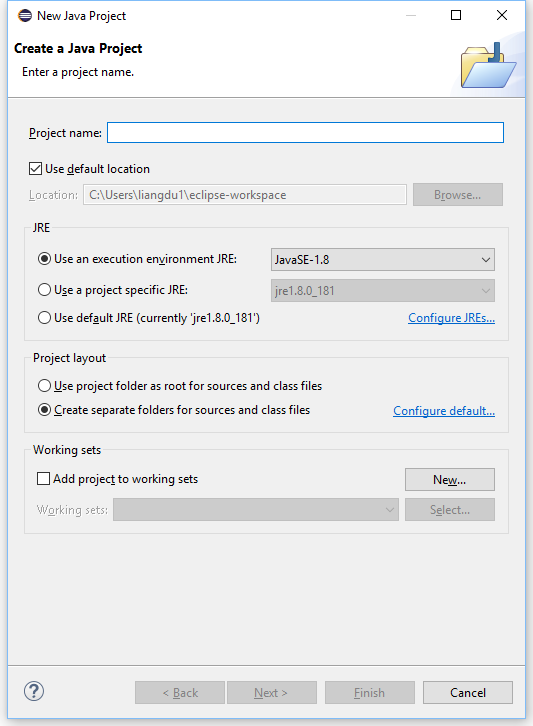
- Donnez à votre projet le nom que vous souhaitez. Par exemple, CreateAndSendPackage. Cliquez ensuite sur Suivant.
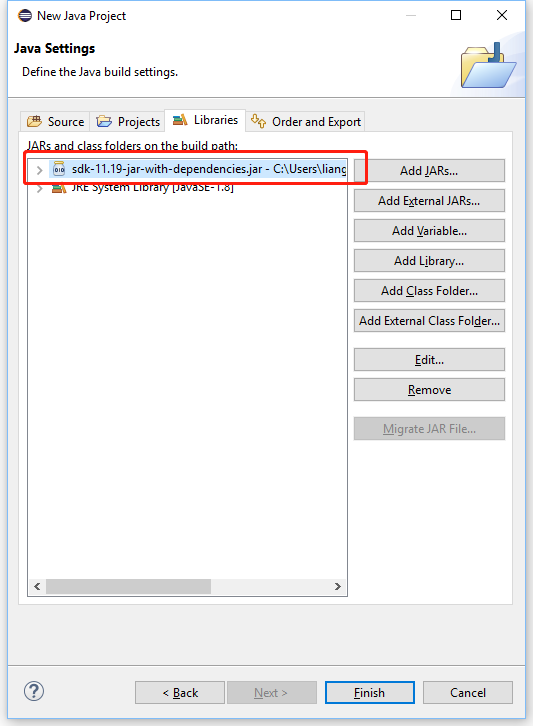
- Dans l'onglet Bibliothèques , cliquez sur Ajouter un JAR externe. Naviguez jusqu'à l'emplacement où vous avez enregistré votre SDK, et sélectionnez le jar sdk jar-with-dependencies.
- Sélectionnez Ouvrir. Vous verrez que le SDK Jar a été ajouté à votre chemin de construction.
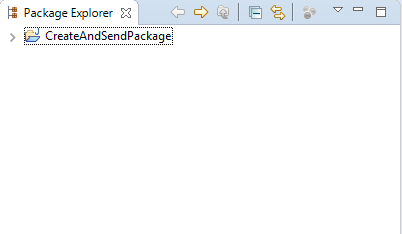
- Cliquez sur Terminer. Votre nouveau projet a maintenant été ajouté à la vue de votre Package Explorer.
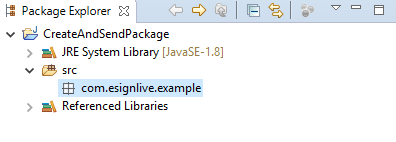
- Développez le paquet en cliquant sur la flèche à gauche, cliquez avec le bouton droit de la souris sur le dossier src et allez à Nouveau > Paquet. Saisissez un nom de paquet (par exemple, com.esignlive.exemple). Cliquez sur Terminer.
- Créez un nouveau fichier Java :
- Cliquez avec le bouton droit de la souris sur votre nouveau paquet dans l'Explorateur de paquets et allez sur Nouveau > Fichier.
- Saisissez un nom pour le fichier (par exemple, SimpleCreateAndSendPackage.java).
- Cliquez sur Terminer.
- Ajoutez à votre projet un exemple de fichier PDF que vous souhaitez faire signer. Vous pouvez utiliser un simple copier-coller de votre système de fichiers vers votre projet dans l'explorateur de paquet.
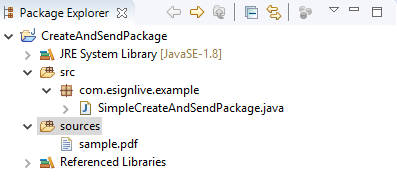
Votre projet devrait maintenant ressembler à ceci :
Le code
Dans cette section, le code sera décomposé section par section. Vous pouvez télécharger l'exemple complet de code à partir du partage de code de la communauté des développeurs, ici.
Comment se connecter
Les lignes de code suivantes définissent vos informations de connexion pour OneSpan Sign.
public static final String API_KEY = "your_api_key";
public static final String API_URL = "https://sandbox.esignlive.com/api";    // Use https://apps.esignlive.com/api For Production

//Alternatively
public static final String CLIENT_APP_ID = "your_client_id";
public static final String CLIENT_APP_SECRET = "your_client_secret";
public static final String BASE_API_URL = "https://sandbox.esignlive.com";    // Use https://apps.esignlive.com For Production
public static final String API_URL = BASE_API_URL + "/api";
Clés API
Bien que les clés API puissent être utilisées avec OneSpan Sign, nous vous recommandons d'utiliser plutôt une application client. Les applications clients sont plus flexibles et contribuent à réduire le nombre de failles de sécurité potentielles.
Par rapport aux clés AP, I'application client présente les avantages suivants :
-
Avec les applications client, l'accès peut être créé, renouvelé ou révoqué selon les besoins. Les clés API sont fixes, et donc si vous voulez faire des changements d'accès, vous devrez communiquer avec notre équipe de soutien.
-
Plusieurs applications client peuvent être utilisées si vous avez configuré plusieurs intégrations. Cela permet de limiter la portée de toute attaque frauduleuse sur votre système. À l'inverse, une seule clé API est fournie pour toutes les intégrations.
-
Les applications clientes utilisent des jetons temporaires pour permettre l'accès à l'API, qui ne sont disponibles que pour une brève période de temps. Les clés API n'expirent pas et, par conséquent, toute violation vous obligera à communiquer avec notre équipe de soutien.
La clé API peut ne pas être visible, en fonction de votre environnement et des privilèges de votre compte. Seul le propriétaire d'un compte peut consulter une clé API.
Pour afficher votre clé API
- Dans la section Clé API de la page Clé API et application client, cliquez sur l'icône Afficher.
Par défaut, votre clé API est masquée.
Application client
Avant que les intégrateurs puissent faire des demandes via les API REST ou les fonctions SDK, OneSpan Sign exige que les utilisateurs enregistrent une application client ou fournissent une clé API sécurisée pour authentifier les appels API. OneSpan vous recommande d'utiliser une application client.
Pour enregistrer une application client
Vous pouvez authentifier les appels d'API REST à partir du système d'un utilisateur en fournissant à ce dernier un jeton d'API sécurisé mais de courte durée (par exemple, 30 minutes) qui peut être utilisé pour l'authentification. Cette fonctionnalité est appelée Applications clients. Pour l'activer, vous devez communiquer avec notre équipe de soutien. Une fois cette fonctionnalité activée, les intégrateurs tiers pourront se connecter à l'API OneSpan Sign en utilisant ces jetons d'API.
Cette fonction n'est pas prise en charge pour les OneSpan Sign les connecteurs.
Pour créer une application client
- Cliquez sur Admin > Accès à l'API.
- Dans la page Paramètres d'authentification, utilisez le volet de gauche pour sélectionner Clé API et application client.
- Cliquez sur Ajouter. Une barre latérale Créer une application client apparaît.
- Saisissez un nom pour l'application client.
- Cliquez sur Créer.
- Copiez l'ID client et les codes secrets qui apparaissent
- Conservez l'ID client et les codes secrets dans un endroit sûr.
- Cliquez sur Terminé.
Le secret n'apparaîtra plus une fois que vous aurez cliqué sur Terminé. Pour vos dossiers, veuillez copier ce secret dans un endroit sûr. L'ID et le secret du client sont utilisés pour récupérer le jeton temporaire de l'API.
Ensuite, il y a l'URL_API. Si vous utilisez un compte Sandbox , l'URL correcte est déjà en place. Si vous utilisez un compte de production, trouvez l'URL correspondante dans ce guide.
Comment créer un paquet
La ligne de code suivante crée un client OneSpan Sign en utilisant les informations d'identification des applications clientes du compte OneSpan Sign ou la clé API et l'URL API appropriée que vous avez définie ci-dessus.
EslClient eslClient = new EslClient(API_KEY, API_URL);

//Alternatively
EslClient eslClient = new EslClient(ApiTokenConfig.newBuilder()
		.clientAppId(CLIENT_APP_ID)
		.clientAppSecret(CLIENT_APP_SECRET)
		.baseUrl(BASE_API_URL)
		.tokenType(TokenType.OWNER)
		.build(),
		BASE_API_URL + "/api", false, null, new Dictionary<string,string>());
Le bloc de code suivant est celui où vous créez réellement le paquet de documents. Dans ce bloc, vous donnez un nom à votre paquet.
DocumentPackage documentPackage = newPackageNamed("Test Package Java SDK")
Ensuite, vous allez ajouter deux signataires au paquet. L'un étant vous-même et l'autre étant la personne à qui vous enverrez le paquet. Dans ce bloc, remplacez les adresses électroniques et les noms (et éventuellement l'entreprise et les titres) par les informations de votre test. Définissez le Custom Id dans le SDK pour mieux identifier votre signataire.
.withSigner(newSignerWithEmail("[email protected]")
		.withCustomId("Signer")                           //optional
		.withFirstName("SignerFirstName")
		.withLastName("SignerLastName")
		.withCompany("ABC Company")                       //optional
		.withTitle("Applicant"))                          //optional
.withSigner(newSignerWithEmail("[email protected]")
		.withFirstName("YourFirstName")
		.withLastName("YourLastName"))
Maintenant, vous ajoutez le document que vous voulez faire signer et placez les blocs de signature pour vos signataires. Encore une fois, n'oubliez pas de remplacer les valeurs de l'échantillon dans ce bloc par les informations de votre test. En option, le réglage de Document and Signature Ids vous aidera à mieux localiser vos signatures.
.withDocument(newDocumentWithName("sampleAgreement")
	.withId("document1")                              //optional
	.fromFile("your_file_path")
	.withSignature(signatureFor("[email protected]")
		.withId(new SignatureId("signature1"))    //optional
		.onPage(0)
		.atPosition(175, 165))
	.withSignature(signatureFor("[email protected]")
		.onPage(0)
		.atPosition(550, 165)))
Enfin, vous construisez votre paquet en utilisant le code suivant :
.build();
Maintenant que le paquet de documents est prêt, accédez à votre client OneSpan Sign, créez votre paquet et envoyez-le aux signataires. Pour ce faire, utilisez le code suivant :
// Issue the request to the OneSpan Sign server to create the DocumentPackage
PackageId packageId = eslClient.createPackageOneStep(documentPackage);

// Send the package to be signed by the participants
eslClient.sendPackage(packageId);
Résultats
Votre classe Java étant terminée, vous pouvez aller de l'avant et exécuter votre application simple. Il y a plusieurs façons de le faire à partir d'Eclipse :
- Dans la barre d'outils, sélectionnez le bouton Exécuter.
- Dans la barre de menu, sélectionnez Exécuter > Exécuter
- Dans l'explorateur de paquet, cliquez avec le bouton droit de la souris sur votre classe Java et sélectionnez Exécuter sous > Application Java.
Si vous consultez la boîte de réception de votre compte OneSpan Sign Sandbox, vous verrez que le paquet a été créé et qu'il attend les signatures.
Pour télécharger l'exemple complet de code, consultez notre site Partage de code.
Cette rubrique vous guidera dans le processus de création d'un paquet à l'aide du SDK OneSpan Sign.NET. Dans cette rubrique, vous apprendrez à :
-
Télécharger .NET SDK et Microsoft Visual Studio
- Création et configuration d'un projet C#
- Création et envoi d'un paquet de documents
Préalables
Pour continuer, vous devez avoir les éléments suivants :
- OneSpan Sign's .NET SDK: Pour télécharger la version la plus récente de la trousse SDK .NET de OneSpan Sign, consultez la rubrique Pour commencer avec les SDK.
- Microsoft Visual Studio: Ce sujet utilise Microsoft Visual Studio. Vous pouvez utiliser autre chose, mais tout dans ce guide sera décrit en utilisant Visual Studio. Pour télécharger Microsoft Visual Studio, consultez la communauté Visual Studio. Assurez-vous de sélectionner le développement de bureau .NET lors de l'installation.
Comment créer un projet C# dans Visual Studio
Avant de créer et d'envoyer un paquet, vous devez créer un projet Microsoft Visual Studio.
Pour créer et configurer votre projet C#
- Lancez Microsoft Visual Studio.
- Cliquez sur Créer un nouveau projet.
- Sélectionnez un projet vierge et nommez-le comme vous le souhaitez. Une fois terminé, vous verrez votre projet dans l'Explorateur de solutions.
- Cliquez sur Outils > NuGet Package Manager > Console Package Manager.
- Saisissez la commande suivante, où <version_number> est le numéro de version du OneSpan Sign's .NET SDK que vous avez téléchargé précédemment.
Install-Package OneSpanSign.Sdk -Version <version_number>
Vous verrez maintenant ce fichier dans votre projet dans l'Explorateur de solutions.
Le code
Dans cette section, le code sera décomposé section par section. Vous pouvez télécharger l'exemple complet de code à partir du partage de code de la communauté des développeurs, ici.
Comment se connecter
Les premières lignes de code définissent les bibliothèques que vous allez utiliser.
using OneSpanSign.Sdk;
using OneSpanSign.Sdk.Builder;
using System;
using System.IO;
Les lignes de code suivantes définissent vos informations de connexion pour OneSpan Sign.
private static String API_URL = "https://sandbox.esignlive.com/api";    // Use https://apps.esignlive.com/api For Production
private static String API_KEY = "YOUR_API_KEY";

//Alternatively
private static String CLIENT_APP_ID = "your_client_id";
private static String CLIENT_APP_SECRET = "your_client_secret";
private static String BASE_API_URL = "https://sandbox.esignlive.com";    // Use https://apps.esignlive.com For Production
private static String API_URL = BASE_API_URL + "/api";
Clés API
Bien que les clés API puissent être utilisées avec OneSpan Sign, nous vous recommandons d'utiliser plutôt une application client. Les applications clients sont plus flexibles et contribuent à réduire le nombre de failles de sécurité potentielles.
Par rapport aux clés AP, I'application client présente les avantages suivants :
-
Avec les applications client, l'accès peut être créé, renouvelé ou révoqué selon les besoins. Les clés API sont fixes, et donc si vous voulez faire des changements d'accès, vous devrez communiquer avec notre équipe de soutien.
-
Plusieurs applications client peuvent être utilisées si vous avez configuré plusieurs intégrations. Cela permet de limiter la portée de toute attaque frauduleuse sur votre système. À l'inverse, une seule clé API est fournie pour toutes les intégrations.
-
Les applications clientes utilisent des jetons temporaires pour permettre l'accès à l'API, qui ne sont disponibles que pour une brève période de temps. Les clés API n'expirent pas et, par conséquent, toute violation vous obligera à communiquer avec notre équipe de soutien.
La clé API peut ne pas être visible, en fonction de votre environnement et des privilèges de votre compte. Seul le propriétaire d'un compte peut consulter une clé API.
Pour afficher votre clé API
- Dans la section Clé API de la page Clé API et application client, cliquez sur l'icône Afficher.
Par défaut, votre clé API est masquée.
Application client
Avant que les intégrateurs puissent faire des demandes via les API REST ou les fonctions SDK, OneSpan Sign exige que les utilisateurs enregistrent une application client ou fournissent une clé API sécurisée pour authentifier les appels API. OneSpan vous recommande d'utiliser une application client.
Pour enregistrer une application client
Vous pouvez authentifier les appels d'API REST à partir du système d'un utilisateur en fournissant à ce dernier un jeton d'API sécurisé mais de courte durée (par exemple, 30 minutes) qui peut être utilisé pour l'authentification. Cette fonctionnalité est appelée Applications clients. Pour l'activer, vous devez communiquer avec notre équipe de soutien. Une fois cette fonctionnalité activée, les intégrateurs tiers pourront se connecter à l'API OneSpan Sign en utilisant ces jetons d'API.
Cette fonction n'est pas prise en charge pour les OneSpan Sign les connecteurs.
Pour créer une application client
- Cliquez sur Admin > Accès à l'API.
- Dans la page Paramètres d'authentification, utilisez le volet de gauche pour sélectionner Clé API et application client.
- Cliquez sur Ajouter. Une barre latérale Créer une application client apparaît.
- Saisissez un nom pour l'application client.
- Cliquez sur Créer.
- Copiez l'ID client et les codes secrets qui apparaissent
- Conservez l'ID client et les codes secrets dans un endroit sûr.
- Cliquez sur Terminé.
Le secret n'apparaîtra plus une fois que vous aurez cliqué sur Terminé. Pour vos dossiers, veuillez copier ce secret dans un endroit sûr. L'ID et le secret du client sont utilisés pour récupérer le jeton temporaire de l'API.
Ensuite, il y a l'URL_API. Si vous utilisez un compte Sandbox , l'URL correcte est déjà en place. Si vous utilisez un compte de Production , vous devez utiliser l'URL commentée.
OssClient ossClient = new OssClient(API_KEY, API_URL);

//Alternatively
OssClient ossClient = new OssClient(new ApiTokenConfig {
	ClientAppId = CLIENT_APP_ID,
	ClientAppSecret = CLIENT_APP_SECRET,
	BaseUrl = BASE_API_URL,
	TokenType = ApiTokenType.OWNER
},
BASE_API_URL + "/api", false, null, new Dictionary<string, string>());
Dans la ligne suivante, vous créez un FileStream et lisez le fichier que vous voulez téléverser avec votre paquet. Assurez-vous de remplacer le texte de remplacement PATH_TO_YOUR_PDF par l'emplacement de votre fichier PDF.
FileStream fs = File.OpenRead("PATH_TO_YOUR_PDF");
Le bloc de code suivant est celui où vous créez réellement le paquet de documents. Dans ce bloc, vous donnez un nom à votre paquet.
DocumentPackage superDuperPackage = PackageBuilder
	.NewPackageNamed("Test Package .NET")
	.WithSettings(DocumentPackageSettingsBuilder.NewDocumentPackageSettings())
Ensuite, les signataires sont ajoutés au paquet.
.WithSigner(SignerBuilder.NewSignerWithEmail("[email protected]")
			.WithFirstName("Signer First Name")
			.WithLastName("Signer Last Name")
			.WithCustomId("Signer"))
.WithSigner(SignerBuilder.NewSignerWithEmail("[email protected]")
			.WithFirstName("Your First Name")
			.WithLastName("Your Last Name"))
Ensuite, le document est ajouté, y compris les cases de signature pour vos signataires.
.WithDocument(DocumentBuilder.NewDocumentNamed("sampleAgreement")
			.FromStream(fs, DocumentType.PDF)
			.WithSignature(SignatureBuilder
				.SignatureFor("[email protected]")
				.OnPage(0)
				.AtPosition(175, 165))
			.WithSignature(SignatureBuilder
				.SignatureFor("[email protected]")
				.OnPage(0)
				.AtPosition(550, 165))
			)
Le paquet étant complètement défini, vous pouvez maintenant le construire et l'envoyer.
.Build();

PackageId packageId = ossClient.CreatePackageOneStep(superDuperPackage);
ossClient.SendPackage(packageId);
Résultats
Exécutez ce code en sélectionnant Commencer dans la barre d'outils. Après avoir fait cela, vous devriez pouvoir vous connecter au compte OneSpan Sign et voir le paquet que vous venez de créer.
Pour télécharger l'exemple complet de code, consultez notre site Partage de code.
Cette rubrique vous guidera dans le processus de création et d'envoi d'une transaction à l'aide de l'API REST Java OneSpan Sign.
Dans cet exemple, des données utiles minimales sont utilisées, où deux signataires, un document et une signature par signataire sont ajoutés au paquet.
Pour une description complète de chaque champ et des autres attributs facultatifs, voir Tableau des données utiles de la demande. Vous pouvez également vous référer à l'API interactive pour obtenir plus d'informations.
Requête HTTP
POST /api/packages
En-têtes HTTP
				Authorization: Basic api_key / Bearer access_token
				Accept: application/json
			Content-Type: multipart/form-data
Données utiles de la demande
------WebKitFormBoundary1bNO60n7FqP5WO4t
Content-Disposition: form-data; name="file"; filename="testDocumentExtraction.pdf"
Content-Type: application/pdf
%PDF-1.5
%µµµµ
1 0 obj
<>>>
endobj....
------WebKitFormBoundary1bNO60n7FqP5WO4t
Content-Disposition: form-data; name="payload"
{
	"roles":[
		{
			"id":"Role1",
			"signers":[
				{
					"email":"[email protected]",
					"firstName":"1.firstname",
					"lastName":"1.lastname",
					"company":"OneSpan Sign"
				}
			]
		},
		{
			"id":"Role2",
			"signers":[
				{
					"email":"[email protected]",
					"firstName":"2.firstname",
					"lastName":"2.lastname",
					"company":"OneSpan Sign"
			}
		]
	}
],

"documents":[
	{
		"approvals":[
			{
				"role":"Role1",
				"fields":[
					{
						"page":0,
						"top":100,
						"subtype":"FULLNAME",
						"height":50,
						"left":100,
						"width":200,
						"type":"SIGNATURE"
					}
				]
			},
		{
				"role":"Role2",
				"fields":[
					{
						"page":0,
						"top":300,
						"subtype":"FULLNAME",
						"height":50,
						"left":100,
						"width":200,
						"type":"SIGNATURE"
					}
				]
			}

		],
		"name":"Test Document"
	}
],
"name":"Example Package",
"type":"PACKAGE",
"language":"en",
"emailMessage":"",
"description":"New Package",
"autocomplete":true,
"status":"SENT"

}
------WebKitFormBoundary1bNO60n7FqP5WO4t--
Données utiles de la réponse
{
"id": "9sKhW-h-qS9m6Ho3zRv3n2a-rkI="
}
Préalables
Pour effectuer ces procédures, vous aurez besoin des éléments suivants :
- Eclipse IDE pour les développeurs Java EE : Vous pouvez le télécharger ici.
Comment créer et configurer un projet Java
Pour commencer, vous devez créer et configurer un projet Java.
Pour créer et configurer un projet Java
- Ouvrez Eclipse en exécutant eclipse.exe à partir du dossier racine d'Eclipse. Une fois démarré, ouvrez la perspective Java. Vous pouvez le faire en allant sur Windows > Perspective ouverte > Autre > Java.
- Une fois la perspective Java ouverte, vous devriez voir la vue de l'Explorateur de paquets sur le côté gauche de l'écran. Cliquez avec le bouton droit de la souris dans cette fenêtre et allez à Nouveau > Porjet Java. La fenêtre suivante apparaît :
- Donnez à votre projet le nom que vous souhaitez. Par exemple, CreateAndSendPackage.
- Cliquez sur Terminer. Votre nouveau projet a maintenant été ajouté à la vue de votre Package Explorer.
- Développez le paquet en cliquant sur la flèche à gauche, cliquez avec le bouton droit de la souris sur le dossier src et allez à Nouveau > Paquet. Saisissez un nom de paquet (par exemple, com.esignlive.exemple). Cliquez sur Terminer.
- Créez un nouveau fichier Java :
- Cliquez avec le bouton droit de la souris sur votre nouveau paquet dans l'Explorateur de paquets et allez sur Nouveau > Fichier.
- Saisissez un nom pour le fichier (par exemple, SimpleCreateAndSendPackage.java).
- Cliquez sur Terminer.
- Ajoutez à votre projet un exemple de fichier PDF que vous souhaitez faire signer. Vous pouvez utiliser un simple copier-coller de votre système de fichiers vers votre projet dans l'explorateur de paquet.
Votre projet devrait maintenant ressembler à ceci :
Le code
Dans cette section, le code sera décomposé section par section. Vous pouvez télécharger l'exemple complet de code à partir du partage de code de la communauté des développeurs, ici.
Comment se connecter
Les lignes de code suivantes définissent vos informations de connexion pour OneSpan Sign.
string apiKey = "YOUR_API_KEY";
string url = "https://sandbox.esignlive.com/api/packages";
Clés API
Bien que les clés API puissent être utilisées avec OneSpan Sign, nous vous recommandons d'utiliser plutôt une application client. Les applications clients sont plus flexibles et contribuent à réduire le nombre de failles de sécurité potentielles.
Par rapport aux clés AP, I'application client présente les avantages suivants :
-
Avec les applications client, l'accès peut être créé, renouvelé ou révoqué selon les besoins. Les clés API sont fixes, et donc si vous voulez faire des changements d'accès, vous devrez communiquer avec notre équipe de soutien.
-
Plusieurs applications client peuvent être utilisées si vous avez configuré plusieurs intégrations. Cela permet de limiter la portée de toute attaque frauduleuse sur votre système. À l'inverse, une seule clé API est fournie pour toutes les intégrations.
-
Les applications clientes utilisent des jetons temporaires pour permettre l'accès à l'API, qui ne sont disponibles que pour une brève période de temps. Les clés API n'expirent pas et, par conséquent, toute violation vous obligera à communiquer avec notre équipe de soutien.
La clé API peut ne pas être visible, en fonction de votre environnement et des privilèges de votre compte. Seul le propriétaire d'un compte peut consulter une clé API.
Pour afficher votre clé API
- Dans la section Clé API de la page Clé API et application client, cliquez sur l'icône Afficher.
Par défaut, votre clé API est masquée.
Application client
Avant que les intégrateurs puissent faire des demandes via les API REST ou les fonctions SDK, OneSpan Sign exige que les utilisateurs enregistrent une application client ou fournissent une clé API sécurisée pour authentifier les appels API. OneSpan vous recommande d'utiliser une application client.
Pour enregistrer une application client
Vous pouvez authentifier les appels d'API REST à partir du système d'un utilisateur en fournissant à ce dernier un jeton d'API sécurisé mais de courte durée (par exemple, 30 minutes) qui peut être utilisé pour l'authentification. Cette fonctionnalité est appelée Applications clients. Pour l'activer, vous devez communiquer avec notre équipe de soutien. Une fois cette fonctionnalité activée, les intégrateurs tiers pourront se connecter à l'API OneSpan Sign en utilisant ces jetons d'API.
Cette fonction n'est pas prise en charge pour les OneSpan Sign les connecteurs.
Pour créer une application client
- Cliquez sur Admin > Accès à l'API.
- Dans la page Paramètres d'authentification, utilisez le volet de gauche pour sélectionner Clé API et application client.
- Cliquez sur Ajouter. Une barre latérale Créer une application client apparaît.
- Saisissez un nom pour l'application client.
- Cliquez sur Créer.
- Copiez l'ID client et les codes secrets qui apparaissent
- Conservez l'ID client et les codes secrets dans un endroit sûr.
- Cliquez sur Terminé.
Le secret n'apparaîtra plus une fois que vous aurez cliqué sur Terminé. Pour vos dossiers, veuillez copier ce secret dans un endroit sûr. L'ID et le secret du client sont utilisés pour récupérer le jeton temporaire de l'API.
Comment créer un paquet
Ensuite, vous verrez que plusieurs variables utilisées dans la création de l'appel sont définies POST comme la valeur limite du formulaire et le fichier que vous prévoyez de télécharger.
String charset = "UTF-8";
File uploadFile1 = new File("C:/Eclipse/workspace_442/CreateAndSendPackage/sampleAgreement.pdf");
String boundary = Long.toHexString(System.currentTimeMillis()); // Generate a random value for the form boundary
String CRLF = "\r\n"; // Line separator used in multipart/form-data
La ligne suivante est la chaîne JSON qui définit votre paquet. En règle générale, vous construirez probablement votre chaîne JSON de manière dynamique plutôt que d'avoir une chaîne statique géante, comme celle-ci. Cependant, cet exemple peut être utilisé pour fournir une bonne représentation de la structure du JSON dont vous aurez besoin pour créer votre paquet correctement. Notez que de nombreuses propriétés sont laissées vides dans la chaîne car elles ne sont pas nécessaires à la création du paquet. Ils sont là pour vous donner une liste des options disponibles et la façon dont elles sont transmises dans le JSON.
La première partie de la chaîne JSON du paquet est l'objet Rôles. Vous pouvez y définir des éléments tels que l'identifiant, l'entreprise, le prénom, le nom, l'adresse courriel et le nom pour personnaliser les rôles de vos signataires. Parmi les autres paramètres importants, citons le courriel, le titre et la livraison.
string jsonString = "{";
		jsonString += "\"roles\":[{\"id\":\"Role1\",\"signers\":[{\"email\":\"[email protected]\",\"firstName\":\"1.firstname\",\"lastName\":\"1.lastname\",\"company\":\"OneSpan Sign\"}]},{\"id\":\"Role2\",\"signers\":[{\"email\":\"[email protected]\",\"firstName\":\"2.firstname\",\"lastName\":\"2.lastname\",\"company\":\"OneSpan Sign\"}]}],";
La section suivante de la chaîne JSON du paquet est l'objet Documents. Vous y définissez des éléments tels que le nom et les approbations (blocs de signature). Dans les approbations, les principaux éléments à définir sont les paramètres type, subtype, role, page et les location. Celles-ci définiront les signatures requises dans chaque document.
Enfin, les derniers paramètres de la chaîne JSON du paquet que vous voudrez noter sont les suivants name, type, status, emailMessage et autoComplete. Ensuite, vous allez définir la connexion sur laquelle vous allez envoyer votre requête. La première ligne ouvre la connexion à l'URL de la demande. Remarquez que le reste de l'URL pour la demande particulière qui est faite est ajouté à l'URL de base, ici. Le reste configure les propriétés de la demande et crée les fichiers OutputStream et PrintWriter pour communiquer les données utiles de la demande à OneSpan Sign.
HttpsURLConnection connection = null;
URL url = new URL(requestURL);
connection = (HttpsURLConnection) url.openConnection();
connection.setDoOutput(true);
connection.setDoInput(true);
connection.setRequestMethod("POST");
connection.setRequestProperty("Content-Type", "multipart/form-data; boundary=" + boundary);
connection.setRequestProperty("Authorization", "Basic " + apiKey);
connection.setRequestProperty("Accept", "application/json; esl-api-version=11.0");
OutputStream output = connection.getOutputStream();
PrintWriter writer = new PrintWriter(new OutputStreamWriter(output, charset), true);
À l'intérieur du bloc try, le formulaire multipart réel est créé. Dans le code ci-dessous, vous pouvez voir comment la limite, les descripteurs de la partie du formulaire et le contenu sont ajoutés dans chaque partie du formulaire.
// Add pdf file.
writer.append("--" + boundary).append(CRLF);
writer.append("Content-Disposition: form-data; name=\"file\"; filename=\"" + uploadFile1.getName() + "\"").append(CRLF);
writer.append("Content-Type: " + URLConnection.guessContentTypeFromName(uploadFile1.getName())).append(CRLF);
writer.append(CRLF).flush();
Files.copy(uploadFile1.toPath(), output);
output.flush();
writer.append(CRLF).flush();

// add json payload
writer.append("--" + boundary).append(CRLF);
writer.append("Content-Disposition: form-data; name=\"payload\"").append(CRLF);
writer.append("Content-Type: application/json; charset=" + charset).append(CRLF);
writer.append(CRLF).append(jsonContent).append(CRLF).flush();

// End of multipart/form-data.
writer.append("--" + boundary + "--").append(CRLF).flush();
Enfin, vous ferez l'appel POST en transmettant votre formulaire à OneSpan Sign, qui crée votre paquet de documents. Le code de réponse et le contenu de la réponse sont imprimés dans la console.
int responseCode = ((HttpURLConnection) connection).getResponseCode();
System.out.println(responseCode);
if (responseCode == 200) {
	// get and write out response
	BufferedReader in = new BufferedReader(new InputStreamReader(connection.getInputStream()));
	String inputLine;
	StringBuffer response = new StringBuffer();
	while ((inputLine = in.readLine()) != null) {
	response.append(inputLine);
	}
	in.close();
	/ print result
	System.out.println(response.toString());
} else {
	// get and write out response
	BufferedReader in = new BufferedReader(new InputStreamReader(connection.getErrorStream()));
	String inputLine;
	StringBuffer response = new StringBuffer();
	while ((inputLine = in.readLine()) != null) {
	response.append(inputLine);
	}
	in.close();
	// print result
	System.out.println(response.toString());
}
Résultats
Si tout est correct dans votre appel REST, vous devriez obtenir un ID de paquet en réponse :
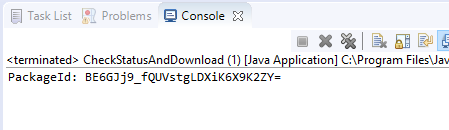
Si vous vous connectez à votre compte OneSpan Sign, vous pouvez voir que le paquet a été créé comme défini dans votre demande.
Tableau des données utiles de la demande
| Propriété | Type | Modifiable | Requis | Par défaut | Exemples de valeurs | Référence |
|---|---|---|---|---|---|---|
| rôles | Gestion des signataires | |||||
| id | chaîne de caractères | Oui | Non | s.o. | Signataire1 | |
| nom | chaîne de caractères | Oui | Non | s.o. | Signataire1 | |
| MessageCourriel | gamme | Oui | Non | s.o. | vérifier la référence | Message courriel |
| attribuer de nouveau | booléen | Oui | Non | 0 | vrai/faux | Changement de signataire |
| attachmentRequirements | gamme | Oui | Non | s.o. | vérifier la référence | Exigences relatives aux pièces jointes |
| index | chaîne de caractères | Oui | Non | 0 | 0/1/2/3 | Flux de travail du signataire |
| type | chaîne de caractères | Oui | Non | SIGNER | SIGNATAIRE / EXPÉDITEUR | |
| signataires | ||||||
| id | chaîne de caractères | Oui | Non | s.o. | Signataire1 | |
| courriel | chaîne de caractères | Oui | Oui | s.o. | [email protected] | |
| Prénom | chaîne de caractères | Oui | Oui | s.o. | Patty | |
| Nom de famille | chaîne de caractères | Oui | Oui | s.o. | Galant | |
| entreprise | chaîne de caractères | Oui | Non | s.o. | Acme Inc. | |
| titre | chaîne de caractères | Oui | Non | nul | Directeur général | |
| groupe | gamme | Oui | Non | s.o. | vérifier la référence | Groupes |
| langue | chaîne de caractères | Oui | Non | s.o. | en/fr/es/… | Configurer la langue du paquet |
| signature | ||||||
| textuel | chaîne de caractères | Non | Non | nul | ||
| handdrawn | chaîne de caractères | Oui | Non | s.o. | AQAAAMkGIVM7tmRJzS2cANoDcyT0ASABAwA= | |
| livraison | gamme | Oui | Non | s.o. | vérifier la référence | Livrer des documents signés par courriel |
| authentificationBaséeConnaissances | gamme | Oui | Non | s.o. | vérifier la référence | Authentification du signataire |
| authentification | gamme | Oui | Non | s.o. | vérifier la référence | Authentification du signataire |
| documents | Gestion des documents | |||||
| description | chaîne de caractères | Oui | Non | s.o. | Description du document1 de test | |
| id | chaîne de caractères | Oui | Non | s.o. | document1 | |
| données | gamme | Oui | Non | s.o. | vérifier la référence | Attributs du document |
| approbations | Signatures | |||||
| rôle | chaîne de caractères | Oui | Oui | s.o. | Signataire1 | |
| id | chaîne de caractères | Oui | Non | s.o. | approbation1 | |
| en option | booléen | Oui | Non | 0 | vrai/faux | Signature facultative |
| enforceCaptureSignature | booléen | Oui | Non | 0 | vrai/faux | Appliquer la signature par capture |
| champs | gamme | Oui | Non | s.o. | vérifier la référence | Champs (voir aussi Ancres de texte) |
| nom | chaîne de caractères | Oui | Non | s.o. | document 1 | |
| extrait | booléen | Oui | Non | 0 | vrai/faux | Extraction de documents/ Balises de texte/ Extraction de positions |
| typesExtraction | gamme | Oui | Non | s.o. | ["TEXT_TAGS","ACROFIELDS"] | Extraction de documents/ Balises de texte |
| champs | gamme | Oui | Non | s.o. | vérifier la référence | Injection de champ |
| nom | chaîne de caractères | Oui | Non | s.o. | document1 | |
| paramètres | gamme | Oui | Non | s.o. | vérifier la référence | Personnalisation Signer Experience |
| expéditeur | Création d'un paquet au nom d'un autre utilisateur | |||||
| Nom de famille | chaîne de caractères | Oui | Non | s.o. | Smith | |
| Prénom | chaîne de caractères | Oui | Non | s.o. | Bob | |
| courriel | chaîne de caractères | Oui | Non | s.o. | [email protected](qui est un expéditeur sous votre compte principal) | |
| statut | chaîne de caractères | Oui | Non | ÉBAUCHE | ÉBAUCHE / ENVOYÉ / COMPLÉTÉ / ARCHIVÉ / DÉCLINÉ / REFUSÉ / EXPIRÉ | |
| nom | chaîne de caractères | Oui | Non | s.o. | Paquet créé à partir d'un modèle via l'API REST | |
| type | chaîne de caractères | Oui | Non | PACKAGE | PAQUET / MODÈLE / MISE EN PAGE | |
| description | chaîne de caractères | Oui | Non | s.o. | Paquet créé avec l'API REST OneSpan Sign | |
| langue | chaîne de caractères | Oui | Non | en | en / fr / es … | Configurer la langue du paquet |
| visibilité | chaîne de caractères | Oui | Non | COMPTE | COMPTE / EXPÉDITEUR | |
| ComplétionAuto | booléen | Oui | Non | 1 | vrai / faux | |
| données | gamme | Oui | Non | s.o. | vérifier la référence | Attribut de paquet |
| dû | chaîne de caractères | Oui | Non | nul | 26-08-17 | |
| notarié | booléen | Oui | Non | 0 | vrai/faux (vérifier la référence, à utiliser uniquement en cas de notarisation) | eNotary |
| IdRôleNotaire | chaîne de caractères | Oui | Non | s.o. | Signataire1 (vérifier de contrôle, à utiliser uniquement en cas de notarisation) | eNotary |
| MessageCourriel | chaîne de caractères | Oui | Non | s.o. | Ce message doit être remis à tous les signataires |
Pour télécharger l'exemple complet de code, consultez notre site Partage de code.
Cette rubrique vous guidera dans le processus de création et d'envoi d'une transaction à l'aide de .NET REST.
Dans cet exemple, des données utiles minimales sont utilisées, où deux signataires, un document et une signature par signataire sont ajoutés au paquet.
Pour une description complète de chaque champ et des autres attributs facultatifs, voir Tableau des données utiles de la demande. Vous pouvez également vous référer à l'API interactive pour obtenir plus d'informations.
Requête HTTP
POST /api/packages
En-têtes HTTP
				Authorization: Basic api_key / Bearer access_token
				Accept: application/json
			Content-Type: multipart/form-data
Données utiles de la demande
------WebKitFormBoundary1bNO60n7FqP5WO4t
Content-Disposition: form-data; name="file"; filename="testDocumentExtraction.pdf"
Content-Type: application/pdf
%PDF-1.5
%µµµµ
1 0 obj
<>>>
endobj....
------WebKitFormBoundary1bNO60n7FqP5WO4t
Content-Disposition: form-data; name="payload"
{
	"roles":[
		{
			"id":"Role1",
			"signers":[
				{
					"email":"[email protected]",
					"firstName":"1.firstname",
					"lastName":"1.lastname",
					"company":"OneSpan Sign"
				}
			]
		},
		{
			"id":"Role2",
			"signers":[
				{
					"email":"[email protected]",
					"firstName":"2.firstname",
					"lastName":"2.lastname",
					"company":"OneSpan Sign"
				}
			]
		}
	],
"documents":[
	{
		"approvals":[
			{
			"role":"Role1",
			"fields":[
				{
					"page":0,
					"top":100,
					"subtype":"FULLNAME",
					"height":50,
					"left":100,
					"width":200,
					"type":"SIGNATURE"
				}
			]
		},
				{
			"role":"Role2",
			"fields":[
				{
					"page":0,
					"top":300,
					"subtype":"FULLNAME",
					"height":50,
					"left":100,
					"width":200,
					"type":"SIGNATURE"
				}
			]
		}
],
"name":"Test Document"
	}
],
	"name":"Example Package",
	 "type":"PACKAGE",
	"language":"en",
	"emailMessage":"",
	"description":"New Package",
	"autocomplete":true,
	"status":"SENT"
}

------WebKitFormBoundary1bNO60n7FqP5WO4t--
Données utiles de la réponse
{
	"id": "9sKhW-h-qS9m6Ho3zRv3n2a-rkI="
}
Comment créer et configurer un projet .NET
Cette rubrique vous guidera dans le processus de vérification du statut d'une transaction et de téléchargement des documents à l'aide du SDK .NET de OneSpan Sign. Dans cette rubrique, vous apprendrez à :
-
Télécharger Microsoft Visual Studio
- Création et configuration d'un projet C#
- Création et envoi d'un paquet de documents
Préalables
Pour effectuer ces procédures, vous aurez besoin des éléments suivants :
- Microsoft Visual Studio: Ce sujet utilise Microsoft Visual Studio. Vous pouvez utiliser autre chose, mais tout dans ce guide sera décrit en utilisant Visual Studio. Pour télécharger Microsoft Visual Studio, consultez la communauté Visual Studio. Assurez-vous de sélectionner le développement de bureau .NET lors de l'installation.
Comment créer un projet C# dans Visual Studio
Avant de créer et d'envoyer un paquet, vous devez créer un projet Microsoft Visual Studio.
Pour créer et configurer votre projet C# dans Visual Studio
- Lancez Microsoft Visual Studio.
- Cliquez sur Créer un nouveau projet.
- Sélectionnez un projet vierge et nommez-le comme vous le souhaitez. Une fois terminé, vous verrez votre projet dans l'Explorateur de solutions.
Vous verrez maintenant ce fichier dans votre projet dans l'Explorateur de solutions.
Le code
Ce guide décompose le code section par section. Vous pouvez télécharger l'exemple complet de code à partir du site Partage de code.
Comment se connecter
Les lignes de code suivantes définissent vos informations de connexion pour OneSpan Sign.
string apiKey = "YOUR_API_KEY";
string url = "https://sandbox.esignlive.com/api";
Clés API
Bien que les clés API puissent être utilisées avec OneSpan Sign, nous vous recommandons d'utiliser plutôt une application client. Les applications clients sont plus flexibles et contribuent à réduire le nombre de failles de sécurité potentielles.
Par rapport aux clés AP, I'application client présente les avantages suivants :
-
Avec les applications client, l'accès peut être créé, renouvelé ou révoqué selon les besoins. Les clés API sont fixes, et donc si vous voulez faire des changements d'accès, vous devrez communiquer avec notre équipe de soutien.
-
Plusieurs applications client peuvent être utilisées si vous avez configuré plusieurs intégrations. Cela permet de limiter la portée de toute attaque frauduleuse sur votre système. À l'inverse, une seule clé API est fournie pour toutes les intégrations.
-
Les applications clientes utilisent des jetons temporaires pour permettre l'accès à l'API, qui ne sont disponibles que pour une brève période de temps. Les clés API n'expirent pas et, par conséquent, toute violation vous obligera à communiquer avec notre équipe de soutien.
La clé API peut ne pas être visible, en fonction de votre environnement et des privilèges de votre compte. Seul le propriétaire d'un compte peut consulter une clé API.
Pour afficher votre clé API
- Dans la section Clé API de la page Clé API et application client, cliquez sur l'icône Afficher.
Par défaut, votre clé API est masquée.
Application client
Avant que les intégrateurs puissent faire des demandes via les API REST ou les fonctions SDK, OneSpan Sign exige que les utilisateurs enregistrent une application client ou fournissent une clé API sécurisée pour authentifier les appels API. OneSpan vous recommande d'utiliser une application client.
Pour enregistrer une application client
Vous pouvez authentifier les appels d'API REST à partir du système d'un utilisateur en fournissant à ce dernier un jeton d'API sécurisé mais de courte durée (par exemple, 30 minutes) qui peut être utilisé pour l'authentification. Cette fonctionnalité est appelée Applications clients. Pour l'activer, vous devez communiquer avec notre équipe de soutien. Une fois cette fonctionnalité activée, les intégrateurs tiers pourront se connecter à l'API OneSpan Sign en utilisant ces jetons d'API.
Cette fonction n'est pas prise en charge pour les OneSpan Sign les connecteurs.
Pour créer une application client
- Cliquez sur Admin > Accès à l'API.
- Dans la page Paramètres d'authentification, utilisez le volet de gauche pour sélectionner Clé API et application client.
- Cliquez sur Ajouter. Une barre latérale Créer une application client apparaît.
- Saisissez un nom pour l'application client.
- Cliquez sur Créer.
- Copiez l'ID client et les codes secrets qui apparaissent
- Conservez l'ID client et les codes secrets dans un endroit sûr.
- Cliquez sur Terminé.
Le secret n'apparaîtra plus une fois que vous aurez cliqué sur Terminé. Pour vos dossiers, veuillez copier ce secret dans un endroit sûr. L'ID et le secret du client sont utilisés pour récupérer le jeton temporaire de l'API.
Ensuite, il y a l'URL_API. Si vous utilisez un compte Sandbox , l'URL correcte est déjà en place. Si vous utilisez un compte de Production , vous devez utiliser l'URL commentée.
Comment créer un paquet
La ligne suivante est la chaîne JSON qui définit votre paquet. En règle générale, vous construirez probablement votre chaîne JSON de manière dynamique plutôt que d'avoir une chaîne statique géante, comme celle-ci. Cela permet de donner une bonne représentation de la structure du JSON afin de créer votre paquet correctement. De nombreuses propriétés qui ne sont pas nécessaires à la création sont volontairement laissées vides dans la chaîne de caractères. Vous pouvez ainsi voir certaines des autres options disponibles et la façon dont elles sont transmises dans le JSON.
La première partie de la chaîne JSON du paquet est l'objet Rôles. Vous pouvez y définir des éléments tels que l'identifiant, l'entreprise, le prénom, le nom, l'adresse courriel et le nom pour personnaliser les rôles de vos signataires. Parmi les autres paramètres importants, citons le courriel, le titre et la livraison.
{
	"roles":[
		{
			"id":"Role1",
			"signers":[
				{
					"email":"[email protected]",
					"firstName":"1.firstname",
					"lastName":"1.lastname",
				"company":"OneSpan Sign"
				}
			]
		},
La section suivante de la chaîne JSON du paquet est l'objet Documents. Vous y définissez des éléments tels que le nom et les approbations (blocs de signature).
 "documents":[
	{
		"approvals":[
			{
				"role":"Role1",
				"fields":[
					{
						"page":0,
						"top":100,
						"subtype":"FULLNAME",
						"height":50,
						"left":100,
						"width":200,
						"type":"SIGNATURE"
				}
			]
		},
Dans les approbations, les principaux éléments à définir sont le type, le sous-type, le rôle, la page et les paramètres de localisation. Celles-ci définiront les signatures requises dans chaque document.
jsonString += "\"documents\":[{\"approvals\":[{\"role\":\"Role1\",\"fields\":[{\"page\":0,\"top\":100,\"subtype\":\"FULLNAME\",\"height\":50,\"left\":100,\"width\":200,\"type\":\"SIGNATURE\"}]},{\"role\":\"Role2\",\"fields\":[{\"page\":0,\"top\":300,\"subtype\":\"FULLNAME\",\"height\":50,\"left\":100,\"width\":200,\"type\":\"SIGNATURE\"}]}],\"name\":\"Test Document\"}],";
Enfin, les derniers paramètres de la chaîne JSON du paquet que vous voudrez noter sont le nom, le type, le statut, le message électronique et la fonction de complétion automatique. Dans cet exemple, le statut est réglé sur ENVOYÉ. Cela permettra d'envoyer le paquet et de notifier les signataires. Si vous voulez sauvegarder ce paquet en tant que ébauche, mettez la valeur ÉBAUCHE, à la place.
 jsonString += "\"name\":\"Example Package\",\"type\":\"PACKAGE\",\"language\":\"en\",\"emailMessage\":\"\",\"description\":\"New Package\",\"autocomplete\":true,\"status\":\"SENT\"";
jsonString += "}";
La ligne suivante du code prendra votre chaîne JSON et créera l'objet StringContent que vous passerez comme charge utile dans votre commande API REST.
StringContent jsonContent = new StringContent(jsonString, Encoding.UTF8, "application/json");
Les lignes suivantes liront votre fichier PDF et l'utiliseront pour créer votre objet ByteArrayContent de fichier pour votre appel REST. Veillez à remplacer le caractère générique par le chemin d'accès de votre fichier.
byte[] fileByteArray = File.ReadAllBytes("PATH_TO_YOUR_PDF.pdf");
			ByteArrayContent content = new ByteArrayContent(fileByteArray);
Les quelques lignes suivantes définissent l'en-tête de disposition du contenu de l'objet de contenu du fichier pdf.
content.Headers.ContentDisposition = new ContentDispositionHeaderValue("form-data");
content.Headers.ContentDisposition.Name = "\"file\"";
content.Headers.ContentDisposition.FileName = "\"NAME_OF_YOUR_FILE.pdf\"";
content.Headers.ContentType = new MediaTypeHeaderValue("application/pdf");
Le bloc de code suivant est l'endroit où vous créez votre formulaire multipartite et où vous ajoutez vos objets de contenu créés ci-dessus pour les transmettre avec votre appel REST. Veillez à définir le nom du fichier.
MultipartFormDataContent form = new MultipartFormDataContent();
form.Add(content, "\"file\"", "\"NAME_OF_YOUR_FILE.pdf\"");
form.Add(jsonContent, "\"payload\"");
Ensuite, vous allez créer le HttpClient que vous utiliserez pour effectuer votre requête POST et définir les valeurs appropriées de l'en-tête authorization et accept.
HttpClient myClient = new HttpClient();
myClient.DefaultRequestHeaders.Authorization = new AuthenticationHeaderValue("Basic", apiKey);
myClient.DefaultRequestHeaders.Add("Accept", "application/json");
Enfin, vous ferez l'appel POST, en transmettant votre formulaire à OneSpan Sign, créant ainsi votre paquet de documents. La ligne Débogage affichera le résultat sur la console de sortie de débogage.
var response = myClient.PostAsync(new Uri(url) + "/packages/", form).Result;
Debug.WriteLine(response.Content.ReadAsStringAsync().Result);
Résultats
Si votre appel REST est correct, vous devriez obtenir un identifiant de paquet dans votre réponse, comme celui-ci :
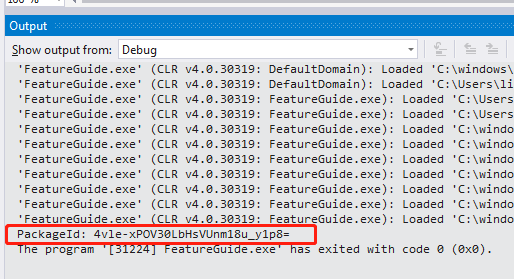
Si vous vous connectez à votre compte OneSpan Sign, vous pouvez voir que le paquet a été créé comme défini dans votre demande :
Tableau des données utiles de la demande
| Propriété | Type | Modifiable | Requis | Par défaut | Exemples de valeurs | Référence |
|---|---|---|---|---|---|---|
| rôles | Gestion des signataires | |||||
| id | chaîne de caractères | Oui | Non | s.o. | Signataire1 | |
| nom | chaîne de caractères | Oui | Non | s.o. | Signataire1 | |
| MessageCourriel | gamme | Oui | Non | s.o. | vérifier la référence | Message courriel |
| attribuer de nouveau | booléen | Oui | Non | 0 | vrai/faux | Changement de signataire |
| attachmentRequirements | gamme | Oui | Non | s.o. | vérifier la référence | Exigences relatives aux pièces jointes |
| index | chaîne de caractères | Oui | Non | 0 | 0/1/2/3 | Flux de travail du signataire |
| type | chaîne de caractères | Oui | Non | SIGNER | SIGNATAIRE / EXPÉDITEUR | |
| signataires | ||||||
| id | chaîne de caractères | Oui | Non | s.o. | Signataire1 | |
| courriel | chaîne de caractères | Oui | Oui | s.o. | [email protected] | |
| Prénom | chaîne de caractères | Oui | Oui | s.o. | Patty | |
| Nom de famille | chaîne de caractères | Oui | Oui | s.o. | Galant | |
| entreprise | chaîne de caractères | Oui | Non | s.o. | Acme Inc. | |
| titre | chaîne de caractères | Oui | Non | nul | Directeur général | |
| groupe | gamme | Oui | Non | s.o. | vérifier la référence | Groupes |
| langue | chaîne de caractères | Oui | Non | s.o. | en/fr/es/… | Configurer la langue du paquet |
| signature | ||||||
| textuel | chaîne de caractères | Non | Non | nul | ||
| handdrawn | chaîne de caractères | Oui | Non | s.o. | AQAAAMkGIVM7tmRJzS2cANoDcyT0ASABAwA= | |
| livraison | gamme | Oui | Non | s.o. | vérifier la référence | Livrer des documents signés par courriel |
| authentificationBaséeConnaissances | gamme | Oui | Non | s.o. | vérifier la référence | Authentification du signataire |
| authentification | gamme | Oui | Non | s.o. | vérifier la référence | Authentification du signataire |
| documents | Gestion des documents | |||||
| description | chaîne de caractères | Oui | Non | s.o. | Description du document1 de test | |
| id | chaîne de caractères | Oui | Non | s.o. | document1 | |
| données | gamme | Oui | Non | s.o. | vérifier la référence | Attributs du document |
| approbations | Signatures | |||||
| rôle | chaîne de caractères | Oui | Oui | s.o. | Signataire1 | |
| id | chaîne de caractères | Oui | Non | s.o. | approbation1 | |
| en option | booléen | Oui | Non | 0 | vrai/faux | Signature facultative |
| enforceCaptureSignature | booléen | Oui | Non | 0 | vrai/faux | Appliquer la signature par capture |
| champs | gamme | Oui | Non | s.o. | vérifier la référence | Champs (voir aussi Ancres de texte) |
| nom | chaîne de caractères | Oui | Non | s.o. | document 1 | |
| extrait | booléen | Oui | Non | 0 | vrai/faux | Extraction de documents/ Balises de texte/ Extraction de positions |
| typesExtraction | gamme | Oui | Non | s.o. | ["TEXT_TAGS","ACROFIELDS"] | Extraction de documents/ Balises de texte |
| champs | gamme | Oui | Non | s.o. | vérifier la référence | Injection de champ |
| nom | chaîne de caractères | Oui | Non | s.o. | document1 | |
| paramètres | gamme | Oui | Non | s.o. | vérifier la référence | Personnalisation Signer Experience |
| expéditeur | Création d'un paquet au nom d'un autre utilisateur | |||||
| Nom de famille | chaîne de caractères | Oui | Non | s.o. | Smith | |
| Prénom | chaîne de caractères | Oui | Non | s.o. | Bob | |
| courriel | chaîne de caractères | Oui | Non | s.o. | [email protected](qui est un expéditeur sous votre compte principal) | |
| statut | chaîne de caractères | Oui | Non | ÉBAUCHE | ÉBAUCHE / ENVOYÉ / COMPLÉTÉ / ARCHIVÉ / DÉCLINÉ / REFUSÉ / EXPIRÉ | |
| nom | chaîne de caractères | Oui | Non | s.o. | Paquet créé à partir d'un modèle via l'API REST | |
| type | chaîne de caractères | Oui | Non | PACKAGE | PAQUET / MODÈLE / MISE EN PAGE | |
| description | chaîne de caractères | Oui | Non | s.o. | Paquet créé avec l'API REST OneSpan Sign | |
| langue | chaîne de caractères | Oui | Non | en | en / fr / es … | Configurer la langue du paquet |
| visibilité | chaîne de caractères | Oui | Non | COMPTE | COMPTE / EXPÉDITEUR | |
| ComplétionAuto | booléen | Oui | Non | 1 | vrai / faux | |
| données | gamme | Oui | Non | s.o. | vérifier la référence | Attribut de paquet |
| dû | chaîne de caractères | Oui | Non | nul | 26-08-17 | |
| notarié | booléen | Oui | Non | 0 | vrai/faux (vérifier la référence, à utiliser uniquement en cas de notarisation) | eNotary |
| IdRôleNotaire | chaîne de caractères | Oui | Non | s.o. | Signataire1 (vérifier de contrôle, à utiliser uniquement en cas de notarisation) | eNotary |
| MessageCourriel | chaîne de caractères | Oui | Non | s.o. | Ce message doit être remis à tous les signataires |
Pour télécharger l'exemple complet de code, consultez notre site Partage de code.
Ce guide vous guidera dans le processus de création et d'envoi d'un paquet de documents (transaction dans la nouvelle interface utilisateur) avec le SDK APEX de OneSpan Sign, y compris le téléchargement du SDK APEX et la création d'une classe APEX.
Préalables
Pour effectuer ces procédures, vous aurez besoin des éléments suivants :
- APEX SDK: Avant de pouvoir utiliser le SDK APEX, vous devez le télécharger. Vous pouvez le faire en cliquant ici.
- Un compte de développeur Salesforce : Pour ce guide, vous aurez besoin d'un compte de développeur Salesforce. Vous pouvez vous inscrire gratuitement en cliquant ici.
Création et envoi d'un paquet
Maintenant que vous avez tous les éléments essentiels pour remplir le guide, vous pouvez aller créer et envoyer un paquet.
Installation et configuration du SDK
Le SDK peut être installé à l'aide du bouton Déployer vers Salesforce.
Configuration de vos paramètres de connexion
Après l'installation dans votre organisation Sandbox ou Developer , vous devrez configurer les paramètres de connexion en créant une entrée dans les paramètres personnalisés. Assurez-vous que vous avez une entrée avec le nom API OneSpan Sign Paramètres de connexion dans l'organisation et qu'elle comporte les champs suivants :
- Endpoint__c
- API_Key__c
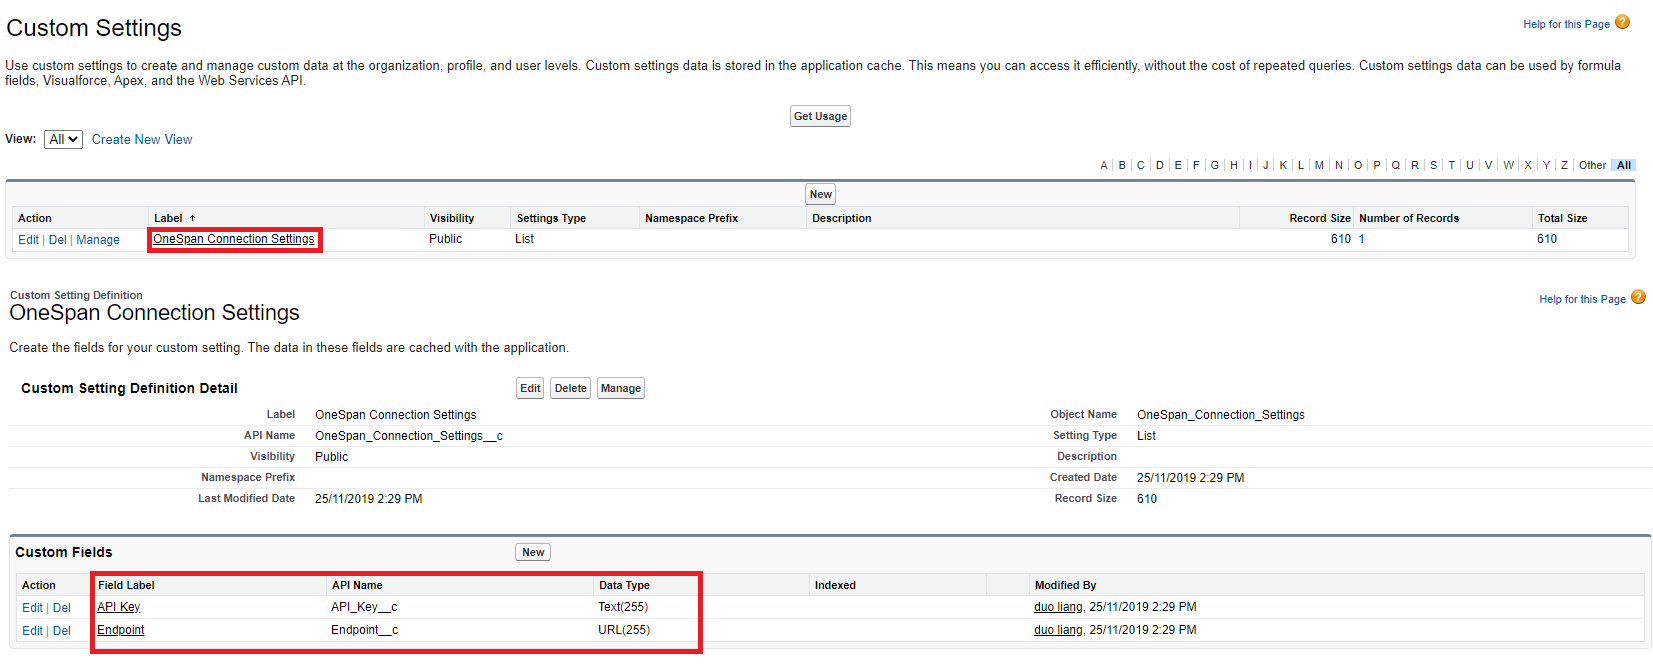
Une fois que vous avez mis en place le paramètre personnalisé, vous devez vous assurer que vous avez un enregistrement dont le nom est Principal. Si vous n'avez pas cet enregistrement dans les paramètres personnalisés, vous pouvez l'ajouter.
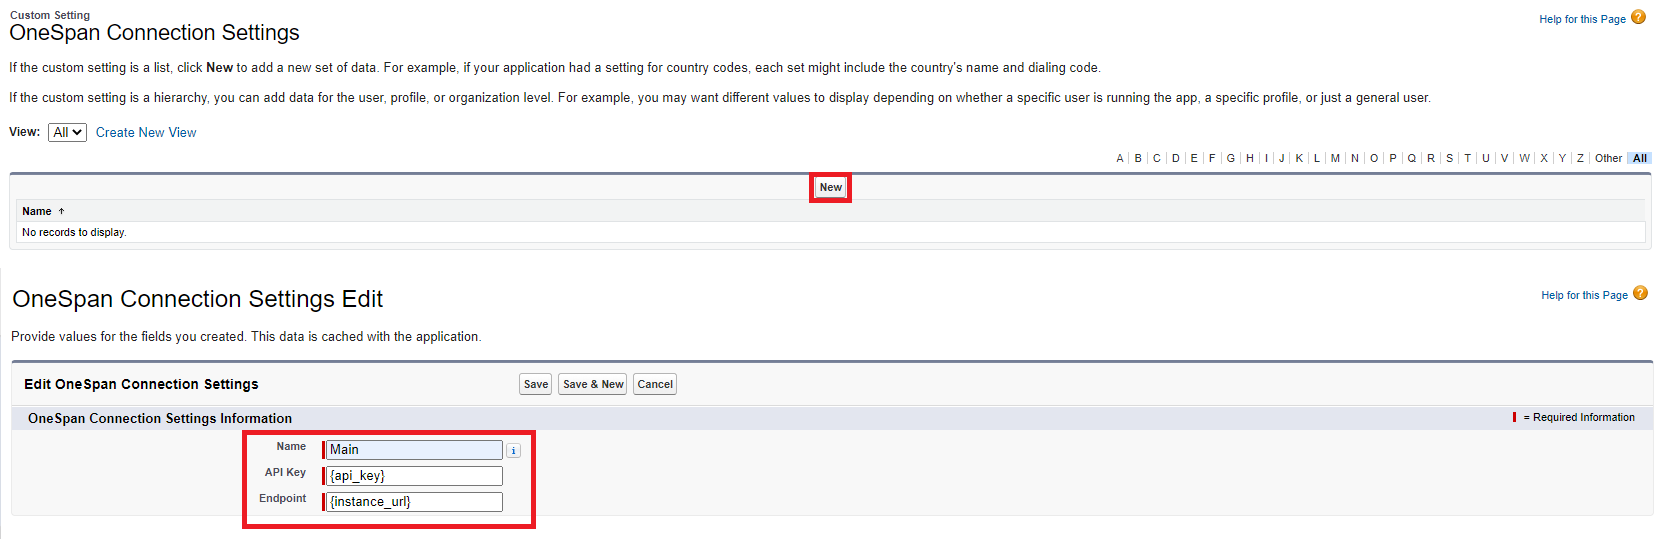
Pour ajouter un paramètre personnalisé
- Naviguez jusqu'à la page Détails du paramètre personnalisé
- Cliquez sur Gérer.
- Cliquez sur Nouveau et saisissez ce qui suit :
- Nom : Principal
- Clé Api : Votre clé API
- Point final : Saisissez le point final de votre instance en ajoutant /api à la fin. Par exemple, https://sandbox.esignlive.com/api
- Cliquez sur Enregistrer.
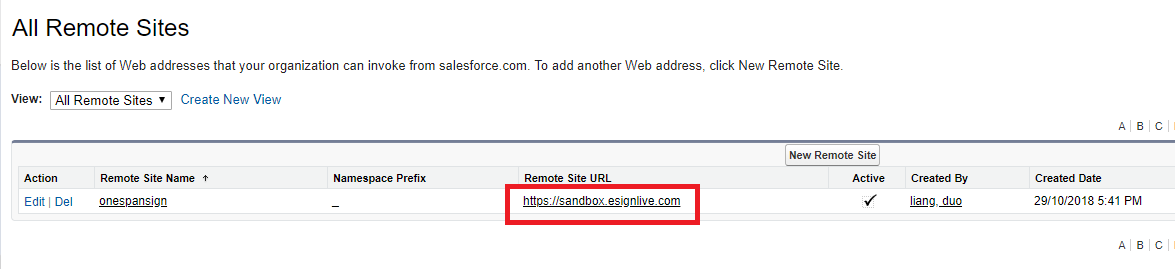
Ajout d'un point final de site distant
Pour que les appels soient acheminés depuis Salesforce, vous devez ajouter le point final du site distant. Il s'agit du même point final que celui utilisé lors de la création d'un paramètre personnalisé, mais sans le /api ajouté à la fin. Il faudra l'ajouter aux paramètres du site distant de l'organisation Salesforce à partir de laquelle vous avez l'intention d'utiliser le SDK. Une fois que vous avez ajouté le site distant, assurez-vous qu'il est marqué comme actif, comme indiqué ci-dessous.
Le code
Dans cette section, le code ci-dessous sera décomposé section par section.
public class OssCreatePackage{

	public void createPackage() {
	//Create OSS client
	OneSpanSDK sdk = new OneSpanSDK();

	//Create package
	OneSpanAPIObjects.Package_x pkg = new OneSpanAPIObjects.Package_x();
	pkg.name = 'Example Package Using APEX SDK1 - ' + Datetime.now().format();

	String packageId = sdk.createPackage(pkg);
	System.debug('PackageId: ' + packageId);

	//Add Signer
	String roleResponse = sdk.addRole('John', 'Smith', '[email protected]', packageId);

	//Add Document
	StaticResource sr = [SELECT Id, Body FROM StaticResource WHERE Name = 'testdoc1' LIMIT 1];
	Map<String,Blob> doc = new Map<String,Blob>();
	doc.put('Sample Document', sr.Body);

	OneSpanAPIObjects.Document document = new OneSpanAPIObjects.Document();
	document.name = 'Sample Contract';
	document.id = 'document1';

	sdk.createDocuments(packageId, document, doc);
	//Add Signature
	Map<String,Object> role = (Map<String,Object>)JSON.deserializeUntyped(roleResponse);
	String roleId = (String)(role.get('id'));

	OneSpanAPIObjects.Field field = new OneSpanAPIObjects.Field();
	field.left = 208;
	field.width = 200;
	field.height = 50;
	field.top = 518;
	field.page = 0;
	field.subtype = 'CAPTURE';
	field.type = 'SIGNATURE';

	List<OneSpanAPIObjects.Field> fields = new List<OneSpanAPIObjects.Field>();
	fields.add(field);

	OneSpanAPIObjects.Approval approval = new OneSpanAPIObjects.Approval();
	approval.fields = fields;
	approval.role = roleId;

	String signatureResponse = sdk.addSignature(packageId, 'document1', approval);

	//Send package
	pkg.status = OneSpanAPIObjects.PackageStatus.SENT;

	sdk.updatePackage(pkg, packageId);
	}
}
La première ligne crée votre client OneSpan Sign, en utilisant la clé API OneSpan Sign et l'URL API appropriée que vous avez définie dans Installation et configuration du SDK.
OneSpanSDK sdk = new OneSpanSDK();
Le bloc de code suivant est celui où vous créez le paquet de documents. Dans ce bloc, vous donnez un nom à votre paquet.
        OneSpanAPIObjects.Package_x pkg = new OneSpanAPIObjects.Package_x();
	pkg.name = 'Example Package Using APEX SDK1 - ' + Datetime.now().format();

	String packageId = sdk.createPackage(pkg);
	System.debug('PackageId: ' + packageId);
Ensuite, un signataire est ajouté au paquet. Il s'agit de la personne à qui vous enverrez le paquet pour qu'elle le signe. Dans ce bloc, vous remplacerez l'adresse courriel et le nom par les informations relatives à votre test.
String roleResponse = sdk.addRole('John', 'Smith', '[email protected]', packageId);
Maintenant, vous ajoutez votre document à signer et vous placez également le bloc de signature pour votre signataire. Encore une fois, n'oubliez pas de remplacer les valeurs de l'échantillon dans ce bloc par les informations de votre test.
//Add Document
	StaticResource sr = [SELECT Id, Body FROM StaticResource WHERE Name = 'testdoc1' LIMIT 1];
	Map<String,Blob> doc = new Map<String,Blob>();
	doc.put('Sample Document', sr.Body);

	OneSpanAPIObjects.Document document = new OneSpanAPIObjects.Document();
	document.name = 'Sample Contract';
	document.id = 'document1';

	sdk.createDocuments(packageId, document, doc);
	//Add Signature
	Map<String,Object> role = (Map<String,Object>)JSON.deserializeUntyped(roleResponse);
	String roleId = (String)(role.get('id'));

	OneSpanAPIObjects.Field field = new OneSpanAPIObjects.Field();
	field.left = 208;
	field.width = 200;
	field.height = 50;
	field.top = 518;
	field.page = 0;
	field.subtype = 'CAPTURE';
	field.type = 'SIGNATURE';

	List<OneSpanAPIObjects.Field> fields = new List<OneSpanAPIObjects.Field>();
	fields.add(field);

	OneSpanAPIObjects.Approval approval = new OneSpanAPIObjects.Approval();
	approval.fields = fields;
	approval.role = roleId;

	String signatureResponse = sdk.addSignature(packageId, 'document1', approval);
Dans cet exemple, nous avons ajouté un pdf aux ressources statiques de votre compte Salesforce Developer et l'avons lu comme un type de blob.

Maintenant que votre paquet est prêt, vous utilisez votre client OneSpan Sign pour l'envoyer au signataire.
        //Send package
	pkg.status = OneSpanAPIObjects.PackageStatus.SENT;

	sdk.updatePackage(pkg, packageId);
Résultats
Une fois votre classe APEX terminée, vous pouvez aller de l'avant et l'exécuter. Ouvrez votre console de développement et appuyez sur Ctrl + E pour lancer la fenêtre d'exécution anonyme. Tapez dans :
new OssCreatePackage.createPackage();
Et cliquez sur Exécuter.
Vous pouvez voir l'ID de votre paquet imprimé dans la console de débogage :
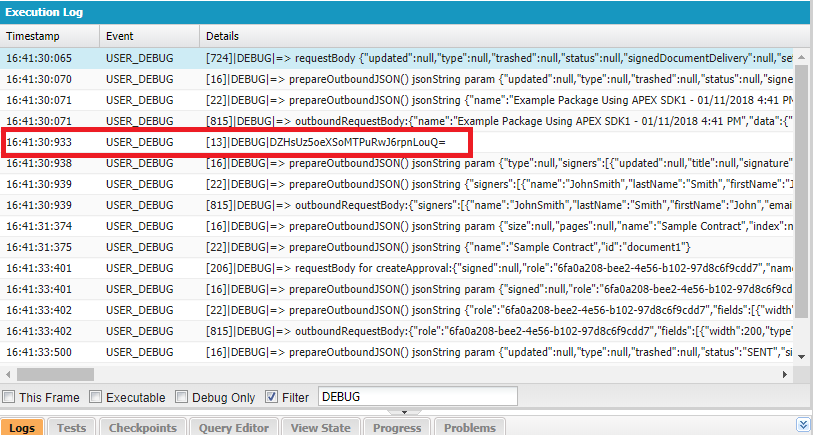
Si vous consultez la boîte de réception de votre compte OneSpan Sign Sandbox, vous verrez que le paquet a été créé et qu'il est en attente de signature.