A selected Convention's Text Tag can be used to insert a OneSpan Sign field at particular positions in multiple documents for multiple recipients.
The following types of Text Tags can be used for this purpose:
- Positioning Fields at Static Positions
- Positioning Fields via Text Anchors
- Positioning Fields via PDF Form Fields
Before continuing, be aware of the following:
Before creating any of the above Text Tag types, ensure that each Recipient Label has at least one Text Tag of type Signature (Full Name, Initials, Capture, or Mobile Capture). If a Recipient Label doesn’t have any Text Tags, the OneSpan Sign transaction created with that label could be corrupted.
When applying a Convention to a transaction, the OneSpan Sign Embedded Integration for Salesforce connector appears to scan all documents and look for all the tags defined in the convention for each of the documents. If it does not find a tag, a zero-dimensions field positioned at (0,0) may be created.

When a Text Tag inserts an object in a document, that object overwrites and thus obscures any preexisting content in that place.
You can use Text Tags with the Auto-Prepare feature to automatically prepare entire OneSpan Sign transactions for sending (see Auto-Preparing Transactions).
Positioning Fields at Static Positions
The following procedure illustrates how to use the Static Position Text Tag to insert OneSpan Sign fields at static positions (fixed X-Y coordinates) in multiple documents for multiple recipients.
To insert a OneSpan Sign field at a static position in multiple documents for multiple recipients:
- Create a new Convention, and save it.
- On the Convention Detail page, click New OneSpan Sign Recipient Label.
- Give the Recipient Label a name, and then click Save.
- Click New Text Tag to create a Text Tag in the Recipient Label.
- On the New Text Tag page, select Static Position from the drop-down list, and give the Text Tag a name.
- Type values for the Text Tag's Top Offset and Left Offset.
- Specify the Page number on which the Text Tag should appear.
- Specify the Width and Height of the OneSpan Sign field you want to create.
- In the OneSpan Sign Field Name section, choose the desired Type from the drop-down list. Then click Save.
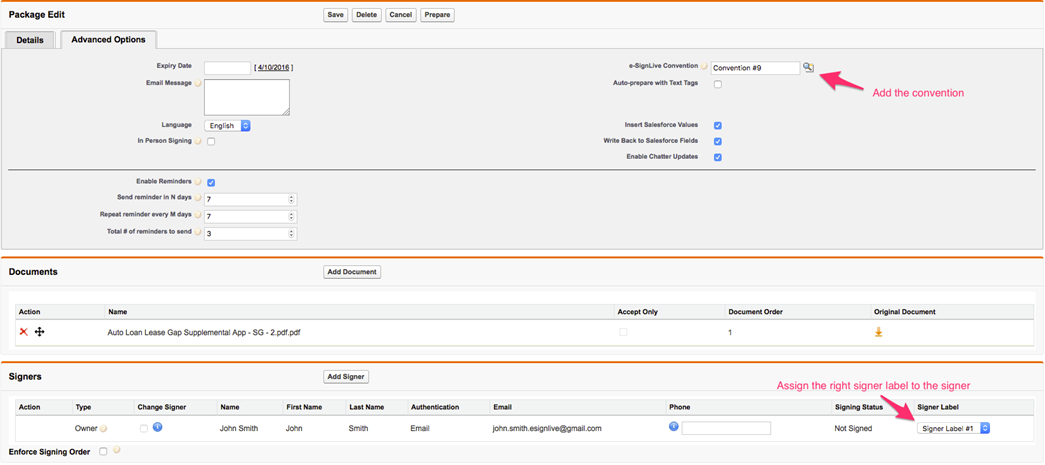
- Create a new OneSpan Sign transaction, and add your Convention to the transaction.
- On the OneSpan Sign Transaction page, click Advanced Options.
- In the OneSpan Sign Convention field, select Lookup.
- Choose the Convention created above, and add documents to the transaction.
- Add recipients to the transaction, and assign each recipient a Recipient Label from the drop-down list.
- Click Prepare to see the Designer. Verify that the field defined in the Convention has been inserted properly in each document for each relevant recipient. Once you're satisfied with the results, you can close the Designer, and then click Send to send the transaction.
This step specifies the field's fixed position on a page. The next step specifies the page on which the OneSpan Sign field will appear.
Pages are counted sequentially from the first to the last document in the transaction.

If at this step you choose the Recipient Label created above, the field created above will appear for that recipient.

Positioning Fields via Text Anchors
The following procedure illustrates how to use the Text Anchor Text Tag to insert OneSpan Sign fields in multiple documents for multiple recipients.
Fields will be inserted at the positions of the Text Anchors.
Text Anchors are available for both Microsoft Word documents and PDF documents.
To use Text Anchors to insert a OneSpan Sign field in multiple documents for two recipients:
- Create a new Convention, and save it.
- On the Convention Detail page, click New OneSpan Sign Recipient Label.
- Give a name to the Recipient Label, and then click Save. This Recipient Label is for the first recipient.
- Click New Text Tag to create a Text Tag in the Recipient Label.
- On the Text Tag page, choose Text Anchor from the Field Type drop-down list, and give the Text Tag a name.
- Fill in the Text field with the exact string to be searched for in the uploaded documents.
- Add the Character Index within the Text Anchor. It will be used to calculate the position of the field.
- Add the Occurrence of the search string. For example, a value of 2 will skip the first two occurrences of the anchor text, and use the third occurrence to calculate the position.
- Specify a Top Offset and Left Offset for the field's position relative to the relevant anchor text. Each offset can be positive, negative, or zero.
- Specify the Width and Height of the desired OneSpan Sign field.
- Under the OneSpan Sign Field Name, choose Signature as the desired type from the drop-down list. Then click Save.
- Repeat Steps 2-11 for the second recipient. The following image illustrates how the resultant Signature Blocks may appear at the end of this procedure.
- Create another Text Anchor for the signing date, with the Text Anchor being the first occurrence of DATE.
- Create a Recipient Label for the second recipient, and within it create two Text Tags. The first is for the signature, using WITNESS SIGNATURE as the anchor text. The second is for the signing date, using the second occurrence of DATE.
- Create a new OneSpan Sign transaction. You must give the transaction a name.
- On the OneSpan Sign transaction page, click Advanced Options.
- In the OneSpan Sign Convention field, select Lookup.
- Choose the created Convention.
- Add documents and recipients to the transaction , and assign each recipient a Recipient Label from the drop-down list.
- Click Prepare to open the Designer. Verify that the Signature Blocks and signing dates defined above have been properly inserted. You can then close the Designer, and click Send to send the transaction.

If the exact text string cannot be found in an uploaded document, OneSpan Sign will trigger an error and then delete the document from the transaction.


If at this step you choose a Recipient Label created above, the field created above will appear for that recipient.

Positioning Fields via PDF Form Fields
The following procedure illustrates how to use the PDF Form Field Text Tag to insert OneSpan Sign fields in multiple documents for multiple recipients.
The PDF Form Fields already have fixed positions in the relevant PDF, and the OneSpan Sign fields will be placed in the PDF Form Fields.
To use PDF Form Fields to insert a OneSpan Sign field in multiple documents for multiple recipients:
- Verify that the relevant PDF document has at least one PDF Form Field.
- Create a new Convention, and save it.
- On the Convention Detail page, click New OneSpan Sign Recipient Label.
- Give the Recipient Label a name, and then click Save.
- Click New Text Tag to create a Text Tag in the Recipient Label.
- On the Text Tag page, select PDF Form Field from the drop-down list.
- Give the Text Tag a name, and fill in the Form Field Name with the name of the PDF Form Field from the PDF.
- On the OneSpan Sign Field Name, select the field type from the drop-down list (e.g., signature, auto-fill signed date, input text field). Then click Save.
- Create a new OneSpan Sign transaction. You must give the transaction a name.
- On the OneSpan Sign transaction page, click Advanced Options.
- In the OneSpan Sign Convention field, select Lookup, and choose the Convention created above.
- Add documents and recipients to the transaction, and assign each recipient a Recipient Label from the drop-down list.
- Click Prepare to open the Designer. Verify that the signature and signing date defined above have been properly inserted at the positions of the pre-existing PDF Form Fields. You can then close the Designer, and click Send to send the transaction.


If at this step you choose a Recipient Label created above, the field created above will appear for that recipient.