Deploying the Push Notification Service
The Push Notification Service is needed only if your connector is installed on-premises. If you have a SaaS deployment, please ignore this section.
The deployment instructions below are relevant only if you are using v1.2 of OneSpan Sign Embedded Integration for CRM.
The Push Notification Service:
- Receives an Event Notification (callback) from OneSpan Sign every time the status of an e-signature process changes.
- Transmits that information to the relevant connector.
The rest of this section describes:
- Installing the Push Notification Service
- Verifying the Push Notification Service
- Uninstalling the Push Notification Service
Installing the Push Notification Service
To install the Push Notification Service:
-
Create an IIS Website by doing the following:
- Connect to IIS with sufficient privileges.
- Click Add Web Site. A new dialog box appears.
- Specify the following parameters:
- Site name: You can specify any name you want.
- Physical path: This path should identify the folder where the Push Notification Service will be installed.
- Port: You can specify any port number you want.
- Click OK.


- Ensure that the Application Pool version is 4.0 by selecting the Basic Settings of the Application Pool, as illustrated below.
- Run the Installer by doing the following:
- Double-click the file
ESLEventReceiverInstaller.msi. - On the Welcome screen, click Next. A new dialog box appears.
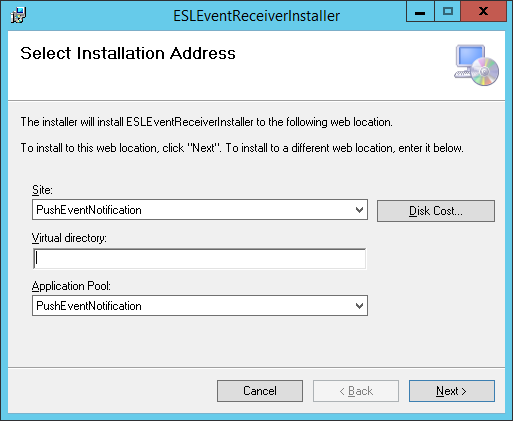
- Specify the IIS Site and Application Pool.
Specify a Virtual directory only if you want to host the service on a virtual directory inside the IIS Website. Otherwise, leave that field blank.
- Click Next. The Connection Settings page appears.
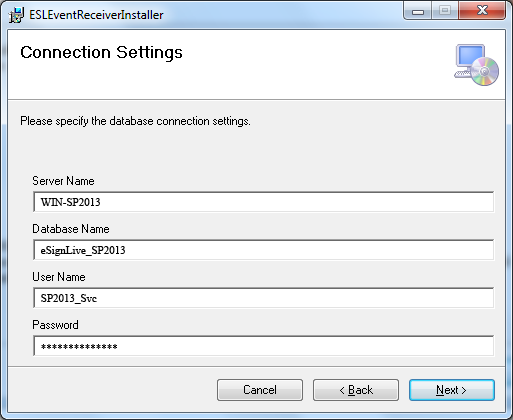
- Specify the following parameters, which will be used to store the service's notifications. Their values were determined when the SQL database was installed as part of your connector's deployment.
- Server Name: Name of the SQL server
- Database Name: Name of the SQL database
- User Name: The user name associated with the database
- Password: Password for the User name
- Click Next.
- Double-click the file
- After the installation is complete, click Close.
- To verify that the service is running: (1) open the service in the Contents View of IIS; (2) browse for
PostEvent.svc.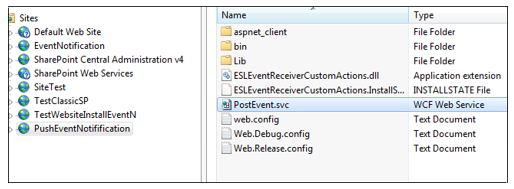
- Bind the IIS Website to the public IP or domain, so OneSpan Sign can send notifications to the Push Notification Service. For this purpose, bear in mind that:
- The URL for the Push Notification Service is:
http://{SERVER_NAME:PORT}/PostEvent.svc/PostESLEventHere {
SERVER_NAME:PORT} is a placeholder for the server name and port number.The service can be hosted on any port you want.
The server name and port must be accessible from the Internet. You may want to open your firewall exclusively to OneSpan Sign's IP address. If so, you can obtain that IP address from our Support Team.
This URL should be used in OneSpan Sign Account > Callback URL in the connector configuration.
PostESLEventis the method in the service that receivesHTTP POSTrequests with a JSON payload as event data.


Verifying the Push Notification Service
To verify that events are being properly received by the Push Notification Service:
- Create a package using your OneSpan Sign connector.
- The service should have received at least one event associated with the new package. Verify that it has by checking the SQL table:
Select * From EslNotifications- If the expected events do not appear, check the following service log:
- If the log files have not been created, there could be a permission issue on the IIS Website directory. Ensure that the account running the Application Pool has write permissions to the Website folder.
{SERVICE_INSTALLATION_FOLDER}\Logs\Log.txt


The Push Notification Service will not work if there is not enough free memory. If you find that it isn't working, ensure that on the server where the service is installed, the free memory is > 5% of the total memory.
Uninstalling the Push Notification Service
The Push Notification Service is needed by your connector if it was installed on-premises. Thus you should uninstall the service only if you also want to uninstall the on-premises deployment of your connector.
To uninstall the Push Notification Service for your connector:
- Run the file
ESLEventReceiverInstaller.msi, and select Remove ESLEventReceiverInstaller. Then click Finish. - Delete the IIS Website and Application Pool by right-clicking PushNotificationService, and selecting Remove.

Deploying the Push Notification Service
The Push Notification Service is needed only if your connector is installed on-premises. If you have a SaaS deployment, please ignore this section.
The deployment instructions below are relevant only if you are using v1.2 of OneSpan Sign Embedded Integration for CRM.
The Push Notification Service:
- Receives an Event Notification (callback) from OneSpan Sign every time the status of an e-signature process changes.
- Transmits that information to the relevant connector.
The rest of this section describes:
- Installing the Push Notification Service
- Verifying the Push Notification Service
- Uninstalling the Push Notification Service
Installing the Push Notification Service
To install the Push Notification Service:
-
Create an IIS Website by doing the following:
- Connect to IIS with sufficient privileges.
- Click Add Web Site. A new dialog box appears.
- Specify the following parameters:
- Site name: You can specify any name you want.
- Physical path: This path should identify the folder where the Push Notification Service will be installed.
- Port: You can specify any port number you want.
- Click OK.
- Ensure that the Application Pool version is 4.0 by selecting the Basic Settings of the Application Pool, as illustrated below.
- Run the Installer by doing the following:
- Double-click the file
ESLEventReceiverInstaller.msi. - On the Welcome screen, click Next. A new dialog box appears.
- Specify the IIS Site and Application Pool.
Specify a Virtual directory only if you want to host the service on a virtual directory inside the IIS Website. Otherwise, leave that field blank.
- Click Next. The Connection Settings page appears.
- Specify the following parameters, which will be used to store the service's notifications. Their values were determined when the SQL database was installed as part of your connector's deployment.
- Server Name: Name of the SQL server
- Database Name: Name of the SQL database
- User Name: The user name associated with the database
- Password: Password for the User name
- Click Next.
- Double-click the file
- After the installation is complete, click Close.
- To verify that the service is running: (1) open the service in the Contents View of IIS; (2) browse for
PostEvent.svc. - Bind the IIS Website to the public IP or domain, so OneSpan Sign can send notifications to the Push Notification Service. For this purpose, bear in mind that:
- The URL for the Push Notification Service is:
http://{SERVER_NAME:PORT}/PostEvent.svc/PostESLEventHere {
SERVER_NAME:PORT} is a placeholder for the server name and port number.The service can be hosted on any port you want.
The server name and port must be accessible from the Internet. You may want to open your firewall exclusively to OneSpan Sign's IP address. If so, you can obtain that IP address from our Support Team.
This URL should be used in OneSpan Sign Account > Callback URL in the connector configuration.
PostESLEventis the method in the service that receivesHTTP POSTrequests with a JSON payload as event data.
Verifying the Push Notification Service
To verify that events are being properly received by the Push Notification Service:
- Create a package using your OneSpan Sign connector.
- The service should have received at least one event associated with the new package. Verify that it has by checking the SQL table:
Select * From EslNotifications- If the expected events do not appear, check the following service log:
- If the log files have not been created, there could be a permission issue on the IIS Website directory. Ensure that the account running the Application Pool has write permissions to the Website folder.
{SERVICE_INSTALLATION_FOLDER}\Logs\Log.txt
The Push Notification Service will not work if there is not enough free memory. If you find that it isn't working, ensure that on the server where the service is installed, the free memory is > 5% of the total memory.
Uninstalling the Push Notification Service
The Push Notification Service is needed by your connector if it was installed on-premises. Thus you should uninstall the service only if you also want to uninstall the on-premises deployment of your connector.
To uninstall the Push Notification Service for your connector:
- Run the file
ESLEventReceiverInstaller.msi, and select Remove ESLEventReceiverInstaller. Then click Finish. - Delete the IIS Website and Application Pool by right-clicking PushNotificationService, and selecting Remove.
Deploying the Push Notification Service
The Push Notification Service is needed only if your connector is installed on an on-premises instance of Dynamics CRM. If you are installing the connector on Dynamics CRM 365, please ignore this section.
The deployment instructions below are relevant only if you are using v2.1 of OneSpan Sign Embedded Integration for CRM.
The Push Notification Service:
- Receives an Event Notification (callback) from OneSpan Sign every time the status of an e-signature process changes.
- Transmits that information to the relevant connector.
The rest of this section describes:
- Installing the Push Notification Service
- Verifying the Push Notification Service
- Uninstalling the Push Notification Service
Installing the Push Notification Service
To install the Push Notification Service:
- Unzip the file
PushNotificationService.zipinto the folder where you want to install the service. -
Create an IIS Website by doing the following:
- Connect to IIS with sufficient privileges.
- Click Add Web Site. A new dialog box appears.
- Specify the following parameters:
- Site name: You can specify any name you want.
- Physical path: This path should identify the folder where the zip file was unzipped.
- Port: You can specify any port number you want.
- Click OK.

- Ensure that the Application Pool version is 4.0 by selecting the Basic Settings of the Application Pool, as illustrated below.
- Edit the file
web.configas follows:- Update the connectionString in the "<add name="CrmLocal" connectionString="....">" section of the file.
- Update the following parameters:
- URL: The URL of your OneSpan Sign Embedded Integration for CRM organization (e.g., http://hostname:8888/Dynamics2015)
- Domain: The domain name
- Username: The user name associated with a domain account that has Admin privileges on OneSpan Sign Embedded Integration for CRM 2.0
- Password: Password for the Username
- Save your changes, and restart the Website in IIS.
- To verify that the service is running: (1) open the service in the Contents View of IIS; (2) browse for
PostEvent.svc.
- Bind the IIS Website to the public IP or domain, so OneSpan Sign can send notifications to the Push Notification Service. For this purpose, bear in mind that:
- The URL for the Push Notification Service is:
http://{SERVER_NAME:PORT}/PostEvent.svc/PostESLEventHere {
SERVER_NAME:PORT} is a placeholder for the server name and port number.The service can be hosted on any port you want.
The server name and port must be accessible from the Internet. You may want to open your firewall exclusively to OneSpan Sign's IP address. If so, you can obtain that IP address from our Support Team.
This URL should be used in OneSpan Sign Account > Callback URL in the connector configuration.
PostESLEventis the method in the service that receivesHTTP POSTrequests with a JSON payload as event data.
Verifying the Push Notification Service
To verify that events are being properly received by the Push Notification Service:
- Create a package using your OneSpan Sign connector.
- Verify that the service has received a OneSpan Sign Notification Entity about the new package.
- If the expected events do not appear, check the following service log:
- If the log files have not been created, there could be a permission issue on the IIS Website directory. Ensure that the account running the Application Pool has write permissions to the Website folder.

{SERVICE_INSTALLATION_FOLDER}\Logs\Log.txt
The Push Notification Service will not work if there is not enough free memory. If you find that it isn't working, ensure that on the server where the service is installed, the free memory is > 5% of the total memory.
Uninstalling the Push Notification Service
The Push Notification Service is needed by your connector if it was installed on-premises. Thus you should uninstall the service only if you also want to uninstall the on-premises deployment of your connector.
To uninstall the Push Notification Service for your connector:
- Delete the IIS Website and Application Pool by right-clicking PushNotificationService, and selecting Remove.
- Remove the service's unzipped folder.