Installing OneSpan Sign for Microsoft Dynamics CRM
To install OneSpan Sign for Microsoft Dynamics CRM 2013 for the first time, sequentially perform the following procedures:
- Step 1: Importing the Solution
Step 2: Configuring the Dashboard & Report
Step 3: Configuring Connector Settings
Step 4: Configuring the Language
Step 5: Installing the Notification Service for Dynamics CRM
Step 1: Importing the Solution
To import the solution into OneSpan Sign for Microsoft Dynamics CRM:
- Connect to OneSpan Sign for Microsoft Dynamics CRM as a user with Administrator privileges.
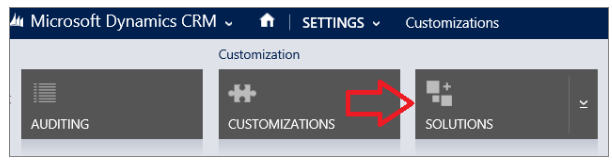
- From the top menu, click OneSpan Sign for Microsoft Dynamics CRM > Settings.
- From Customization, click Solutions.
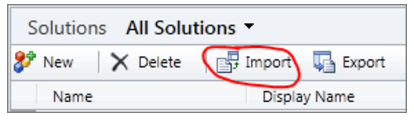
- From All Solutions, click Import.
-
Dynamics CRM prompts you for the location of the solution package. Click Browse, and select the solution package ESLConnector_1_0_0_X_managed.zip. - Click Next to display the Solution Information.
- Click Next to show the Import Options. Select the checkbox for activate any processes…, then click Next. The solution will import, and a summary page will appear.
- Click Close to complete the solution installation.
- From Solutions, click Publish All Customizations.


Step 2: Configuring the Dashboard & Report
To configure the Dashboard and Report:
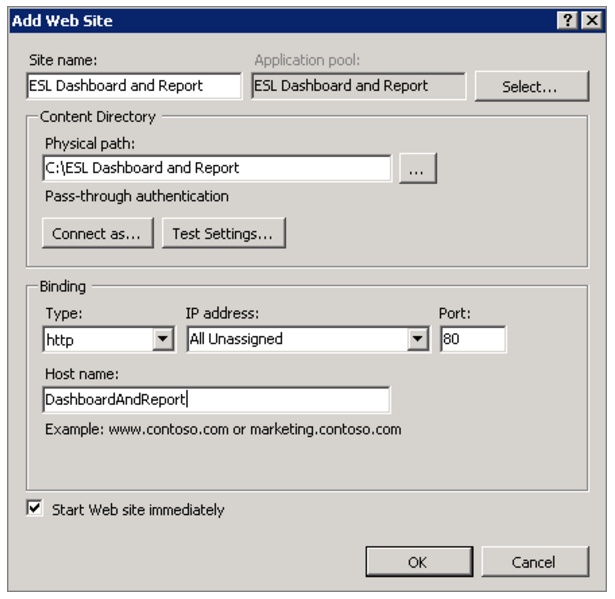
- Create a new site named
ESL Dashboard and Report. - Unzip the file
ESL Dashboard and Report.zip. - Provide the Physical path to the above unzipped folder.
- Provide a Host name. This mapping of the host name to the physical server's IP should also be done in the DNS server.
- Change the port number to the port of your choice.
- Click OK.
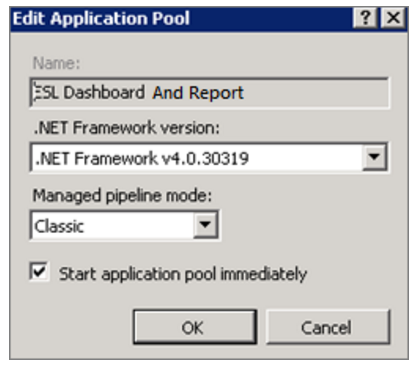
- In the dialog box Edit Application Pool, make the settings match the following screen.
- In the unzipped folder, modify the file
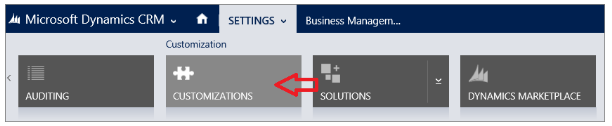
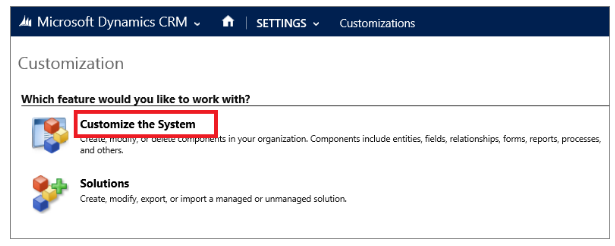
Web.configas follows: - In Settings, go to Customizations and click Customize the System.
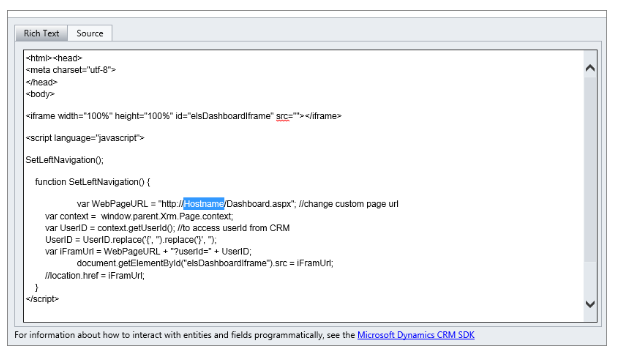
- Select Web resources from the left pane, and find the
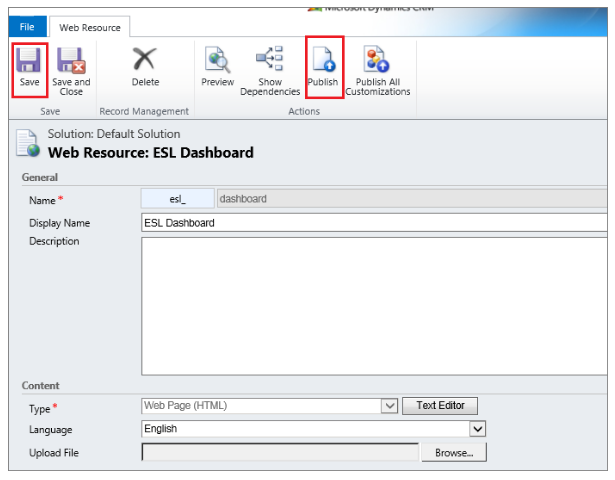
ESL DashboardHTML type web resource. - Open it, and replace the host name with the site name (where Dashboard and Report is deployed). Then save and publish it.
- Repeat the process for the OneSpan Sign Report web resource.
<appSettings>
            <add key="CRMURL" value="http://ServerName/OrganizationName/XRMServices/2011/Organization.svc" />
            <add key="crmuser" value="UserName" />
            <add key="crmpass" value="Password" />
            </appSettings>

Step 3: Configuring Connector Settings
To configure the connector settings:
- On the Settings tab under OneSpan Sign Settings, click OneSpan Sign Account. A grid appears that displays OneSpan Sign accounts. Its list should initially be empty.
- From the Ribbon, click New to create a new OneSpan Sign account.
- A new dialog box appears.
- Enter the following required information.
- Name: Name of the configuration item
- Email: Email address of the account owner
The following configuration settings depend on the URL from which you log in to OneSpan Sign. If you're uncertain about your login URL, refer to the email you received when you signed up, and follow the link Log into your account. You will be directed to a login page, at which point your login URL will appear in your browser's address bar.
- For US clients who are deploying to a US Production Environment, and whose login URL is https://apps.esignlive.com/login:
- API URL:
https://apps.esignlive.com/api
- Designer URL:
https://apps.esignlive.com/auth?senderAuthenticationToken={0}&target=https://apps.esignlive.com/designer/{1}?profile=dynamics1.2 - Signing URL:
- For US clients who are deploying to a US Sandbox Environment, and whose login URL is https://sandbox.esignlive.com/login:
- API URL:
https://sandbox.esignlive.com/api
- Designer URL:
- Signing URL:
- For US clients who are deploying to a US Production Environment, and whose login URL is https://apps.e-Signlive.com/login:
- API URL:
https://apps.e-SignLive.com/api
- Designer URL:
- Signing URL:
- For US clients who are deploying to a US Sandbox Environment, and whose login URL is https://sandbox.e-SignLive.com/login:
- API URL:
https://sandbox.e-SignLive.com/api
- Designer URL:
- Signing URL:
- For Canadian clients who are deploying to a Canadian Production Environment, and whose login URL is https://apps.e-SignLive.ca/login:
- API URL:
https://apps.e-SignLive.ca/api
- Designer URL:
- Signing URL:
- For Canadian clients who are deploying to a Canadian Sandbox Environment, and whose login URL is https://sandbox.e-SignLive.ca/login:
- API URL:
https://sandbox.e-SignLive.ca/api
- Designer URL:
- Signing URL:
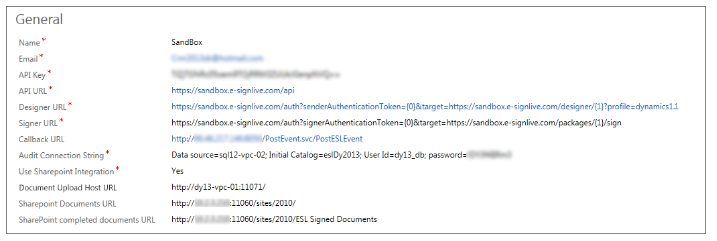
- Enter the Callback URL used for the Event notification service. For example: http://server/PostEvent.svc/PostESLEvent
- Save the form, and then click the Set Callback URL ribbon button to register the URL with OneSpan Sign.
- Enter the Audit Connection String from the database created earlier.
- Indicate if you want to use SharePoint Integration. If yes, then:
- Enter the Document Upload Host URL. This is the hostname of the hosted site created in Step 2: Configuring the Dashboard & Report.
- Enter the SharePoint Documents URL, where
eSignLive.com.ESL.WebService.wspwill be deployed in your SharePoint Integration. This is the SharePoint Site URL from which you will select documents for Dynamics CRM. - Enter the SharePoint Completed Document URL. This is the URL of the SharePoint Site Library to which signed documents from OneSpan Sign will be saved.
- Click Verify Settings to confirm that the API Key and API URL are correct, and that communication with the OneSpan Sign server can be established.


https://apps.esignlive.com/auth?signerAuthenticationToken={0}&target=https://apps.esignlive.com/packages/{1}/signhttps://sandbox.eSignlive.com/auth?senderAuthenticationToken={0}&target=https://sandbox.esignlive.com/designer/{1}?profile=dynamics1.2https://sandbox.eSignlive.com/auth?signerAuthenticationToken={0}&target=https://sandbox.esignlive.com/packages/{1}/signhttps://apps.e-SignLive.com/auth?senderAuthenticationToken={0}&target=https://apps.e-SignLive.com/designer/{1}?profile=dynamics1.2https://apps.e-SignLive.com/auth?signerAuthenticationToken={0}&target=https://apps.e-SignLive.com/packages/{1}/signhttps://sandbox.e-SignLive.com/auth?senderAuthenticationToken={0}&target=https://sandbox.e-SignLive.com/designer/{1}?profile=dynamics1.2https://sandbox.e-SignLive.com/auth?signerAuthenticationToken={0}&target=https://sandbox.e-SignLive.com/packages/{1}/signhttps://apps.e-SignLive.ca/auth?senderAuthenticationToken={0}&target=https://apps.eSignLive.ca/designer/{1}?profile=dynamics1.2https://apps.eSignLive.ca/auth?signerAuthenticationToken={0}&target=https://apps.e-SignLive.ca/packages/{1}/signhttps://sandbox.e-SignLive.ca/auth?senderAuthenticationToken={0}&target=https://sandbox.e-SignLive.ca/designer/{1}?profile=dynamics1.2https://sandbox.e-SignLive.ca/auth?signerAuthenticationToken={0}&target=https://sandbox.e-SignLive.ca/packages/{1}/sign
Data Source=servername; Initial Catalog=databasename; uid=userid ; pwd=password
Step 4: Configuring the Language
To configure the language that the connector will display:
- In Settings, click OneSpan Sign Language. A OneSpan Sign Languages grid appears. Its list should initially be empty.
- To configure a new language for the connector, click New.
- Enter the language's Name and Value. For example, for English: Name = English and Value = en. To see the name-value pairs of all supported languages, see Supported Languages.
- Click Save.
Step 5: Installing the Notification Service for Dynamics CRM
The following procedure installs a Windows Notification Service that will: (1) read status updates from the SQL Notifications Database table created in a previous step; (2) apply these updates to Dynamics CRM's data about OneSpan Sign packages.
To install the Notification Service:
- Unzip the contents of
eSignLive.comESLNotificationService.zipinto a new directory. - Open the file
eSignLive.comESLNotificationService.exe.configin a text editor. - Modify the connection string for the SQL Server as follows:
SQL Server connection string:
Data Source=<ServerName>;Initial Catalog=<dbname>;User ID=<sqluser>;Password=<password>
- Replace
<ServerName>with the name of the SQL Server. - Replace
<dbname>with the name of the database where the Notifications table was installed. - Replace
<sqluser>and<password>with the SQL login credentials that have Read and Write access to the database.
CRM connection string:
Url=<crmURL>; Domain=<domain>; Username=<user>; Password=<password>
            <appSettings>
            <addkey="CRMURL"value="<crmURL>/XRMServices/2011/Organization.svc"/>
            <add key="crmuser" value="Username" />
            <add key="crmpass" value="password" />
            </appSettings>
- Replace
<crmURL>with the URL of the CRM installation. - Replace
<domain>,<user>and<password>with the domain user credentials that have administrative access to the CRM installation.
eSignLive.comESLNotificationService.exe -installeSignLive Notifications service is present.eSignLive.comEventLog has been created under the Applications and Services Logs group.eSignLive.comEventLog, and confirm the record of an event which indicates that the service has been started.Installing OneSpan Sign for Microsoft Dynamics CRM
To install OneSpan Sign for Microsoft Dynamics CRM 2015 for the first time, sequentially perform the following procedures:
Step 1: Importing the Solution
Step 2: Configuring the Dashboard & Report
Step 3: Configuring Connector Settings
Step 4: Configuring the Language
Step 5: Installing the Notification Service for Dynamics CRM
Step 1: Importing the Solution
To import the solution into OneSpan Sign for Microsoft Dynamics CRM:
- Connect to OneSpan Sign for Microsoft Dynamics CRM as a user with Administrator privileges.
- From the top menu, click OneSpan Sign for Microsoft Dynamics CRM > Settings.
- From Customization, click Solutions.
- From All Solutions, click Import.
- Dynamics CRM prompts you for the location of the solution package. Click Browse, and select the solution package
ESLConnector_1_0_0_X_managed.zip. - Click Next to display the Solution Information.
- Click Next to show the Import Options. Select the checkbox for activate any processes…, then click Next. The solution will import, and a summary page will appear.
- Click Close to complete the solution installation.
- From Solutions, click Publish All Customizations.
Step 2: Configuring the Dashboard & Report
To configure the Dashboard and Report:
- Create a new site named
ESL Dashboard and Report. - Unzip the file
ESL Dashboard and Report.zip. - Provide the Physical path to the above unzipped folder.
- Provide a Host name. This mapping of the host name to the physical server's IP should also be done in the DNS server.
- Change the port number to the port of your choice.
- Click OK.
- In the dialog box Edit Application Pool, make the settings match the following screen.
- In the unzipped folder, modify the file
Web.configas follows: - In Settings, go to Customizations and click Customize the System.
- Select Web Resources from the left pane, and find the
ESL DashboardHTML type web resource. - Open it, and replace the host name with the site name (where Dashboard and Report is deployed). Then save and publish it.
- Repeat the process for the ESL Report web resource.
<appSettings>
					<add key="CRMURL" value="http://ServerName/OrganizationName/XRMServices/2011/Organization.svc" />
					<add key="crmuser" value="UserName" />
					<add key="crmpass" value="Password" />
				</appSettings>
Step 3: Configuring Connector Settings
To configure the connector settings:
- On the Settings tab under OneSpan Sign Settings, click OneSpan Sign Account. A grid appears that displays OneSpan Sign accounts. Its list should initially be empty.
- From the Ribbon, click New to create a new OneSpan Sign account.
- A new dialog box appears.
- Enter the following required information.
- Name: Name of the configuration item
- Email: Email address of the account owner
The following configuration settings depend on the URL from which you log in to OneSpan Sign. If you're uncertain about your login URL, refer to the email you received when you signed up, and follow the link Log into your account. You will be directed to a login page, at which point your login URL will appear in your browser's address bar.
- For US clients who are deploying to a US Production Environment, and whose login URL is https://apps.esignlive.com/login:
- API URL:
https://apps.esignlive.com/api
- Designer URL:
https://apps.esignlive.com/auth?senderAuthenticationToken={0}&target=https://apps.esignlive.com/designer/{1}?profile=dynamics1.2 - Signing URL:
- For US clients who are deploying to a US Sandbox Environment, and whose login URL is https://sandbox.esignlive.com/login:
- API URL:
https://sandbox.esignlive.com/api
- Designer URL:
- Signing URL:
- For US clients who are deploying to a US Production Environment, and whose login URL is https://apps.e-Signlive.com/login:
- API URL:
https://apps.e-SignLive.com/api
- Designer URL:
- Signing URL:
- For US clients who are deploying to a US Sandbox Environment, and whose login URL is https://sandbox.e-SignLive.com/login:
- API URL:
https://sandbox.e-SignLive.com/api
- Designer URL:
- Signing URL:
- For Canadian clients who are deploying to a Canadian Production Environment, and whose login URL is https://apps.e-SignLive.ca/login:
- API URL:
https://apps.e-SignLive.ca/api
- Designer URL:
- Signing URL:
- For Canadian clients who are deploying to a Canadian Sandbox Environment, and whose login URL is https://sandbox.e-SignLive.ca/login:
- API URL:
https://sandbox.e-SignLive.ca/api
- Designer URL:
- Signing URL:
- Enter the Callback URL used for the Event notification service. For example: http://server/PostEvent.svc/PostESLEvent
- Save the form, and then click the Set Callback URL ribbon button to register the URL with OneSpan Sign.
- Enter the Audit Connection String from the database created earlier.
- Indicate if you want to use SharePoint Integration. If yes, then:
- Enter the Document Upload Host URL. This is the hostname of the hosted site created in Step 2: Configuring the Dashboard & Report.
- Enter the SharePoint Documents URL, where
eSignLive.com.ESL.WebService.wspwill be deployed in your SharePoint Integration. This is the SharePoint Site URL from which you will select documents for Dynamics CRM. - Enter the SharePoint Completed Document URL. This is the URL of the SharePoint Site Library to which signed documents from OneSpan Sign will be saved.
- Click Verify Settings to confirm that the API Key and API URL are correct, and that communication with the OneSpan Sign server can be established.
https://apps.esignlive.com/auth?signerAuthenticationToken={0}&target=https://apps.esignlive.com/packages/{1}/signhttps://sandbox.eSignlive.com/auth?senderAuthenticationToken={0}&target=https://sandbox.esignlive.com/designer/{1}?profile=dynamics1.2https://sandbox.eSignlive.com/auth?signerAuthenticationToken={0}&target=https://sandbox.esignlive.com/packages/{1}/signhttps://apps.e-SignLive.com/auth?senderAuthenticationToken={0}&target=https://apps.e-SignLive.com/designer/{1}?profile=dynamics1.2https://apps.e-SignLive.com/auth?signerAuthenticationToken={0}&target=https://apps.e-SignLive.com/packages/{1}/signhttps://sandbox.e-SignLive.com/auth?senderAuthenticationToken={0}&target=https://sandbox.e-SignLive.com/designer/{1}?profile=dynamics1.2https://sandbox.e-SignLive.com/auth?signerAuthenticationToken={0}&target=https://sandbox.e-SignLive.com/packages/{1}/signhttps://apps.e-SignLive.ca/auth?senderAuthenticationToken={0}&target=https://apps.eSignLive.ca/designer/{1}?profile=dynamics1.2https://apps.eSignLive.ca/auth?signerAuthenticationToken={0}&target=https://apps.e-SignLive.ca/packages/{1}/signhttps://sandbox.e-SignLive.ca/auth?senderAuthenticationToken={0}&target=https://sandbox.e-SignLive.ca/designer/{1}?profile=dynamics1.2https://sandbox.e-SignLive.ca/auth?signerAuthenticationToken={0}&target=https://sandbox.e-SignLive.ca/packages/{1}/sign
Data Source=servername; Initial Catalog=databasename; uid=userid ; pwd=password
Step 4: Configuring the Language
To configure the language that the connector will display:
- In Settings, click OneSpan Sign Language. A OneSpan Sign Languages grid appears. Its list should initially be empty.
- To configure a new language for the connector, click New.
- Enter the language's Name and Value. For example, for English: Name = English and Value = en. To see the name-value pairs of all supported languages, see Supported Languages.
- Click Save.
Step 5: Installing the Notification Service for Dynamics CRM
The following procedure installs a Windows Notification Service that will: (1) read status updates from the SQL Notifications Database table created in a previous step; (2) apply these updates to Dynamics CRM's data about OneSpan Sign packages.
To install the Notification Service:
- Unzip the contents of
eSignLive.comESLNotificationService.zipinto a new directory. - Open the file
eSignLive.comESLNotificationService.exe.configin a text editor. - Modify the connection string for the SQL Server as follows:
SQL Server connection string:
Data Source=<ServerName>;Initial Catalog=<dbname>;User ID=<sqluser>;Password=<password>
- Replace
<ServerName>with the name of the SQL Server. - Replace
<dbname>with the name of the database where the Notifications table was installed. - Replace
<sqluser>and<password>with the SQL login credentials that have Read and Write access to the database.
CRM connection string:
Url=<crmURL>; Domain=<domain>; Username=<user>; Password=<password>
            <appSettings>
            <addkey="CRMURL"value="<crmURL>/XRMServices/2011/Organization.svc"/>
            <add key="crmuser" value="Username" />
            <add key="crmpass" value="password" />
            </appSettings>
- Replace
<crmURL>with the URL of the CRM installation. - Replace
<domain>,<user>and<password>with the domain user credentials that have administrative access to the CRM installation.
eSignLive.comESLNotificationService.exe -installeSignLive Notifications service is present.eSignLive.comEventLog has been created under the Applications and Services Logs group.eSignLive.comEventLog, and confirm the record of an event which indicates that the service has been started.Installing OneSpan Sign for Microsoft Dynamics CRM
This section describes how to install version 2 of OneSpan Sign for Microsoft Dynamics CRM.
Prerequisites
- You have a Sandbox or Production account for version 11 of OneSpan Sign, and an associated API Key.
- You have Administrator privileges for OneSpan Sign for Microsoft Dynamics CRM.
- If you are installing the connector within an on-premises instance of Dynamics CRM, you have performed the procedure Installing the Push Notification Service.
To get a free Sandbox account, follow the instructions on this page.
Action
To install version 2 of OneSpan Sign for Microsoft Dynamics CRM:
- Log into Microsoft Dynamics CRM as a user with Administrator privileges.
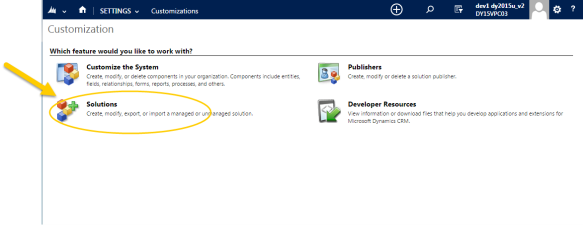
- Navigate to Microsoft Dynamics CRM > Settings.
- In the Customization group, click Solutions.
- In the All Solutions window, click Import.
- Click Browse, and select the file Download OneSpan Sign for Microsoft Dynamics v2.0 Release Candidate (Solution Package).
- Click Next to display the Solution Information.
- Click Next to display the Import Options.
- Select the checkbox under Post Import Actions, then click Import. The solution is imported, and a summary page appears. After a certain delay, a message should state that the import was successful.
- Click Close.
- Click Publish All Customizations. This ensures that OneSpan Sign for Microsoft Dynamics CRM online will be aware of all data changes that affect the User Interface.

You are prompted for the location of the solution package.
To complete your installation, you must configure the solution.