La balise de texte d'une convention sélectionnée peut être utilisée pour insérer un champ OneSpan Sign à des positions particulières dans plusieurs documents pour plusieurs signataires.
En fait, trois types de balises de texte peuvent être utilisés à cette fin :
- Champs de positionnement via les champs du formulaire PDF
- Champs de positionnement en position statique
- Champs de positionnement via les ancres de texte
Avant de créer l'un des types d'étiquette de texte ci-dessus, assurez-vous que chaque étiquette de signataire comporte au moins une étiquette de texte de type Signature (Nom complet, Initiales, Capture ou Capture mobile). Si une étiquette de signataire ne comporte aucune étiquette de texte, la transaction OneSpan Sign créée avec cette étiquette pourrait être corrompue.
Lorsqu'une balise de texte insère un objet dans un document, cet objet écrase et occulte tout contenu préexistant à cet endroit.
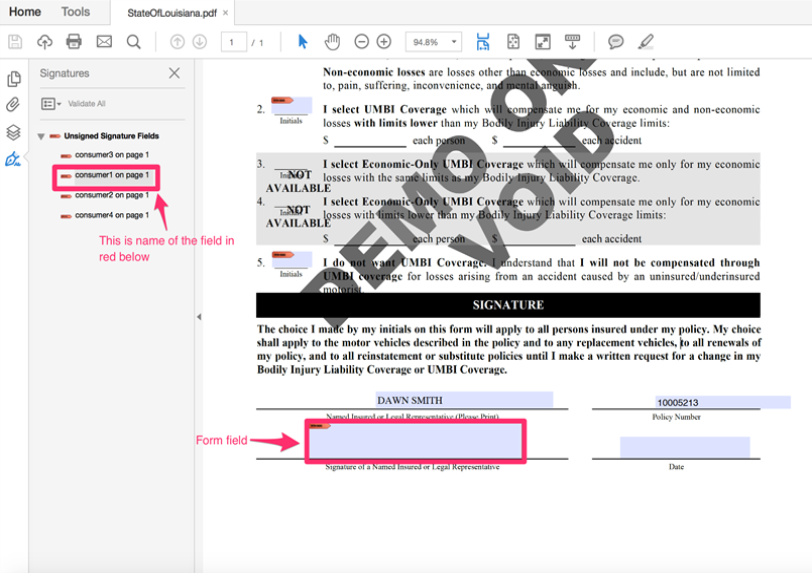
Champs de positionnement via les champs du formulaire PDF
La procédure suivante illustre comment utiliser la balise de texte de champ de formulaire PDF pour insérer des champs OneSpan Sign dans plusieurs documents pour plusieurs signataires.
Les champs du formulaire PDF doivent déjà avoir des positions fixes dans le PDF concerné (champs OneSpan Sign seront placés dans ces champs du formulaire PDF).
Pour utiliser les champs de formulaire PDF afin d'insérer un champ OneSpan Sign dans plusieurs documents pour plusieurs signataires :
- Assurez-vous que le document PDF concerné possède au moins un champ de formulaire PDF.
- Créez une nouvelle convention et enregistrez-la.
- Dans la section Étiquette du signataire des détails de la convention, cliquez sur +.
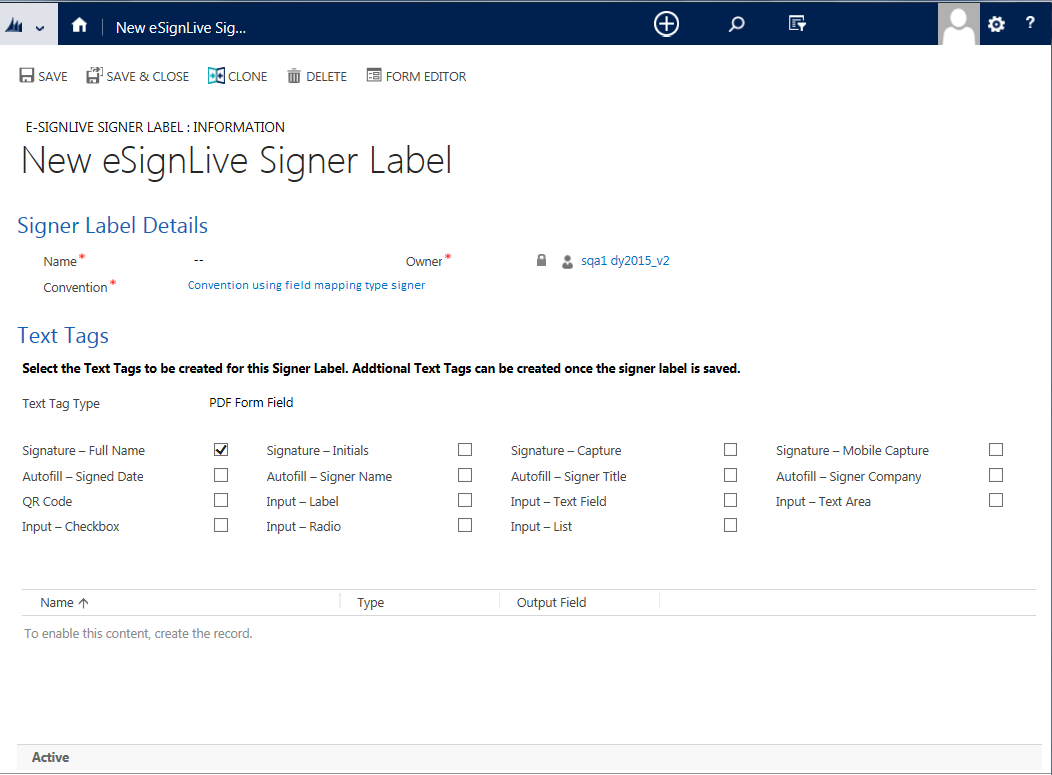
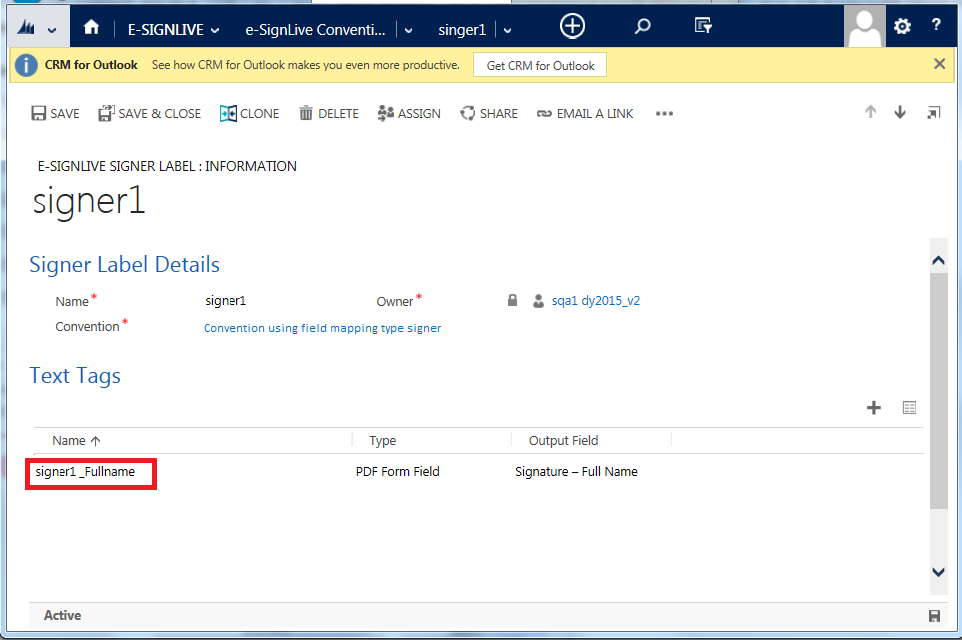
- Dans la page Nouvelle étiquette de signataire OneSpan Sign, fournissez un nom pour le champ Étiquette de signataire.
- Cliquez sur Enregistrer.
- Cliquez sur le nom actif pour créer une balise de texte dans l'étiquette du signataire.
- Dans la section Balise de texte, sélectionnez Champ de formulaire PDF dans la liste déroulante.
- Si nécessaire, modifiez le nom de la balise de texte et complétez le nom du champ du formulaire.
- Dans la section Détails de la balise de texte, sélectionnez le type de Champ de sortie dans la liste déroulante (par exemple, signature, date de signature remplie automatiquement, champ de saisie de texte).
- Cliquez sur Enregistrer.
- Créez une nouvelle transaction OneSpan Sign.
- Dans la section Convention des options avancées, cliquez sur Recherche et choisissez la convention précédemment créée.
- Ajoutez des documents et des signataires à la transaction.
- Double-cliquez sur chaque signataire et attribuez une étiquette de signataire à chaque signataire à partir de l'option Recherche.
Si, à cette étape, vous choisissez une étiquette de signataire créée ci-dessus, le champ créé ci-dessus apparaîtra pour ce signataire.
- Cliquez sur Préparer pour ouvrir le concepteur. Assurez-vous que la signature et la date de signature définies ci-dessus ont été correctement insérées aux positions des champs du formulaire PDF préexistant. Vous pouvez ensuite fermer le Concepteur, et cliquer sur Envoyer pour envoyer la transaction.

Champs de positionnement en position statique
La procédure suivante illustre comment utiliser la balise de texte de position statique pour insérer les champs OneSpan Sign à des positions statiques (coordonnées X-Y fixes) dans plusieurs documents pour plusieurs signataires.
Pour insérer un champ OneSpan Sign dans une position statique dans plusieurs documents pour plusieurs signataires :
- Créez une nouvelle convention et enregistrez-la.
- Dans la section Étiquette du signataire des Détails de la convention, cliquez sur +.
- Dans la page Nouvelle étiquette de signataire OneSpan Sign, fournissez un nom pour le champ Étiquette de signataire.
- Cliquez sur Enregistrer.
- Cliquez sur le nom actif pour créer une balise de texte dans l'étiquette du signataire.
- Dans la section Balise de texte, sélectionnez Position statique dans la liste déroulante, et donnez un nom à la balise de texte.
- Saisissez des valeurs pour le décalage vers le haut et le décalage à gauche de la balise de texte.
Cette étape permet de spécifier la position fixe du champ sur une page. L'étape suivante consiste à spécifier la page sur laquelle le champ OneSpan Sign apparaîtra.
- Indiquez le numéro de la page sur laquelle l'étiquette de texte doit apparaître.
Les pages sont comptées séquentiellement du premier au dernier document de la transaction.
- Indiquez la largeur et la hauteur du champ OneSpan Sign à créer.
- Dans la section Détails de la balise de texte, sélectionnez le type de Champ de sortie dans la liste déroulante (par exemple, signature, date de signature remplie automatiquement, champ de saisie de texte).
- Cliquez sur Enregistrer.
- Créez une nouvelle transaction OneSpan Sign.
- Dans la section Convention des Options avancées, cliquez sur Recherche et choisissez la convention précédemment créée.
- Ajoutez des documents et des signataires à la transaction.
- Double-cliquez sur chaque signataire et attribuez une étiquette de signataire à chaque signataire à partir de l'option Recherche.
Si, à cette étape, vous choisissez l'étiquette du signataire créée ci-dessus, le champ créé ci-dessus apparaîtra pour ce signataire.
- Cliquez sur Préparer pour voir le concepteur. Assurez-vous que le champ défini dans la Convention a été inséré correctement dans chaque document pour chaque signataire concerné. Lorsque vous êtes satisfait des résultats, vous pouvez fermer le Concepteur, puis cliquer sur Envoyer pour envoyer la transaction.

Champs de positionnement via les ancres de texte
La procédure suivante illustre comment utiliser la balise d'ancrage de texte pour insérer des champs OneSpan Sign dans plusieurs documents pour plusieurs signataires.
Les champs seront insérés à l'emplacement des ancres de texte.
Les ancres de texte sont disponibles pour les documents Microsoft Word et les documents PDF.
Pour utiliser les ancres de texte afin d'insérer un champ OneSpan Sign dans plusieurs documents pour deux signataires :
- Créez une nouvelle convention et enregistrez-la.
- Dans la section Étiquette du signataire des Détails de la convention, cliquez sur +.
- Dans la page Nouvelle étiquette de signataire OneSpan Sign, fournissez un nom pour le champ Étiquette de signataire.
- Cliquez sur Enregistrer.
- Cliquez sur le nom actif pour créer une balise de texte dans l'étiquette du signataire.
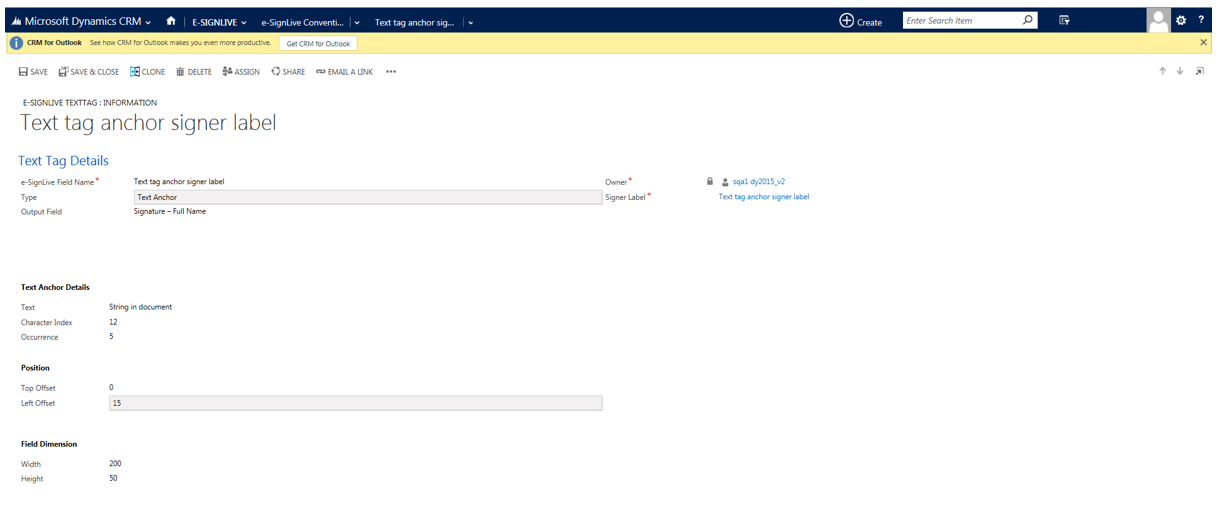
- Dans la section Balise de texte, sélectionnez Ancre de texte dans la liste déroulante, puis donnez un nom à la balise de texte.
- Dans la section Détails de l'ancre de texte, remplissez le champ Texte avec la chaîne exacte à rechercher dans les documents téléversés.
Si la chaîne de texte exacte ne peut être trouvée dans un document téléversé, OneSpan Sign déclenchera une erreur et supprimera ensuite le document de la transaction.
- Ajoutez l'indice de caractère dans l'ancre de texte. Ce sera utilisé pour calculer la position du champ.
- Ajoutez l'occurrence de la chaîne de recherche. Par exemple, une valeur de 2 permet d'ignorer les deux premières occurrences du texte d'ancrage et d'utiliser la troisième occurrence pour calculer la position.
- Dans la section Position, indiquez un décalage vers le haut et un décalage à gauche pour la position du champ par rapport au texte d'ancrage correspondant. Chaque décalage peut être positif, négatif ou nul.
- Dans la section Dimension du champ, indiquez la largeur et la hauteur du champ OneSpan Sign souhaité.
- Dans la section Détails de la balise de texte, sélectionnez le type de Champ de sortie dans la liste déroulante (par exemple, signature, date de signature remplie automatiquement, champ de saisie de texte).
- Cliquez sur Enregistrer.
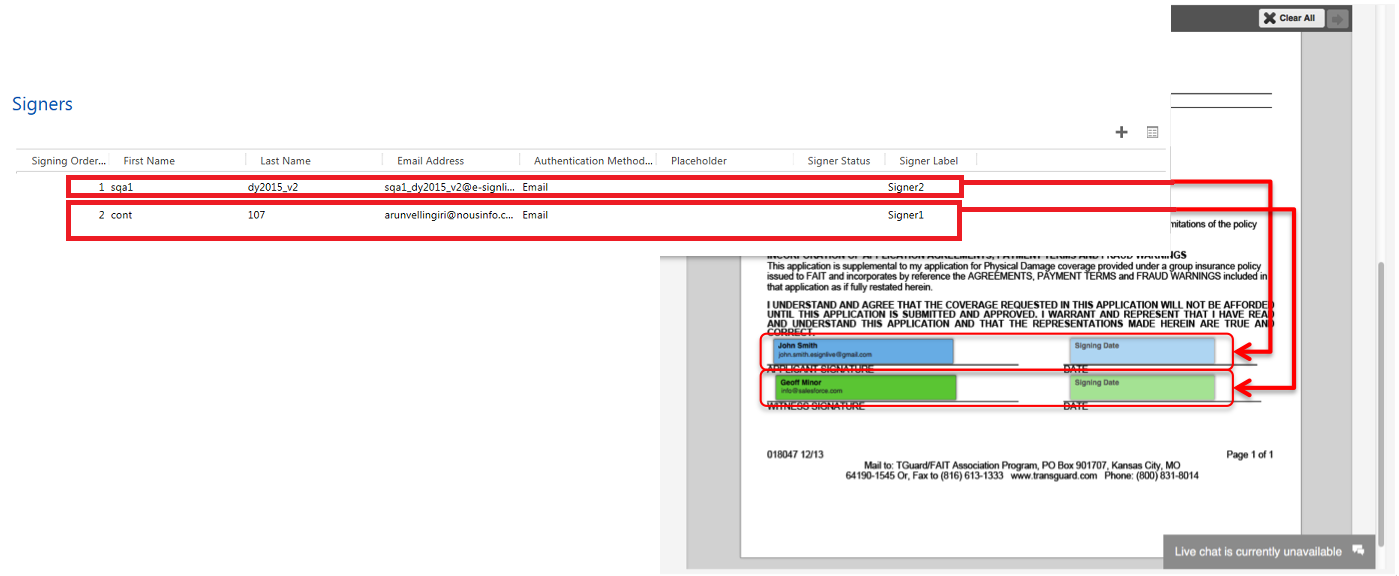
- Répétez les étapes 3 à 13 pour le deuxième signataire. L'image suivante illustre comment les blocs de signature résultants peuvent apparaître à la fin de cette procédure.
- Créez une autre ancre de texte pour la date de signature, l'ancre de texte étant la première occurrence de DATE.
- Créez une étiquette de signataire pour le deuxième signataire, et créez deux balises de texte à l'intérieur de celle-ci. La première concerne la signature, en utilisant SIGNATURE DU TÉMOIN comme texte d'ancrage. La deuxième est pour la date de signature, en utilisant la deuxième occurrence de DATE.
- Créez une nouvelle transaction OneSpan Sign.
- Dans la section Convention des Options avancées, cliquez sur Recherche et choisissez la convention précédemment créée.
- Ajoutez des documents et des signataires à la transaction.
- Double-cliquez sur chaque signataire et attribuez une étiquette de signataire à chaque signataire à partir de l'option Recherche.
Si, à cette étape, vous choisissez l'étiquette du signataire créée ci-dessus, le champ créé ci-dessus apparaîtra pour ce signataire.
- Cliquez sur Préparer pour ouvrir le concepteur. Assurez-vous que les blocs de signature et les dates de signature définis ci-dessus ont été correctement insérés. Vous pouvez ensuite fermer le Concepteur, et cliquer sur Envoyer pour envoyer la transaction.