Many organizations can serve as your Identity Provider for SAML.
The following sections describe how to configure the following providers:
For customers in FedRAMP environments, the default Identity Provider (IdP) is Active Directory Federation Services (ADFS), provided and maintained by Microsoft Entra ID. If there is a need to use a third-party service as the IdP, such as Okta or OneLogin, please contact our Support Team for assistance.
No matter which Identity Provider you use, you should do the following:.
- Set the Signature algorithm name for SAML to SHA256withRSA.
- On your Identity Provider, configure the following Attribute Mappings (OneSpan Sign will use them to identify the user who is logging in):
- emailaddress
- firstname
- givenname
- cn
- lastname
- surname
- sn
- account
- accountid
- accountId
- role
- type
- userType
| User | Attributes |
|---|---|
|
One of the following: |
|
| first name |
One of the following: |
| last name |
One of the following: |
| accountid |
One of the following: |
| type |
One of the following: |
If you want to configure an Identity Provider only for "recipients" (not members of a OneSpan Sign account), specify only the parameter email. You don't need to specify a first name or last name .
If you need to import the required metadata into your keystore, see Updating your SAML Certificate and Metadata
SSO and Roles and Permissions
If Sender Auto Provisioning has been disabled a sender will automatically be activated upon logging in for the first time (assuming that their activation status is Pending, and not Locked). If Roles and Permissions have been enabled, then this feature works in the following scenarios:
- Pending user with no role
- Pending user with role
- Active user with no role
- Active user with role
Microsoft's Active Directory Federation Services (ADFS) can serve as a SAML 2.0 Identity Provider for OneSpan Sign.
To configure ADFS to serve as a SAML Identity Provider for OneSpan Sign:
- Start the ADFS 2.0 Management Console.
- Open the Trust Relationships folder, and right-click Relying Party Trusts.
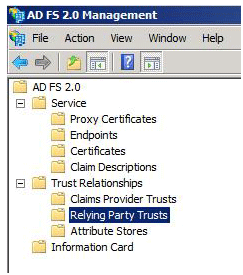
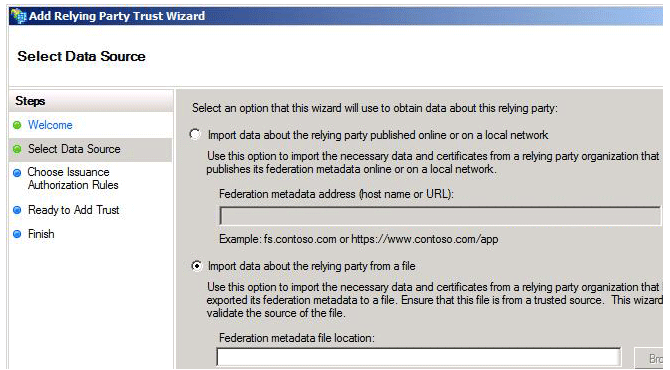
- Select Add Relying Party Trust, and then Start.
- In the Add Relying Party Trust wizard, select Import data about the relying party from a file.
- Import the required metadata into your keystore. To download it, see Updating your SAML Certificate and Metadata.
- Complete the wizard as necessary, entering your Display Name, and the Authorization Rules you want to use.
- On the Advanced tab, change the Secure hash algorithm to SHA-256.
-
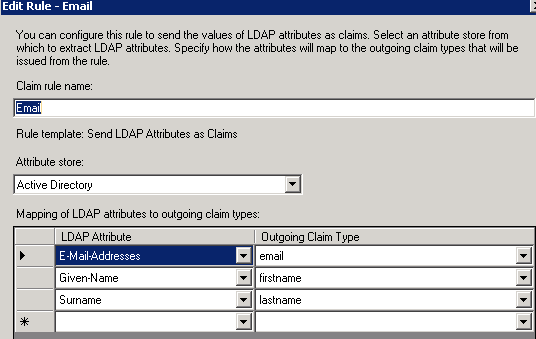
Create new Claims Rule for LDAP Attributes using the following template:

- Edit the rule so your screen looks as follows:
-
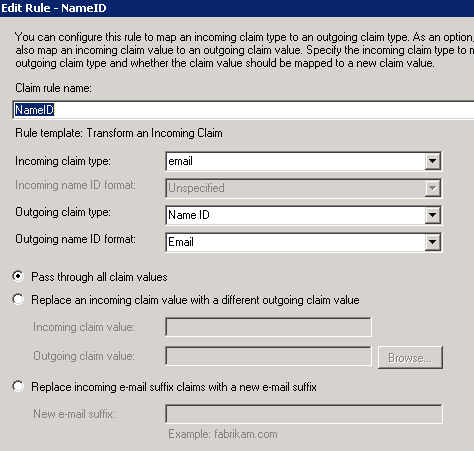
Create another Claims Rule to Transform an Incoming Claim. This will add email to the Subject of the response as NameID.

-
This Claim Rule will reference the first Claim Rule. For this reason, the latter must remain Rule 1.
OKTA can serve as a SAML Identity Provider for OneSpan Sign.
The following example configures OKTA as the Identity Provider for a OneSpan Sign US Sandbox instance.
To configure OKTA to serve as a SAML Identity Provider for OneSpan Sign:
- Navigate to https://www.okta.com/developer/signup/, and create a free OKTA Developer Edition organization.
- Log in to the Admin Console, and click Add Applications.
- Click Create New App, and select SAML 2.0 as the Sign On Method.
- In the General Settings section, enter an App name. Then click Next.
- In the Configure SAML section, paste the following URL into the Single sign on URL fields, where <your environment> represents your OneSpan Sign environment:
https://<your environment>/sso/saml/SSO/alias/e-signlive
| Environment | FQDN |
|---|---|
| Canada Sandbox | sandbox.e-signlive.ca |
| US2 Sandbox | sandbox.esignlive.com |
| US1 Sandbox | sandbox.e-signlive.com |
| Europe Production | apps.esignlive.eu |
| Canada Production | apps.e-signlive.ca |
| US2 Production | apps.esignlive.com |
| US1 Production | apps.e-signlive.com |
| Australia Production | apps.esignlive.com.au |
Keep the recipient URL and destination URL the same.
- In the Audience Restriction field, enter the SP entity ID. For example:
urn:saml:sso:<your environment>. - For the default relay state value, enter
<your environment>/packages/inbox - Click Show Advanced Settings, and configure the settings in the following table:
Be sure to replace all periods in your environment address with a colon. For example, instead of urn:saml:sso:sandbox:esignlive.com, the SP entity ID should be be urn:saml:sso:sandbox:esignlive:com and not urn:saml:sso:sandbox:esignlive.com .
| SETTING | VALUE |
|---|---|
|
Name ID format |
EmailAddress |
|
Response |
Signed |
|
Assertion Signature |
Unsigned |
|
Signature Algorithm |
RSA_SHA256 |
|
Digest Algorithm |
SHA256 |
|
Assertion Encryption |
Unencrypted |
|
SAML Single Logout |
Disabled |
|
authContextClassRef |
Unspecified |
|
Honor Force Authentication |
No |
|
SAML Issuer ID |
http://www.okta.com/${org.externalKey} |
- In the Attribute Statements section, add the following three attribute statements, and then click Next:
- In the Feedback section, select This is an internal application that we created. Then click Finish.
You will now see the Sign On section of your newly created Example SAML Application. Keep this page open in a separate browser tab or window. You will need its Identity Provider metadata link when you perform the procedure Configuring SAML on Your eSignLive Account.
- Right-click the People section of the Name of your application, and select Open Link In New Tab (so you can come back to the Sign On section later).
- In the new tab that opens, click the Assign Application button.
- A dialog box called Assign name of Application to up to 500 people appears. Type your username in the search box, and select the check box next to your username. Then click Next.
- You will be prompted to enter user-specific attributes. Click Confirm Assignments to keep the defaults.
You are now ready to perform the procedure Configuring SAML on Your eSignLive Account. You will need the Identity Provider metadata link from Step 10.
| Name | Name Format | Value |
|---|---|---|
| URI Reference | user.email | |
| firstname | URI Reference | user.firstName |
| lastname | URI Reference | user.lastName |
To copy the Identity Provider metadata link, right-click it and select Copy.
Microsoft recently renamed Microsoft Azure Active Directory to Microsoft Entra ID. References to Azure and Microsoft Entra ID may be used interchangeably. For more information, see New Name for Azure AD.
Azure AD can serve as a SAML Identity Provider for OneSpan Sign. For more information on this, see the Microsoft Azure documentation.
To configure Azure to work with OneSpan Sign, you must perform the following procedures:
- Satisfying Prerequisites
- Adding OneSpan Sign as an Application to Azure AD
- Configuring Basic SAML Settings
- Configuring User Attributes and Claims
- Configuring Users & Permissions
- Testing the SP Initiated SSO
Prerequisites
To get started, you need the following items:
- An Azure AD subscription
- A OneSpan Sign account, either Sandbox or Production
- The SAML Metadata that applies to your OneSpan Sign instance (e.g., sandbox.esignlive.com)
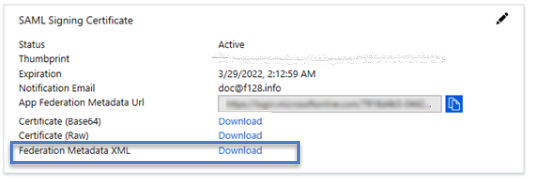
- If you plan to use SP Initiated SSO, you must download the Federation Metadata XML file.
To download the Federation Metadata XML file:
- Sign in to the Azure portal as either a Cloud application admin, or as an application admin for your Azure AD tenant.
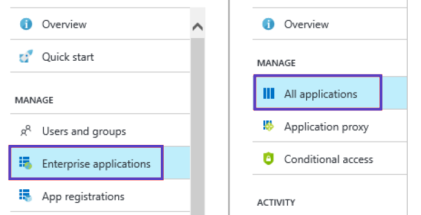
- Click Azure Active Directory.
- From the active directory, click Enterprise application, and then All Applications.
- Find the Manage section, and select Single sign-on.
- Select SAML.
- On the Set up single sign-on with SAML page, navigate to the SAML Signing Certificate section.
- Click the Federation Metadata Download link.
- Contact our Support Team, so we can complete the configurations needed on our end.
Adding OneSpan Sign as an Application to Azure AD
The first step in configuring Azure as a SAML provider for OneSpan Sign is to add OneSpan Sign to the Azure AD application portal.
To add OneSpan Sign to the Azure AD portal:
- Sign in to the Azure portal as either a Cloud application admin, or as an application admin for your Azure AD tenant.
- Click Azure Active Directory.
- Select Enterprise applications, and then click All Applications.
- Click New application, and then choose Non-gallery application.

- Enter a name for your application (e.g., OSS) , and then click Add.
Configuring Basic SAML Settings
Now you have added the app, you need to make some basic SAML configurations.
The settings you must configure will vary, depending on your OneSpan Sign instance, and on whether you will configure SSO to be IDP Initiated or SP Initiated.
To configure your SAML settings:
- Sign in to the Azure portal as either a Cloud application admin, or as an application admin for your Azure AD tenant.
- Click Azure Active Directory.
- From the active directory, click Enterprise application, and then choose the app you just added (e.g., OSS).
- Find the Manage section, and then select Single sign-on.
- Select SAML.
- On the Set up single sign-on with SAML page, click the edit icon in the Basic SAML Configuration section.
- Enter the following information:
- Identifier (Entity ID): The Entity ID can be copied from the SAML Metadata you downloaded earlier. To find the Entity ID, open the metadata file using a text editor such as Notepad, and search for Entity ID. Once found, copy and paste the entry into this field.
- Reply URL: The reply URL is your SSO service URL. For example, https://<your instance>/sso/saml/SSO/alias/e-signlive.
- Sign on URL: This field is necessary only if you will use SP Initiated SSO. If you are using IDP Initiated SSO, leave this field blank. if you will use SP Initiated SSO, enter the following: https://<server:port>/sso/saml/login/alias/e-signlive?idp=<EntityId of an IdP>,
where:- <server:port> is the server port used by your OneSpan Sign instance. For example, https://sandbox.esignlive.com.
<EntityId of an IdP> is the Entity ID found in the Federation Metadata XML file you downloaded earlier. To find the Entity ID, open the metadata file using a text editor such as Notepad, and search for Entity ID. Once found, copy and paste the entry into this section of the URL.
Be sure to replace all periods in your environment address with a colon. For example, instead of urn:saml:sso:sandbox:esignlive.com, the SP entity ID should be be urn:saml:sso:sandbox:esignlive:com and not urn:saml:sso:sandbox:esignlive.com .
- If you are using SP Initiated SSO, contact our Support Team so we can complete the configurations that are needed on our end.
The following table contains more information about SAML's configuration settings:
| SAML Configuration Setting | SP-Initiated | IDP-Initiated | Description |
|---|---|---|---|
|
Identifier (Entity ID) |
Required for some apps |
Required for some apps |
Uniquely identifies the application. Azure AD sends the identifier to the application as the Audience parameter of the SAML token. The application is expected to validate it. This value also appears as the Entity ID in any SAML metadata provided by the application. You can find this value as the Issuer element in the AuthnRequest (SAML request) sent by the application. |
|
Reply URL |
Optional |
Required |
Specifies where the application expects to receive the SAML token. The reply URL is also referred to as the Assertion Consumer Service (ACS) URL. You can use the additional reply URL fields to specify multiple reply URLs. For example: (1) you might need additional reply URLs for multiple sub-domains; (2) for testing purposes, you can simultaneously specify multiple reply URLs (local host & public URLs). |
|
Sign-on URL |
Required |
Don't specify |
When a user opens this URL, the service provider redirects to Azure AD to authenticate the user and sign them on. Azure AD uses the URL to start the application from Office 365 or the Azure AD Access Panel. When blank, Azure AD performs IDP-Initiated sign-on if a user launches the application from Office 365, the Azure AD Access Panel, or the Azure AD SSO URL. |
|
Relay State |
Optional |
Optional |
Specifies to the application where to redirect the user after authentication is completed. Typically the value is a valid URL for the application. However, some applications use this field differently. For more information, ask the application vendor. |
|
Logout URL |
Optional |
Optional |
Used to send the SAML Logout responses back to the application. |
Once completed, your Basic SAML Configuration should look something like this, with the values in each field representing values from your own site. For example, in the following image you must replace sandbox.esignlive.com with the domain name from your own SSO service URL:

Configuring User Attributes and Claims
Once your Basic SAML Settings have been configured, you can begin creating associations between a user and their attributes.
If you have more than one account with the same entity ID and you have auto-provisioning enabled, you will need to add the account ID as an attribute. If you do not, the user will not be created. To obtain the account ID, contact our Support Team.
To configure user attributes and claims:
-
Click Azure Active Directory.
- From the active directory, click Enterprise application, and then choose the app you just added (e.g., OSS).
- On the Set up single sign-on with SAML page, click the edit icon in the User Attributes section.
- Delete any existing attributes that appear.
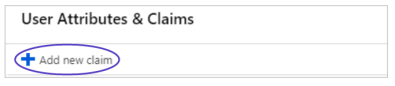
- Click Add new claim.
- In the Name box, type the attribute name.
- Leave the Namespace field blank.
- Add the following claims in the Source Attribute field, mapping the claim name and source attributes as follows:
Name Options Source Attribute firstname
user.givenname email
user.mail lastname
user.surname 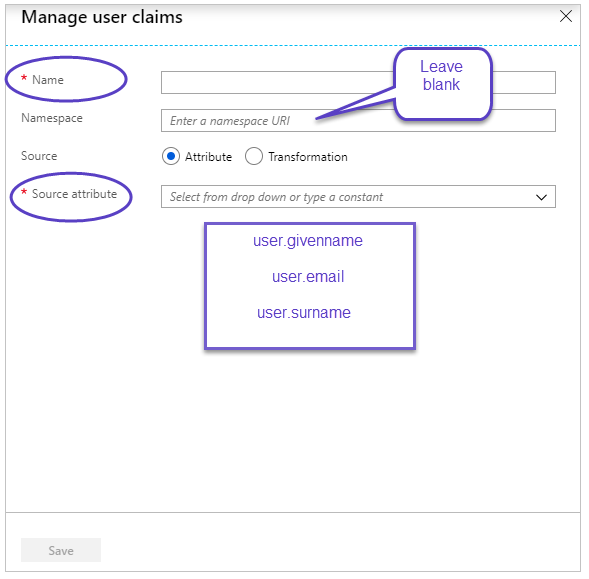
- Click Save.
Automatic Provisioning
If you have the same SAML configured in multiple accounts across the same instance, you will need to add an additional attribute to automatically provision new senders to a specific account. If you fail to do so, automatic provisioning will fail.
The name of the required attribute is accountid. It can be mapped to any Azure Ad attributes that have the destination account UID (for the list of your account UIDs, contact our Support Team).
-
accountid: This claim should be mapped to an active directory attribute that contains the owner account's accountID.
- type: This claim should be mapped to an active directory attribute that is either a Regular value or a Manager value.
Configuring Users & Permissions
Now that you've defined some user attributes and claims, you can begin to assign users to the app.
To configure user permissions:
-
Click Azure Active Directory.
- From the active directory, click Enterprise application, and then choose the app you just added (e.g., OSS).
- Click Users and Groups.
- Click Add user.
- In the Add Assignment section, select Users and Groups.
- Select the user or group you want to assign to use the application.
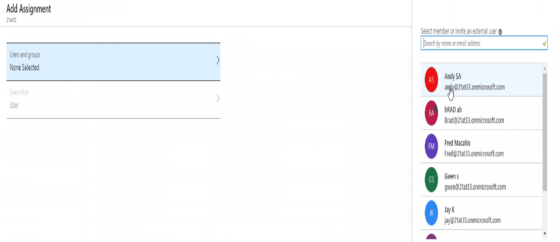
- Click Select.
Testing the SP Initiated SSO
Now that you've finished your configurations, you can test to see that everything works.
To test the SP Initiated SSO:
- Sign in to the Azure portal as either a Cloud application admin, or as an application admin for your Azure AD tenant.
- Click Azure Active Directory.
- From the active directory, click Enterprise application, and then choose the app you just added (e.g., OSS).
- Find the Manage section, and then select Single sign-on.
- In the Test Single Sign On section, click Test.
- Click Sign in as current user.