A transaction is an e-signature process within OneSpan Sign. A transaction usually contains: (1) up to ten documents; (2) one or more recipients. The sender of a transaction therefore generally performs the following procedures: Creates a Transaction > Adds Documents > Adds Recipients > Prepares the Documents for Signing.
The following sections describe various aspects of preparing documents for distribution to reviewers and recipients:
- Preparing Transactions and Templates Manually
- Creating and Applying Layouts
- Auto-Preparing via OneSpan Sign Conventions
Preparing Transactions and Templates Manually
This section describes:
The Basic Procedure
A transaction or template can be prepared only after at least one document and one recipient have been added to it.
To manually prepare a transaction or transaction template for distribution to reviewers and recipients:
- Locate the appropriate transaction via Chatter Feed, Dashboard, or Search.
- On the Transaction Edit page or the Transaction Template Edit page, click the Prepare button.
- An Electronic Disclosures and Signatures Consent page appears. Scroll down until the first document in the transaction or template appears.
- To add a Signature Block for a recipient:
- Click Recipients to select a recipient or signer from the list.
- Click Fields to display the Signature Blocks that are available for this transaction. Note that the you are required to first add a Click-to-Sign or Click-to-Initial block before you can add any other type of field.
- Drag a block to the desired place in the document.
- Select any additional fields that you would like to add to the document, and place them in the appropriate place.
- Repeat for each recipient involved in the transaction.
- If you want to change the Signature Block type or add a field, click the Settings gear icon. This opens the Signature Block Types pane. For descriptions of your options in this pane see Supplementary Information.
- Repeat Steps 3 and 4 for each Signature Block you want to add to the document.
- If the transaction includes more than one document, open the next document by clicking the navigation arrow in the preview window's toolbar. Then repeat Steps 3 and 4.
- After you add the last signatures and fields to the last document, close the preview window. You are now ready to send the transaction for signing.
The Field Settings pane has a Field Formatting section that specifies a font size for the field (i.e., the font size that will be used for text in the field when the parent document is printed). The options are: (1) a specific font size; (2) Auto-fit (which will scale the text to fill its input box); (3) Inherit from parent (this is the default, and will use the font size defined at the transaction/template level).
The Accept Only option enables you to specify recipients who will be invited to "accept" this document during the Signer Experience. Flagging a recipient as Accept Only on a document removes from the document all the Signature Fields associated with that recipient.
Supplementary Information
This section discusses the following topics, which supplement the preceding procedure:
Signature Block Settings
Every Signature Block has a menu that can be used to manage the block after it has been added to a document. To access this menu, select the Signature Block and then click the Settings [Gear Icon].
The menu lists the following options:
- Field Name: Allows you to enter a descriptive name for the Signature Block.
- Recipient enables you to change the recipient associated with the block.
- Signature Type enables you to change the block's type.
Signature Block Types
OneSpan Sign has four types of Signature Blocks:
- Click-to-Sign: This is the default type. To sign this type, a recipient simply clicks the block. The recipient's name is then stamped on the block.
- Click-to-Initial: To sign this type, a recipient simply clicks the block. The recipient's initials are then stamped on the block.
- Capture Signature: To sign this type, a recipient clicks the block, and draws their signature. The drawing is then stamped on the block.
- Mobile Capture: To sign this type, a recipient writes their signature in a mobile browser using their fingertip or a stylus. This signature type must be enabled at the account level.
- Is optional: Optional Signatures permit a signer to complete a transaction without signing all of their signatures inside the transaction's documents. Any signature type can be flagged as "optional" provided this feature is enabled for your account.
Field Menu
Every field box includes a menu that can be used to manage the field after it has been added to a document. To access this menu, select the field, and then click the Settings [Gear Icon].
The Field Menu lists the following options:
- Type enables you to change the field's type.
- Remove deletes the field from the document.
- Settings is an option that is available only for the following field types:
- Text Field or Text Area: You can edit the Name, Default Value, Is Required, and Maximum Length settings.
- Checkbox: You can edit the Name, Default Value, and Is Required settings.
- Radio: You can edit the Name, Default Value, and Radio Group settings.
- List: You can edit the Name, Default Value, and List settings.
Field Types
The system supports the following types of fields:
| Field Type | Description |
|---|---|
| Signing Date | This field is automatically filled with the date when the document was signed. |
| Signer Name | This field is automatically filled with the recipient's first and last names. These names are provided when the recipient is added to a transaction. |
| Signer Title | This field is automatically filled with the recipient's title. That title is provided when the recipient is added to a transaction. If a title is not provided, this field remains blank and is not visible in the document. If the recipient is a contact, lead, or user in Salesforce, this field will automatically be filled with information stored in Salesforce. |
| Signer Company | This field is automatically filled with the name of the recipient's company. That name is provided when the recipient is added to a transaction. If the recipient's company is not provided, this field remains blank and is not visible in the document. If the recipient is a contact, lead, or user in Salesforce, this field will automatically be filled with information stored in Salesforce. |
| Text Field | This field is a box in which a recipient can provide additional information at the time of signing. |
| Text Area | This field is an area in which text can be entered by recipients, with automatic "text wrap-around". There is a 4000-character limit on text areas. A text area's settings can specify its: (1) Name, (2) Default Value; (3) Maximum Length; (4) if the text area Is Required. |
| Checkbox | This is a field that a recipient can click to display a checkmark (clicking it again removes that checkmark). A checkbox is useful to indicate that the recipient has completed an action. For example, a document may include text such as "Have you applied for a mortgage with another financial institution?", with the text "Yes" or "No". You can include a checkbox beside "Yes" and another beside "No". |
| Radio | Radio buttons enable users to select one of multiple options. Radio buttons can be grouped together by associating them with a common group name. Identifying one button as the group default ensures that it will be pre-selected. A radio button's settings can specify its: (1) Name ; (2) Radio Group; (3) the group's Default Value; (4) if a selection Is Required. |
| List | This field enables a recipient to choose one value from a list of options. Once a selection is made, only that value will be displayed, thereby reducing the occupied space on the screen. A list's settings can specify its: (1) Name; (2) Default Value; (3) List Items. |
| Label | A transaction sender can add to a document a label field in which text can be embedded. This is a read-only field, with a value that will simply be stamped on the PDF. During the Signer Experience, the label will appear as non-editable text. |
Creating and Applying Layouts
A layout enables a sender to quickly create a new transaction by using a previous document as a blueprint. Once a document has been saved as a layout, it can be applied to subsequently created documents.
The rest of this section describes:
Creating a Layout
To create a layout from a document:
- In the upper right of the Prepare page, click Save Layout.
- The Save Current Document Layout dialog box appears. Interact appropriately with the following fields:
- Name: Type a unique name for the layout. If the typed name is not unique, and you complete this procedure with that name, the old layout with this name will be overwritten. This field is required.
- Description: Type an optional description for the layout.
- Share Layout: Enable this option if you want the layout to be available to other users on your account. By default, this is disabled.
- Click Save.
Applying a Layout
To apply a layout to a document:
- In the upper right of the Prepare page, click Apply Layout.
- The Apply Layout dialog box displays the following options:
- Show Shared: This option determines if the Layout list will include shared layouts created by other users on your account. By default, this is disabled. If you want to broaden that list, select this box.
- Select a Layout: This is a drop-down list that by default displays all and only those layouts created by you. If you are logged in as a delegate for another user, by default the list displays all and only those layouts created by that user. If the option Show Shared is selected, the list also displays shared layouts created by other users on your account.
- Select a layout from the Layout list.
- Click Apply.
When a layout is applied, if a recipient does not exist in the associated transaction, the software uses a recipient "placeholder".
If the layout has Signature Fields outside the boundaries of the recipient document, those fields may be not be visible after the layout is applied.
Auto-Preparing via OneSpan Sign Conventions
An OneSpan Sign Convention is something that contains one or more of the following types of objects:
- Text Tags — A Text Tag is an object that can insert a OneSpan Sign field (e.g., Street Address) at particular positions in multiple documents for multiple recipients.
- Field Mappings — A Field Mapping is an object that enables the following features:
- Insert — This feature copies a value of a Salesforce field (e.g., Street Address) into a corresponding field of a OneSpan Sign document when a transaction is being prepared. That data can then be retrieved from the signed document. The data in question can be either data about a recipient, or data about a Salesforce "related object".
- Writeback — This feature copies a value of a OneSpan Sign field (e.g., First Name) into a corresponding Salesforce field. Using it, data entered by recipients during the Signer Experience can be written back into Salesforce fields, based on Field Mappings defined when the transaction is completed.
The relevant OneSpan Sign field must exist before you can insert a Salesforce value into it. You can create the required OneSpan Sign field by using a Text Tag.
The Writeback feature is disabled by default.
This rest of this section describes:
- Creating a Convention
- Text Tag Types
- Using Field Mappings
- Editing or Deleting Convention-Related Objects
Creating a Convention
To create a OneSpan Sign Convention:
- Click Conventions in the OneSpan Sign Embedded Integration for Salesforce menu. Only a OneSpan Sign Admin can access this tab.
- Click New. The New Convention page appears.
- Type a Convention Name and click Save. The Convention Detail page appears.
- In the Recipient Labels section, click New Recipient Label.The Recipient Label Edit page appears.
- Type a Recipient Label Name, and click Save.
You can create multiple Recipient Labels per Convention.
- If you want to create a Text Tag:
- In the Recipient Labels section, select the Recipient Label that you want to create a text tag for.
- Enter a Name for the new Text Tag.
- In the Text Tags section, click New. The New Text Tag page appears.
- From the Type drop-down list, select a Text Tag type (see Text Tag Types).
- In the section that appears, specify appropriate Text Tag details (see Text Tag Types). The configurations that will be available to you are dependent on the type of Text Tag you select.
- Click Save.
You can create multiple Text Tags per Recipient Label.
- If you want to create a Field Mapping, see Creating a Field Mapping.
Text Tag Types
A selected Convention's Text Tag can be used to insert a OneSpan Sign field at particular positions in multiple documents for multiple recipients. In fact, three types of Text Tags can be used for this purpose:
Text Anchors
If in Creating a Convention, you selected Text Anchor as the Type, configure the following parameters:
Text Anchor Information
- Text — The exact string that will be searched for in the uploaded document.
- Character Index — The index of the character within the anchor text that will be used to calculate the field's position.
- Occurrence — The number of occurrences of the string to be skipped. Example: If occurrence = 2, the system will skip the first two occurrences of anchor text, and use the third occurrence to calculate the field's position.
Position
- Top Offset — An absolute offset applied to the final y value of the top-left corner of the field
- Left Offset — An absolute offset applied to the final x value of the top-left corner of the field
Field Dimension
- Width — Width of the field to be created
- Height — Height of the field to be created
e-Sign Field Name
- Type
- Signatures: Full Name, Initials, Capture, Mobile Capture.
- Autofill: Signed Date, Signer Name, Signer Title, Signer Company.
- Inputs: Text Field, Text Area, Checkbox, Radio, List, Custom Field
- Is Optional: Specifies whether or not the signature is required.
PDF Form Fields
If in Creating a Convention, you selected PDF Form Fields, configure the following parameters:
PDF Form Field
- Form Field Name: Adobe Acrobat can be used to add a Form Field to a PDF document. This name will be specified during that procedure.
e-Sign Field Name
- Type
- Signatures: Full Name, Initials, Capture, Mobile Capture.
- Autofill: Signed Date, SignerRecipient Name, SignerRecipient Title, SignerRecipient Company.
- Inputs: Text Field, Text Area, Checkbox, Radio, List, Custom Field
- Is Optional: Specifies whether or not the signature is required.
Static Positions
If in Creating a Convention, you selected Static Positions as the Type, configure the following parameters:
Position
- Top Offset — An absolute offset applied to the final y value of the top-left corner of the field
- Left Offset — An absolute offset applied to the final x value of the top-left corner of the field
Field Dimension
- Width — Width of the field to be created
- Height — Height of the field to be created
e-Sign Field Name
- Type
- Signatures: Full Name, Initials, Capture, Mobile Capture.
- Autofill: Signed Date, SignerRecipient Name, SignerRecipient Title, SignerRecipient Company.
- Inputs: Text Field, Text Area, Checkbox, Radio, List, Custom Field
- Is Optional: Specifies whether or not the signature is required.
Using Field Mappings
This section describes:
Creating a Field Mapping
To create a Field Mapping:
- On the Convention page, click New. The Field Mapping Edit page appears.
- In the Information section, type a Name for the Field Mapping. Click Enabled to make this Field Mapping available.
- For the Mapping Type, do one of the following.
- Select Recipient if you want to write-back to contacts, leads, or users.
- Select Related Object if you want to write-back to Related Objects (e.g., accounts, opportunities, contracts, custom objects).
- In the e-Sign Field Reference section, type an e-Sign Field Name, or choose Load Field Suggestions From Transaction to open a dialog box that enables you to select an existing transaction. You can also use the Field Suggestions drop-down to select an existing Field Mapping.
- In the Salesforce Object Field Reference, click Add New. to add at least one Salesforce Object Field Reference.
- If the Mapping Type selected was Recipient, a Select Recipient Field dialog box appears.
- If the Mapping Type selected was Related Object, a Select Related Object Field dialog box appears.
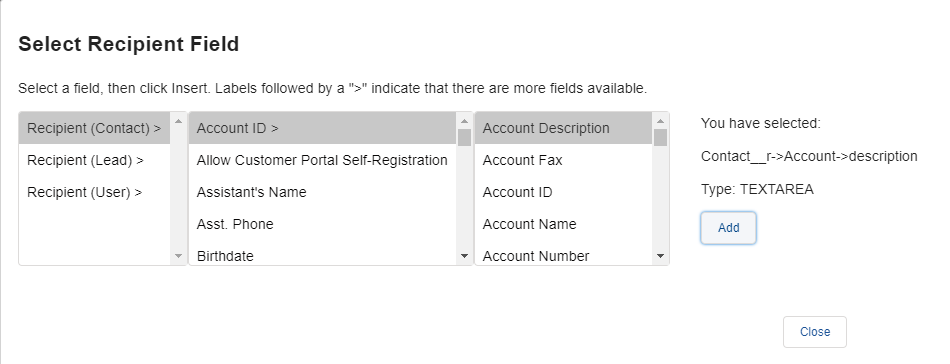
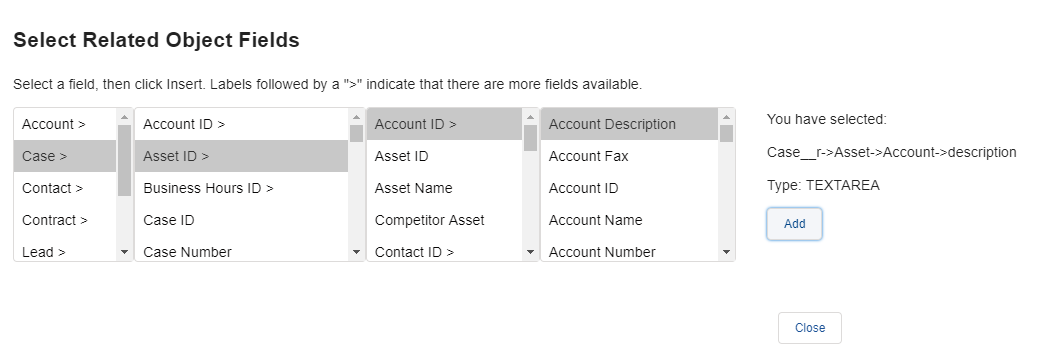
- Select a field, and then click Add to add the field. Only one Field Mapping is allowed per field name. A maximum of 5 reference fields can be added.
- The Salesforce Object Field Reference section is updated with the following information:
- Default Insert Value is the value that will be inserted if the corresponding Salesforce value is empty at the moment of insertion.
- Write Back Does Not Overwrite Existing should be checked if you do not want Field Mapping values to overwrite values stored in Salesforce.
- Write Back Does Not Write Empty should be checked if you do not want empty Field Mapping values to overwrite Salesforce values.
- Disable should be checked if you want to disable a Field Mapping.
- Click Save.
When you are using a Field Mapping for writeback, if a recipient's type is changed before the transaction is completed (e.g., if a Lead is converted to a Contact), the writeback will not be executed, and the recipient's record will not be updated.
Preparing a Transaction with a Field Mapping
To prepare a transaction with a Field Mapping:
- On the Transaction Edit page, click the Advanced Options tab.
- Click the magnifying glass icon next to the OneSpan Sign Convention field. The Convention Lookup dialog box appears.
- Click the Convention you want to use. The dialog box closes. On the Advanced Options tab: (1) the Convention you selected is added to the OneSpan Sign Convention field; (2) the check boxes for Insert Salesforce Values and Write Back to Salesforce Fields are automatically checked.
- Add documents and optionally add more recipients to the transaction (you, as the transaction creator, are automatically added as a recipient).
- Click Prepare. The embedded Designer opens. Note that on its left side, a Convention Field Names section lists all the fields that have been created in the Convention.
- For every field you want to map:
- Add Signature Blocks for the recipient, then click the gear icon, and add a text field.
- Next to the text field, click the gear icon, and click Settings. The Field Settings dialog box appears.
- Copy the OneSpan Sign Field Name you created to the Name text area.
- Optionally, give the field name a Default Value which will be inserted into the OneSpan Sign field block, and/or check the box Is Required to make the field mandatory.
- Click Save.
- When you have finished adding all Signature Blocks, and have mapped them to existing Field Mappings, on the Transaction Edit page click Send to send the transaction.
- As the documents are signed by all parties, the transaction History is updated with the transaction status, the signing status of each recipient, and the success or failure of the Insert or WriteBack.
- Insert writes values entered in Salesforce to the OneSpan Sign fields of the transaction document. Insert is performed when the transaction is prepared.
- WriteBack retrieves the information entered by the recipient in the document, and saves the value in the corresponding Salesforce field. WriteBack is performed once a transaction is complete.
If a Convention is selected and writeback or insert is activated, and the transaction has some OneSpan Sign input fields that are not referred to in a mapping, the application displays a warning message.
Editing or Deleting Convention-Related Objects
This section describes:
- Editing or Deleting a Convention
- Editing or Deleting a Recipient Label
- Editing or Deleting a Text Tag
Editing or Deleting a Convention
To edit or delete an existing Convention:
- Click Conventions from the OneSpan Sign Embedded Integration for Salesforce menu.
- Select the relevant Convention.
- From the drop-down action menu on the rightm click Edit to edit the Convention, or click Delete to delete the Convention.
You cannot delete a Convention if it is being used by a transaction or transaction template that has the status Prepared.
Editing or Deleting a Recipient Label
To edit or delete an existing Recipient Label:
- Click Conventions from the OneSpan Sign Embedded Integration for Salesforce menu.
- Click the relevant Convention. The Convention Detail page appears.
- In the Recipient Labels section, click Editfrom the drop-down action menu on the right to edit the Recipient Label, or click Delete to delete the Recipient Label.
You cannot delete a Recipient Label if its associated Convention is being used by a transaction or transaction template that has the status Prepared.
Editing or Deleting a Text Tag
To edit or delete an existing Text Tag:
- Click Conventions from the OneSpan Sign Embedded Integration for Salesforce menu.
- Click the relevant Convention. The Convention Detail page appears.
- Click the relevant Recipient Label. The Recipient Label Detail page appears.
- In theText Tags section, click Edit from the drop-down action menu on the right to edit the Text Tag, or click Delete to delete the Text Tag.
You cannot edit or delete a Text Tag if its associated Convention is being used by a transaction or transaction template that has the status Prepared.